HP R1500 HP R1500 G3 UPS User Guide - Page 25
Testing the new battery module, Replacing the UPS, Replacing the UPS option card
 |
View all HP R1500 manuals
Add to My Manuals
Save this manual to your list of manuals |
Page 25 highlights
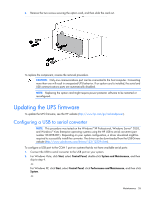
Testing the new battery module After installing the new battery module, press the Test/Alarm Reset button. For information on initiating a self-test, see "Initiating a self-test (on page 20)." IMPORTANT: The UPS does not execute a self-test until the batteries are 90 percent charged. If the installation has been successful, the UPS enters Operate mode. If the installation has not been successful, the alarm beeps, the On Battery LED illuminates, and the General Alarm LED flashes. If this occurs, repeat the procedures in "Replacing the batteries (on page 22)," and check the battery terminal connections. If the condition persists, see "Troubleshooting (on page 31)." IMPORTANT: Charge the batteries for at least 24 hours before supplying backup power to devices. The batteries charge to: • 90% of their capacity within 24 hours • 100% of their capacity within 48 hours Replacing the UPS To remove the UPS: 1. Power down all attached load devices. 2. Power down the UPS ("Powering down the UPS" on page 21). 3. Unplug the UPS power cord. 4. Disconnect the communications cable. 5. Unplug the load devices. 6. Remove the UPS front bezel ("Removing the UPS front bezel" on page 22). 7. Remove the UPS battery bracket. 8. Remove the UPS battery modules. 9. Remove the screws securing the UPS to the rack. 10. Remove the UPS from the rack. To replace the component, reverse the removal procedure. Replacing the UPS option card This component is hot-swappable and can be replaced without powering down the UPS. 1. (optional) To replace the component with the UPS powered down, refer to "Powering down the UPS (on page 21)." Maintenance 25
-
 1
1 -
2
-
3
-
4
-
5
-
6
-
7
-
8
-
9
-
10
-
11
-
12
-
13
-
14
-
15
-
16
-
17
-
18
-
19
-
 20
20 -
 21
21 -
 22
22 -
 23
23 -
 24
24 -
 25
25 -
 26
26 -
 27
27 -
 28
28 -
 29
29 -
 30
30 -
31
-
32
-
33
-
34
-
35
-
36
-
37
-
38
-
39
-
40
-
41
-
42
-
43
-
44
-
45
-
46
-
47
-
48
-
49
-
50
-
51
 |
 |
