HP StorageWorks SB920c HP StorageWorks Tape Blade User Guide (625055-001, Nove - Page 79
Returning the faulty part, Installing the replacement chassis
 |
View all HP StorageWorks SB920c manuals
Add to My Manuals
Save this manual to your list of manuals |
Page 79 highlights
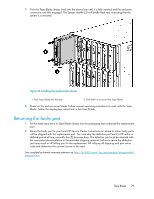
7. Push the Tape Blade chassis back into the device bay until it is fully inserted and the enclosure connectors are fully engaged. The System Health LED will briefly flash red, indicating that the system is connected. Figure 47 Installing the replacement chassis . 1. Push Tape Blade into the bay 2. Push latch in to secure the Tape Blade 8. Power on the partner server blade. Follow normal operating procedures to work with the Tape Blade. Follow the step-by-step instructions in this User Guide. Returning the faulty part 1. Put the faulty tape drive or Tape Blade chassis into the packaging that contained the replacement part. 2. Return the faulty part to your local HP Service Center. Instructions on where to return faulty parts will be shipped with the replacement part. You must ship the defective part back to HP within a defined period of time, normally five (5) business days. The defective part must be returned with the associated documentation in the provided shipping material. Failure to return the defective part may result in HP billing you for the replacement. HP will pay all shipping and part return costs and determine the courier/carrier to be used. See complete hp limited warranty statement at: http://h18006.www1.hp.com/products/storageworks/ warranty.html Tape Blade 79
-
 1
1 -
2
-
3
-
4
-
5
-
6
-
7
-
8
-
9
-
10
-
11
-
12
-
13
-
14
-
15
-
16
-
17
-
18
-
19
-
20
-
21
-
22
-
23
-
24
-
25
-
26
-
27
-
28
-
29
-
30
-
31
-
32
-
33
-
34
-
35
-
36
-
37
-
38
-
39
-
40
-
41
-
42
-
43
-
44
-
45
-
46
-
47
-
48
-
49
-
50
-
51
-
52
-
53
-
54
-
55
-
56
-
57
-
58
-
59
-
60
-
61
-
62
-
63
-
64
-
65
-
66
-
67
-
68
-
69
-
70
-
71
-
72
-
73
-
 74
74 -
 75
75 -
 76
76 -
 77
77 -
 78
78 -
 79
79 -
 80
80 -
 81
81 -
 82
82 -
 83
83 -
 84
84
 |
 |
