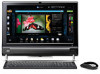
HP TouchSmart 300-1000 Getting Started
HP TouchSmart 300-1000 - Desktop PC Manual
 |
View all HP TouchSmart 300-1000 manuals
Add to My Manuals
Save this manual to your list of manuals |
HP TouchSmart 300-1000 manual content summary:
- HP TouchSmart 300-1000 | Getting Started - Page 1
使用手冊 - HP TouchSmart 300-1000 | Getting Started - Page 2
Hewlett-Packard HP HP HP HP Hewlett-Packard Company P.O. Box 4010 Cupertino, CA 95015-4010 USA © Copyright 2009 Hewlett-Packard Development Company, L.P. Macrovision Macrovision Microsoft、Windows 標誌和 Windows 是 Microsoft Wi-Fi CERTIFIED 802.1n Draft 2.0。 Draft 2.0 指的是 Wi-Fi - HP TouchSmart 300-1000 | Getting Started - Page 3
HP TouchSmart PC 資訊 ...vi 1 功能 ...1 2 HP TouchSmart PC 4 HP TouchSmart PC 6 HP TouchSmart PC 7 作業 LED 8 9 9 9 10 10 10 11 USB 12 12 12 64 位元或 32 12 13 13 13 14 15 Windows Media Center 16 16 16 搭配 Windows Media Center 17 Windows Media Center 18 19 19 19 20 設定 Windows - HP TouchSmart 300-1000 | Getting Started - Page 4
TouchSmart PC 螢幕 ...23 HP TouchSmart 23 24 25 HP TouchSmart 25 瀏覽 HP TouchSmart ...25 HP TouchSmart 27 HP TouchSmart 27 28 28 28 28 29 29 HP TouchSmart 29 HP TouchSmart 29 RSS 摘要...29 HP TouchSmart 相片 ...30 30 31 31 CD 或 DVD 31 HP TouchSmart 畫布 ...31 HP TouchSmart 音樂 ...32 HP - HP TouchSmart 300-1000 | Getting Started - Page 5
HP TouchSmart 37 HP TouchSmart 備註 ...37 38 38 38 HP TouchSmart 時鐘 ...38 39 39 39 41 41 45 45 45 45 Microsoft 46 46 47 47 47 48 48 50 索引 ...51 目錄 v - HP TouchSmart 300-1000 | Getting Started - Page 6
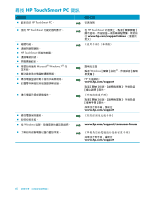
HP TouchSmart PC 資訊 HP TouchSmart PC。 „ 使用 HP TouchSmart HP TouchSmart Microsoft® Windows 7® 作 Windows 在 HP TouchSmart www.hp.com/supportvideos Windows HP www.hp.com/support www.hp.com/support www.hp.com/support/consumer-forum www.hp.com/support - HP TouchSmart 300-1000 | Getting Started - Page 7
歡迎使用 功能 HP TouchSmart PC 50.8 公分 (20 CD/DVD 與 Blu-ray USB BrightView 802.11n HP TouchSmart PC HD VESA VESA 1 - HP TouchSmart 300-1000 | Getting Started - Page 8
IR 遙控器 VESA 2 搭配 Windows Media Center - HP TouchSmart 300-1000 | Getting Started - Page 9
LAN) 連接線 S-Video S-Video)轉接頭 3 - HP TouchSmart 300-1000 | Getting Started - Page 10
HP TouchSmart PC EDC D E F B G A H L KJ I 項目 說明 A 50.8 公分 (20 HP 的 BrightView LCD HP BrightView 1600 x 900 5 毫秒。** 可與 HP TouchSmart HP TouchSmart HD DVD Hewlett-Packard B C 4 - HP TouchSmart 300-1000 | Getting Started - Page 11
、CD-R/RW、DVD+/-R/RW 以及 DVD+/-R 雙 層 (DL)。 CD-ROM、DVD-ROM、CD 音訊、DVD+/-R DL、DVD CD 以及 Blue-ray BD * HP H CD/DVD [Eject Eject CD/DVD。 I USB 連接埠 USB 裝置 (USB 2.0 MP3 J 紅外線 (IR K HP TouchSmart HP TouchSmart PC 並開啟 HP TouchSmart HP TouchSmart HP TouchSmart L DVD 5 - HP TouchSmart 300-1000 | Getting Started - Page 12
HP TouchSmart PC A B C D E 項目 功能 A B HP TouchSmart C 讀卡機 Extreme Digital (xD)、Secure Digital (SD)、Secure Digital High Capacity (SDHC)、MultiMediaCard (MMC)、Memory Stick (MS) 以 及 Memory Stick Pro (MS Pro Mini SD、RS-MMC、 - HP TouchSmart 300-1000 | Getting Started - Page 13
HP TouchSmart PC 的背面 CD E B A F G K JI H 項目 功能 A B Gigabit 10/100/1G) C USB 2.0 3 個) USB 裝置 (USB 2.0 MP3 D SPDIF 輸出) 3.1、4.1 與 5.1 喇叭。 E 2.0 與 2.1 F G H I J K S-Video 7 - HP TouchSmart 300-1000 | Getting Started - Page 14
作業 LED 指示燈 A B C D G E F 您的 HP TouchSmart PC LED): LED 功能 A B 電源 C 光碟機 D 硬碟 E IR Windows Media Center F 此 LED。 G 讀卡機 LED LED LED LED 8 - HP TouchSmart 300-1000 | Getting Started - Page 15
連接電源 UPS AC 電源。 HP TouchSmart PC 電腦支架 HP TouchSmart PC HP TouchSmart PC 5 到 40 度。 5 9 - HP TouchSmart 300-1000 | Getting Started - Page 16
電腦方向 HP TouchSmart PC A B C) 位置。 B C A B B C 電腦旋轉 On 10 - HP TouchSmart 300-1000 | Getting Started - Page 17
HP TouchSmart PC A HP TouchSmart PC 附近 30 公分 (1 Connect] 按鈕 (B) 5 LED LED Connect] 按鈕 (C) 5 LED LED B AC 11 - HP TouchSmart 300-1000 | Getting Started - Page 18
USB USB 夜光燈 HP TouchSmart HP TouchSmart PC 64 位元或 32 位元 1 2 3 4 64 32 12 - HP TouchSmart 300-1000 | Getting Started - Page 19
光碟機 使用 CD/DVD CD、DVD 與 Blu-ray CD/DVD A Eject] 按鈕 (A HP HP TouchSmart PC DSL HP TouchSmart PC 1 ISP 2 DSL 或 cable)。ISP 3 13 - HP TouchSmart 300-1000 | Getting Started - Page 20
4 DSL cable 5 設定 HP TouchSmart PC a 啟動 HP TouchSmart PC。 b 將您的 HP TouchSmart PC 或 c 6 1 ISP 2 DSL 或 cable)。ISP 3 4 DSL 5 14 - HP TouchSmart 300-1000 | Getting Started - Page 21
HP TouchSmart PC 6 a HP TouchSmart PC b LAN c HP TouchSmart PC。 d 藍芽裝置 HP TouchSmart PC PAN 1 2 3 15 - HP TouchSmart 300-1000 | Getting Started - Page 22
Windows Media Center Windows Media Center Windows Media Center HP TouchSmart PC 1 16 2 19 3 完成 Windows Media Center 18 頁的 〈Windows Media Center 4 HP TouchSmart PC Windows Media Center,然 Windows Media Center www.microsoft.com Windows Media Center HP TouchSmart PC - HP TouchSmart 300-1000 | Getting Started - Page 23
搭配 Windows Media Center 1 將 S-Video S-Video A AB S-Video S-Video 輸入 (A) 接頭。 . 2 S-Video B 17 - HP TouchSmart 300-1000 | Getting Started - Page 24
IR Windows Media Center C D A E B 1 A D)。 2 B C)。若要 3 HP TouchSmart PC (E Windows Media Center 1 Windows Media Center]。 2 Windows Media Center Windows Media Center www.microsoft.com Windows Media Center 18 - HP TouchSmart 300-1000 | Getting Started - Page 25
聲音選項 您的 HP TouchSmart PC 2.0 或 2.1 3.1、4.1 或 5.1 „ HP TouchSmart PC MP3 若為 2.0 2.1 將 3.1、4.1 或 5.1 SPDIF SPDIF 時: SPDIF SPDIF SPDIF SoundMAX 軟體。 1 SoundMAX] 圖示。 2 3 在 SPDIF 4 使用 [SoundMAX 19 - HP TouchSmart 300-1000 | Getting Started - Page 26
HP TouchSmart „ 使用 Microsoft a b HP TouchSmart HP TouchSmart c X SoundMAX a SoundMAX] 圖示。 b 設定 Windows Media Center 的音效 Windows Media Center 1 2 點選 [Windows Media Center]。 3 耳機 麥克風 您的 HP TouchSmart PC HP TouchSmart PC 0.5 公尺 (2 1 SoundMAX] 圖示。 2 20 - HP TouchSmart 300-1000 | Getting Started - Page 27
USB MP3 播放器 MP3 HP TouchSmart PC USB HP TouchSmart PC HP TouchSmart 可支援 USB USB Windows 7 www.hp.com/support 電源設定 或 1 2 3 4 的比例。 21 - HP TouchSmart 300-1000 | Getting Started - Page 28
Fn F9 Fn + F9 1 2 Fn F10 Fn F11 Fn F9 Fn + F9 22 - HP TouchSmart 300-1000 | Getting Started - Page 29
清潔 HP TouchSmart PC 螢幕 HP TouchSmart PC HP TouchSmart PC 1 2 3 在 HP TouchSmart PC 4 . HP TouchSmart www.hp.com/ergo。 請將 TouchSmart TouchSmart 23 - HP TouchSmart 300-1000 | Getting Started - Page 30
HP www.hp.com/go/recycle 以瞭解 HP 24 - HP TouchSmart 300-1000 | Getting Started - Page 31
軟體簡介 HP TouchSmart HP TouchSmart HP TouchSmart HP TouchSmart RSS HP TouchSmart www.hp.com/supportvideos TouchSmart 從 Windows HP TouchSmart Windows 7 HP TouchSmart HP TouchSmart 按鈕。 或 HP TouchSmart 瀏覽 HP TouchSmart 您可在 HP TouchSmart HP TouchSmart 執行動作 說明 前往 HP TouchSmart - HP TouchSmart 300-1000 | Getting Started - Page 32
Windows 將 HP TouchSmart Windows 26 Windows 7 HP TouchSmart 並回到 Microsoft Windows 桌面。 HP TouchSmart HP TouchSmart - HP TouchSmart 300-1000 | Getting Started - Page 33
HP TouchSmart HP TouchSmart PC HP TouchSmart Windows HP TouchSmart Windows Media Center Tablet 使用 Tablet 文字。 HP TouchSmart 開啟 HP TouchSmart HP TouchSmart 27 - HP TouchSmart 300-1000 | Getting Started - Page 34
[HP TouchSmart HP TouchSmart 首頁。 2 3 4 選取 [HP TouchSmart Windows 5 6 7 8 HP TouchSmart 9 HP TouchSmart 首頁。 RSS 1 開啟 HP TouchSmart 2 3 4 以 www URL www.hp.com/go/touchsmart Internet Explorer 5 HP TouchSmart 6 HP TouchSmart HP TouchSmart 1 從 HP TouchSmart - HP TouchSmart 300-1000 | Getting Started - Page 35
1 從 HP TouchSmart 2 3 1 從 HP TouchSmart 2 3 HP TouchSmart HP TouchSmart HP TouchSmart 瀏覽器 HP TouchSmart HP TouchSmart Internet Explorer HP TouchSmart HTML RSS RSS HP TouchSmart RSS Internet Explorer RSS 摘要 RSS RSS (Really Simple Syndication RSS HP TouchSmart 內含 - HP TouchSmart 300-1000 | Getting Started - Page 36
HP TouchSmart RSS 請記住,RSS RSS 摘要。 HP TouchSmart 相片 使用 [HP TouchSmart Snapfish TouchSmart Snapfish Snapfish HP TouchSmart HP TouchSmart jpg 相片庫 HP TouchSmart 1 USB 纜線, USB HP TouchSmart Microsoft 2 3 4 5 6 HP TouchSmart 畫面。 7 8 9 HP TouchSmart 1 點選 HP TouchSmart - HP TouchSmart 300-1000 | Getting Started - Page 37
投影片 1 從 HP TouchSmart 2 3 4 5 [HP TouchSmart 5 秒)。 6 7 隱藏相片 HP TouchSmart 1 從 Windows HP TouchSmart 料夾。 2 3 Windows 1 2 3 4 5 CD 或 DVD 34 CD 或 DVD〉。 HP TouchSmart 畫布 31 - HP TouchSmart 300-1000 | Getting Started - Page 38
.m4a。 HP TouchSmart 上安裝 iTunes m4p 和 .m4a 檔 案格式。 HP TouchSmart 音樂 1 2 iTunes 3 iTunes CD USB HP TouchSmart 4 從 HP TouchSmart 5 HP TouchSmart 我的 iTunes iTunes iTunes iTunes HP TouchSmart 從 iTunes HP TouchSmart 音樂 HP TouchSmart HP TouchSmart iTunes 1 從 www - HP TouchSmart 300-1000 | Getting Started - Page 39
專輯封面 1 從 Windows Windows iTunes]。 2 3 4 5 1 CD 2 3 CD iTunes 1 瀏覽到 iTunes Store 2 1 開啟 HP TouchSmart 2 3 單裡。 4 5 6 7 8 9 10 11 500 500 33 - HP TouchSmart 300-1000 | Getting Started - Page 40
或 Windows Media Player Windows CyberLink CD 及 DVD: 1 CyberLink DVD Suite Deluxe]。 2 3 4 5 CD 或 DVD 6 7 插入 CD 或 DVD HP TouchSmart 影片 HP TouchSmart YouTube YouTube HP TouchSmart YouTube CD 或 DVD HP TouchSmart mpg、.mpeg、.dvr-ms、.wmv、.asf 和 .avi。 HP TouchSmart * HP - HP TouchSmart 300-1000 | Getting Started - Page 41
A B C HP TouchSmart 電腦 0.5 公尺 (2 B A C B 使用 HP TouchSmart YouTube YouTube 網站。YouTube 帳號。 除了 HP TouchSmart CyberLink YouCam CyberLink YouCam YouTube CyberLink YouCam CyberLink YouCam]、[CyberLink YouCam 錄製影片 1 2 3 4 3 5 6 7 8 35 - HP TouchSmart 300-1000 | Getting Started - Page 42
9 10 Windows 7 或 [HP TouchSmart VGA 640 x 480。 按鈕。 1 從 HP TouchSmart 2 3 4 5 6 7 8 1 使用 USB 或 2 HP TouchSmart HP TouchSmart YouTube YouTube YouTube YouTube HP TouchSmart YouTube 帳號。 1 開啟 HP TouchSmart 2 3 YouTube 4 YouTube]。 5 YouTube YouTube 6 - HP TouchSmart 300-1000 | Getting Started - Page 43
HP TouchSmart 1 HP TouchSmart MSN Hotmail、MSN Messenger 或 Passport 的 Windows Live Messenger 2 Windows Live Messenger。 3 Windows Live Messenger 4 SoundMAX Integrated 5 6 SoundMAX Integrated 7 選擇 [HP 8 9 HP TouchSmart HP TouchSmart 行事曆 [HP TouchSmart ics HP TouchSmart 備註 HP - HP TouchSmart 300-1000 | Getting Started - Page 44
1 開啟 HP TouchSmart 2 3 4 ABC 5 6 語音備註 1 開啟 HP TouchSmart 2 3 4 5 6 刪除備註 1 開啟 HP TouchSmart 2 3 4 1 2 3 HP TouchSmart 時鐘 個人化 [HP TouchSmart 38 - HP TouchSmart 300-1000 | Getting Started - Page 45
DVR 更新軟體 請至 www.hp.com/go/touchsmart 除了 HP TouchSmart DVD Play DVD Play CyberLink DVD Suite DVD VCD) 以及 Blu-ray Power2Go、YouCam LabelPrint 與 PowerDirector CyberLink Power2Go CD,或從 WAV、MP3 或 WMA CD。您可 CD CD 或 DVD - HP TouchSmart 300-1000 | Getting Started - Page 46
CyberLink PowerDirector HP Advisor DVD VCD 和 DVD HP HP PC Health and Security」和 「PC Help」工具。 40 - HP TouchSmart 300-1000 | Getting Started - Page 47
遙控器 Windows Media Center DVD 遙控器 41 - HP TouchSmart 300-1000 | Getting Started - Page 48
啟 Windows Media Center 5 Windows Media Center 6 Windows Media Center OK 7 8 DVD Windows Media Center DVD DVD 9 10 i 11 Windows Media Center 12 13 14 15 16 17 7 DVD 18 0 到 9 19 20 LED LED 21 A/V HP TouchSmart600 PC 22 Windows - HP TouchSmart 300-1000 | Getting Started - Page 49
25 26 27 Windows Media Center 28 Ch+ 與 Ch DVD 章節。 29 CD 或 DVD。 30 31 32 DVD 章節 30 秒。 33 34 遙控器 43 - HP TouchSmart 300-1000 | Getting Started - Page 50
44 - HP TouchSmart 300-1000 | Getting Started - Page 51
Microsoft 46 頁的 〈Microsoft 46 47 1 2 3 DVD/CD-ROM 4 HP DVD Writer 640b)。 5 6 或 45 - HP TouchSmart 300-1000 | Getting Started - Page 52
Microsoft Microsoft Windows 7 1 2 3 4 1 2 3 4 5 6 1 2 Enter 鍵。 CD 或 DVD 直接從 CD 或 DVD 1 2 3 46 - HP TouchSmart 300-1000 | Getting Started - Page 53
1 2 a b c d 1 2 3 4 5 CD 或 DVD Windows Windows 48 系統復原 CD 48 Windows 7 47 - HP TouchSmart 300-1000 | Getting Started - Page 54
DVD DVD+R 或 DVD-R CD 或 DVD+RW、DVD-RW、DVD+RW DL、DVD-RW DL、DVD+R DL 或 DVD-R DL 光碟 1 至 3 片 DVD 1 2 3 Recovery 1、Recovery 2)。 4 1 Windows 7 2 F11 3 4 HP www.hp.com/support 從 Windows 7 Windows 7 1 2 3 48 - HP TouchSmart 300-1000 | Getting Started - Page 55
4 5 6 往第 49 7。 7 8 9 10 如果 Windows 7 1 2 3 4 F11 Windows 5 6 7 8 48 1 DVD 2 49 - HP TouchSmart 300-1000 | Getting Started - Page 56
3 1 插入 DVD 4 或 5 5 6 7 8 9 10 HP Support Assistant (HP HP Support Assistant (HP HP Support Assistant (HP HP HP Support Assistant] (HP Windows 7 Troubleshooting Tools (Windows 7 Windows 7 Windows 7 Troubleshooting Tools (Windows 7 1 2 3 50 - HP TouchSmart 300-1000 | Getting Started - Page 57
40 YouCam 39 D DSL 14 連線 14 DVD Play 39 H HP Advisor 40 HP TouchSmart 5 39 25 是什麼 25 23 vi 開啟 25 瀏覽 25 I iTunes 32 L LAN 13 5 7 索引 M MP3 播放器 21 R RSS 29 S SoundMAX 19 19 麥克風 20 20 S-Video 連接線 3 S-Video 輸入 17 S-Video 轉接頭 17 U USB 接頭 7 W Windows Media Center 41 18 20 16 Y YouTube 36 - HP TouchSmart 300-1000 | Getting Started - Page 58
22 7 23 9 14 7 設定 14 20 連接埠 6 21 37 七畫 29 25 31 45 47 46 47 46 八畫 vi 6, 12 九畫 按鈕 DVD 控制 5 HP TouchSmart 5 5 30 投影片 31 31 35 距離 35 5 18 連接埠 7 18 46 RSI Windows Media Center 20 6 7 19 20 控制 6 52 32 34 33 32 33 32 十畫 45 38 十一畫 LAN) 13 33 8 vi - HP TouchSmart 300-1000 | Getting Started - Page 59
LED 8 功能 4 位置 35 34 4, 35 35 13 遙控器 LED 8 搭配 HP TouchSmart 使用 41 十五畫 影片 YouTube 36 37 35 36 錄製 35 34 建立 33 影片 36 7 17 十六畫 18 搭配 Windows Media Center 18 18 12 23 22 27 十七畫 46 接收器 LED 8 7 11 關於 10 十八畫 29 藍芽 4 使用 15 S-Video 17 7 二十畫 4 27 清潔 23 二十一畫 45 46 索引 53 - HP TouchSmart 300-1000 | Getting Started - Page 60
二十二畫 讀卡機 LED 8 功能 6 6 二十三畫 1 清潔 23 解析度 4 - HP TouchSmart 300-1000 | Getting Started - Page 61
User Guide - HP TouchSmart 300-1000 | Getting Started - Page 62
is prohibited. Microsoft, the Windows logo, and Windows are trademarks or registered trademarks of specifications and not final. If the final specifications differ from the draft specifications, it may affect the ability of this device to communicate with other 802.11n WLAN devices. HP supports - HP TouchSmart 300-1000 | Getting Started - Page 63
HP TouchSmart PC 4 Left side of the HP TouchSmart PC 6 Back of the HP TouchSmart PC 7 Activity LED indicator lights...8 Connecting the Power ...14 Bluetooth Devices ...15 TV Tuner and Windows Media Center 16 Watching and recording TV programs 16 Connecting the TV signal source to the computer 16 - HP TouchSmart 300-1000 | Getting Started - Page 64
webcam video and snapshots 37 Making a video ...37 Video playlists ...38 Transferring videos to the computer 38 Uploading videos to YouTube 38 Recording home movies ...39 Video chats and conference calls 39 HP TouchSmart Movie Themes 39 HP TouchSmart Calendar ...39 iv User Guide (Features - HP TouchSmart 300-1000 | Getting Started - Page 65
notes ...40 HP TouchSmart Clock ...40 Live TV...41 Updating Software ...41 Software Quick Reference Table 41 Remote Control ...43 Using the remote control ...43 Software Troubleshooting and System Recovery 47 Software Troubleshooting ...47 Software repair overview ...47 Updating drivers ...47 - HP TouchSmart 300-1000 | Getting Started - Page 66
the Internet. „ HP TouchSmart and other software. „ Connect a television signal. „ Recover factory settings. „ Learn how to use the Microsoft® Windows® 7 operating system. „ Troubleshoot the most common computer hardware and software issues. „ Find electronic user guides and specifications for your - HP TouchSmart 300-1000 | Getting Started - Page 67
an adjustable webcam, a CD/DVD and Blu-ray player and burner, Bluetooth capability, ambient lighting, USB ports, a media card reader, a BrightView display, Wireless 802.11n networking, and high-quality speakers. The interactive screen makes wall mounting a good choice for the HP TouchSmart PC. The - HP TouchSmart 300-1000 | Getting Started - Page 68
What's in the box Power cord Keyboard and mouse (wireless option shown with receiver) Cleaning cloth Setup poster and documentation Computers with TV tuners Infrared (IR) emitter cable Remote control Computers with wall-mounting option VESA plate adapter assembly 2 User Guide (Features may vary by - HP TouchSmart 300-1000 | Getting Started - Page 69
not included but that may be required Ethernet (LAN) cable Use to connect to a wired network. Coaxial cable S-Video cable Audio/video composite cable TV tuner (composite video to S-Video) adapter Use to connect to an Internet connection with a cable modem, or to connect the TV signal source to - HP TouchSmart 300-1000 | Getting Started - Page 70
of managing your digital life by touch with the HP TouchSmart software. * High definition (HD) content is required to view HD images. Most current DVDs do not provide HD images. **All specifications represent the typical specifications provided by Hewlett-Packard's component manufacturers; actual - HP TouchSmart 300-1000 | Getting Started - Page 71
the internal location of the wireless LAN (top left and right, not visible externally). The wireless LAN supports IEEE 802.11 b/g/n. F Power/Sleep button Press the Power/Sleep button to turn on your HP TouchSmart PC, or to put it into Sleep mode. To turn off your computer, tap the Start button, and - HP TouchSmart 300-1000 | Getting Started - Page 72
button (select models only) The HP TouchSmart Ambient Light casts a glow from the computer base. Ambient Light is turned off by default. Turn the Ambient Light on or off by pressing the Ambient Light button. C Memory card reader Use the built-in memory card reader to easily access photos and - HP TouchSmart 300-1000 | Getting Started - Page 73
the HP TouchSmart PC Power connector Plug the power cord into the computer. J Stereo Audio In (TV Connect stereo audio input cables (left and right) from a set-top box, tuner models only) digital video camera, or other video device. K S-Video In (TV tuner Capture analog video from a video - HP TouchSmart 300-1000 | Getting Started - Page 74
G E F The following are the activity indicator light-emitting diodes (LEDs) on your HP TouchSmart PC: LED What it does A Webcam Indicates webcam activity. B Power Indicates the power state: blue indicates power on, and amber indicates Sleep mode. C Optical disc drive Indicates optical disc - HP TouchSmart 300-1000 | Getting Started - Page 75
power cord directly into the back of the computer. Plug the power cord into an AC power source through a surge protector/ uninterruptible power supply (UPS). Cable Management The HP TouchSmart PC desktop, pull the computer stand open. Then, if you want to change the angle of the HP TouchSmart PC, - HP TouchSmart 300-1000 | Getting Started - Page 76
switch on the bottom of the mouse is in the On position (the keyboard does not have a Power switch). Then, turn on the computer. If you have trouble using the keyboard and mouse, manually synchronize them as explained in the next procedure. NOTE: Select models may have a wired keyboard and mouse - HP TouchSmart 300-1000 | Getting Started - Page 77
batteries, and then turn on the mouse (A). You may need to manually synchronize the wireless keyboard or mouse if they are not functioning. To synchronize them: „ Make sure the keyboard and mouse are next to the HP TouchSmart PC, within 30 cm (1 foot) and away from interference from other devices - HP TouchSmart 300-1000 | Getting Started - Page 78
computer. Ambient Light Select models only The HP TouchSmart Ambient Light casts a cool white glow from Ambient Light on. Adding Hardware and Software HP TouchSmart PCs may not be compatible with all of the button, and then tap Help and Support. 2 Tap Troubleshooting Tools, and then tap System - HP TouchSmart 300-1000 | Getting Started - Page 79
. A To eject a disc, make sure the power is turned on and then press the Eject button Support Guide for the telephone number to contact HP Support. Connecting to the Internet Your HP TouchSmart PC is designed to support access point and Internet service are required and not instructions. Welcome 13 - HP TouchSmart 300-1000 | Getting Started - Page 80
the HP TouchSmart PC to connect to the wireless network. a Turn on your HP TouchSmart PC. b Connect your HP TouchSmart PC to the wireless network: „ Right-click the Network icon on the taskbar, and then select Open Network and Sharing Center. Click Connect to a network. When the window opens - HP TouchSmart 300-1000 | Getting Started - Page 81
your wired network: a Disconnect power from the broadband modem and the router, and then shut down your HP TouchSmart PC and the computers you want click Hardware and Sound. Find your Bluetooth device and follow the onscreen instructions. 3 If your Bluetooth device is a printer, tap the Start button - HP TouchSmart 300-1000 | Getting Started - Page 82
Windows Media Center, tap Tasks, and then tap learn more. Connecting the TV signal source to the computer Select models only WARNING: Please read "Additional Safety Information" in the Limited Warranty and Support Guide before installing and connecting your HP TouchSmart PC to the electrical power - HP TouchSmart 300-1000 | Getting Started - Page 83
of the computer, behind the computer stand. A Using a set-top box with Windows Media Center (optional step) Sold separately Refer to your set-top box documentation for more details. 1 Connect an S-Video cable to the S-Video In connector (A), located at the back of the computer behind the connector - HP TouchSmart 300-1000 | Getting Started - Page 84
For S-Video, connect HP TouchSmart PC (E), not at the set-top box. Windows Media Center setup wizard Select models only 1 Tap the Start button, tap All Programs, and then tap Windows Media Center. 2 Follow the onscreen instructions to set up your TV tuner and Windows Media Center TV program guide - HP TouchSmart 300-1000 | Getting Started - Page 85
HP TouchSmart PC supports the following speaker options: „ Built-in analog stereo speakers „ Analog 2.0 or 2.1 powered speakers „ Digital 3.1, 4.1, or 5.1 powered speakers „ Audio receiver „ Headphones NOTES: „ The HP TouchSmart PC supports powered speaker systems only. Powered the instructions that - HP TouchSmart 300-1000 | Getting Started - Page 86
screen. „ Use the Microsoft Volume icon on the taskbar: a Press and hold (or with the mouse, right-click) the Volume icon, and then select Open Volume Mixer. The Volume Mixer window opens. b To adjust the volume for HP TouchSmart programs (Notes, Music, and Video Guide (Features may vary by model) - HP TouchSmart 300-1000 | Getting Started - Page 87
HP TouchSmart supports USB and wireless printer connections. If your printer has a parallel port, you must buy a USB parallel printer adapter. Also, you will need to download a printer driver that works with Windows 7. To verify your operating system and compatibility, go to www.hp.com/support Power - HP TouchSmart 300-1000 | Getting Started - Page 88
Power Power Options. 4 Choose a power option. Power for further power savings. „ Screen Display Adjust screen display features: 1 To make adjustments to your screen desktop. You can choose to change the desktop background or the screen screen power-saving feature. „ Press Fn + F9 again to turn the monitor - HP TouchSmart 300-1000 | Getting Started - Page 89
sides and edges of the screen. To clean the touch screen: 1 Turn off the computer. Tap the Start button, and then tap Shut Down. 2 Disconnect the power cord from the wall. 3 Spray a small amount of a mild glass cleaner onto the cleaning cloth that came with your HP TouchSmart PC. You can also use - HP TouchSmart 300-1000 | Getting Started - Page 90
damage to the touch screen. .Using the HP TouchSmart with Safety and Comfort Before you begin using the computer, arrange the computer and your work area to maintain your comfort and productivity. Refer to the Safety & Comfort Guide for important ergonomic information: visit www.hp.com/ergo on the - HP TouchSmart 300-1000 | Getting Started - Page 91
Your Old Computer Hardware Disposing of electronic waste responsibly has been an HP priority for more than 20 years. If this computer is a replacement for an older PC you no longer need, go to www.hp.com/go/recycle to find out how HP can help you dispose of your old computer with minimum impact - HP TouchSmart 300-1000 | Getting Started - Page 92
26 User Guide (Features may vary by model) - HP TouchSmart 300-1000 | Getting Started - Page 93
your photos, watch videos, play music, or search the Internet with a few taps. View the TouchSmart tutorials at www.hp.com/supportvideos (English only); just a few minutes will help you navigate through all the software features. Opening HP TouchSmart from the Windows desktop When you first turn - HP TouchSmart 300-1000 | Getting Started - Page 94
) 28 User Guide (Features may vary by model) Description (continued) Tap the Windows 7 icon in the upper-left corner to minimize HP TouchSmart and go to the Microsoft Windows desktop. To quickly scroll left and right or up and down, you can touch and drag your finger across the screen in the - HP TouchSmart 300-1000 | Getting Started - Page 95
HP TouchSmart Software To use software and navigate the Windows desktop, you can use the touch screen, keyboard, mouse, or remote control (included with select models only). Some tasks, such as HP TouchSmart programs button, tap Control Panel, tap Mobile PC, and then tap Pen and Input Devices. Select - HP TouchSmart 300-1000 | Getting Started - Page 96
icon. 2 Tap the Personalize button. 3 Select Create a new tile. 4 Select HP TouchSmart Program, tap Windows Program or Websites, and then tap Next. 5 Select Choose from a list to show a list of all software programs in your Programs folder. 6 Select the software to add and then tap OK. 7 In the - HP TouchSmart 300-1000 | Getting Started - Page 97
is deleted from the Tile View. The program itself is not deleted. Changing tile icons or color 1 From the HP TouchSmart homepage, tap the Personalize button. 2 content, including pictures, audio files, videos, or updates to view when you choose. HP TouchSmart includes an RSS Feed Reader where you - HP TouchSmart 300-1000 | Getting Started - Page 98
its correct orientation. From HP TouchSmart, you can access photos stored anywhere on your hard drive. HP TouchSmart Photo supports the .jpg file format. card directly from the HP TouchSmart homepage (but not download them): 1 Tap the back arrow in the upper-left corner of the HP TouchSmart window. - HP TouchSmart 300-1000 | Getting Started - Page 99
photos You can hide some of your photos so they do not show up in HP TouchSmart Photo. 1 From your Windows desktop, browse to the photo or folder you do not want to show in the Photos tile in HP TouchSmart Photo. 2 Right-click the photo, and click Properties. 3 Click the General tab, and Attributes - HP TouchSmart 300-1000 | Getting Started - Page 100
HP TouchSmart HP TouchSmart to support .m4p and .m4a file formats. Moving music files into HP TouchSmart HP TouchSmart Music. Moving songs from iTunes into HP TouchSmart Music HP TouchSmart can play music from only one music library at a time. HP TouchSmart TouchSmart Music window by tapping the - HP TouchSmart 300-1000 | Getting Started - Page 101
art when it is missing: 1 From the Windows desktop, tap (or click) the Start button, tap Windows Media library or iTunes. The albums appear in playlists Create a playlist by simply dragging songs to the Playlist window. 1 Open HP TouchSmart, and select the Music tile. 2 Select Album, and then - HP TouchSmart 300-1000 | Getting Started - Page 102
must use a CD recording program, such as CyberLink Power2Go or Windows Media Player, which you access through your Windows desktop. To create CDs and DVDs process starts. HP TouchSmart Video With HP TouchSmart Video, make your own videos using the built-in webcam, play the videos, and then upload - HP TouchSmart 300-1000 | Getting Started - Page 103
of the webcam shot, tilt the screen, or use the webcam adjustment lever (C) just behind the webcam. For optimal sound recording, you should be within one-half meter (2 feet) from the HP TouchSmart computer. B A C B Capturing webcam video and snapshots Use HP TouchSmart to record video and take - HP TouchSmart 300-1000 | Getting Started - Page 104
reflects the date and time of recording. 10 You can rename the file either in Windows 7 or in HP TouchSmart Video. The webcam resolution is VGA 640 x 480. Video playlists You can organize your videos by creating video playlists, much as you might with music. NOTE: You must save your playlist if you - HP TouchSmart 300-1000 | Getting Started - Page 105
an external microphone, choose SoundMAX Integrated microphone, and click Next. 7 Choose HP Webcam as your video, and follow the rest of the instructions. 8 Click Finish. 9 Open the client and follow the directions to start a video chat. HP TouchSmart Movie Themes With the Movie Themes option on the - HP TouchSmart 300-1000 | Getting Started - Page 106
the Play button to review your message. 6 Tap Keep or Cancel. Tap Done to save the voice note. Deleting notes To delete a note: 1 Open HP TouchSmart, and select the Notes tile. 2 Press and drag the note to delete into the Recycle Bin in the bottom right corner of the window. 3 Tap the Recycle Bin - HP TouchSmart 300-1000 | Getting Started - Page 107
programming guide so you can easily find TV programs. Use the digital video recorder (DVR) function to record your favorite shows.* Updating Software Check www.hp.com/go/touchsmart for updated software and new software features. Software Quick Reference Table In addition to the HP TouchSmart - HP TouchSmart 300-1000 | Getting Started - Page 108
video files. „ Quickly organize the Web links you want to keep available to you on your desktop. „ Comparison-shop by using the convenient shopping search engine. „ Get HP software and driver updates. „ Get important messages from HP. „ Access PC Health and Security and PC Help tools. 42 User Guide - HP TouchSmart 300-1000 | Getting Started - Page 109
Using the remote control Select models only Remote Control The remote control works with Windows Media Center and other software. This remote control helps you navigate on the computer just as a TV remote control helps you navigate cable TV options - HP TouchSmart 300-1000 | Getting Started - Page 110
Media Center only) Opens the Music Library window in Windows Media Center. 4 Radio - (Windows Media Center only) Opens the FM Radio window in Windows Media Center. 5 Guide - (Windows Media Center only) Opens the Television Program Guide. 6 Recorded TV - (Windows Media Center OK only) Opens the - HP TouchSmart 300-1000 | Getting Started - Page 111
For HP TouchSmart600 PC game console models only. 22 Picture - (Windows Media Center only) Opens the Pictures Library window. 23 Video - (Windows Media Center only) Opens the Videos Library window. 24 Live TV - (Windows Media Center only) Displays the full-screen view of live TV. Moves a TV program - HP TouchSmart 300-1000 | Getting Started - Page 112
46 User Guide (Features may vary by model) - HP TouchSmart 300-1000 | Getting Started - Page 113
specific item (for example, HP DVD Writer 640b). 5 Click the Driver tab. 6 To update a driver, click Update Driver, and then follow the onscreen instructions. Or To revert to an earlier version of a driver, click Rollback Driver, and then follow the onscreen instructions. Software Troubleshooting - HP TouchSmart 300-1000 | Getting Started - Page 114
Create. 6 Follow the onscreen instructions. For more information about software restore points: 1 Click the Start button, and then click Help and Support. 2 Type system restore in the Search Help box, and then press Enter. Software program and hardware driver reinstallation If an individual factory - HP TouchSmart 300-1000 | Getting Started - Page 115
Welcome screen. 4 Choose the program you want to install, click Next, and follow the onscreen instructions. 5 When you have finished reinstalling, restart the computer. NOTE: Do not skip this last step. You must restart the computer after recovering software programs or hardware drivers. Creating - HP TouchSmart 300-1000 | Getting Started - Page 116
your computer model (typically 1-3 DVDs). The Recovery Disc Creator program tells you the specific number of blank discs needed to make the set. The HP Support. To purchase recovery discs, go to www.hp.com/support and visit the Software & Driver downloads page for your computer model. 50 User Guide - HP TouchSmart 300-1000 | Getting Started - Page 117
the initial company logo screen appear, repeatedly press the F11 key on your keyboard until the Windows is Loading Files message appears on the screen. 5 Under I need the desktop. 8 Turn off the computer, reconnect all peripheral devices, and turn the computer back on. Software Troubleshooting and - HP TouchSmart 300-1000 | Getting Started - Page 118
your PC performance and resolve problems faster with automated updates, onboard diagnostics, and guided assistance. To open HP Support Assistant, tap the Start button, All Programs, HP, and then tap HP Support Assistant. „ Windows 7 Troubleshooting Tools Windows 7 provides troubleshooting tools - HP TouchSmart 300-1000 | Getting Started - Page 119
video-to-S-Video 17 album art 35 Ambient Light feature 6, 12 audio Line In connector 6 Line Out connector 7 troubleshooting 19 Windows Media Center 20 B backup 49 backup discs, creating 49 Bluetooth antenna features 4 using 15 Browser tile 31 button computer power/sleep 5 DVD control 5 HP TouchSmart - HP TouchSmart 300-1000 | Getting Started - Page 120
creating 35 video 38 power adapter connector 7 power cord 9 power settings 13 Power, LED 8 Power/Sleep button 5 powered speakers, connecting 19 R receiver, wireless keyboard and mouse 8 Recovery Manager 48 reinstall a software program 48 remote control IR receiver LED 8 using with HP TouchSmart 43 - HP TouchSmart 300-1000 | Getting Started - Page 121
30 touch screen accessing and navigating 29 cleaning 23 features 4 tutorials vi, 31 Tutorials tile 31 TV connecting 16 tuner 16 TV In connector 7 U updating, drivers 47 upgrading hardware 12 software 12 USB connector 7 V video playlists 38 recording 37 setting up a video chat 39 webcam 37 YouTube - HP TouchSmart 300-1000 | Getting Started - Page 122
- HP TouchSmart 300-1000 | Getting Started - Page 123
- HP TouchSmart 300-1000 | Getting Started - Page 124
Part number: 575631-AC1
-
 1
1 -
 2
2 -
 3
3 -
 4
4 -
 5
5 -
 6
6 -
 7
7 -
8
-
9
-
10
-
11
-
12
-
13
-
14
-
15
-
16
-
17
-
18
-
19
-
20
-
21
-
22
-
23
-
24
-
25
-
26
-
27
-
28
-
29
-
30
-
31
-
32
-
33
-
34
-
35
-
36
-
37
-
38
-
39
-
40
-
41
-
42
-
43
-
44
-
45
-
46
-
47
-
48
-
49
-
50
-
51
-
52
-
53
-
54
-
55
-
56
-
57
-
58
-
59
-
60
-
61
-
62
-
63
-
64
-
65
-
66
-
67
-
68
-
69
-
70
-
71
-
72
-
73
-
74
-
75
-
76
-
77
-
78
-
79
-
80
-
81
-
82
-
83
-
84
-
85
-
86
-
87
-
88
-
89
-
90
-
91
-
92
-
93
-
94
-
95
-
96
-
97
-
98
-
99
-
100
-
101
-
102
-
103
-
104
-
105
-
106
-
107
-
108
-
109
-
110
-
111
-
112
-
113
-
114
-
115
-
116
-
117
-
118
-
119
-
120
-
121
-
122
-
123
-
124
 |
 |

使用手冊