HP Visualize c3000 hp Visualize c3600 UNIX workstations PA8600 upgrade instruc - Page 19
Removing the Side Panel
 |
View all HP Visualize c3000 manuals
Add to My Manuals
Save this manual to your list of manuals |
Page 19 highlights
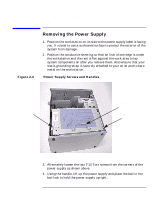
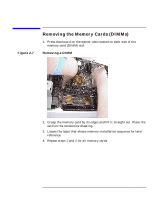
System Board Removal/Replacement Removing the Side Panel Removing the Side Panel 1. Remove the two T-15 Torx thumbscrews located in the top and bottom right edge of the back side of the workstation, as shown below. Figure 2-2 Opened Side Panel Side-Panel Thumbscrew Hinge Slots 2 Side-Panel Hook NOTE 2. Remove the left side panel by grasping the back edge of the panel and rotating the panel outward as shown above. Unhinge the panel and pull it away from the workstation. Set the panel and its screws aside. Only the left side panel is removed. The left side panel is the one on the left when facing the front of the workstation. Chapter 2 19
-
 1
1 -
2
-
3
-
4
-
5
-
6
-
7
-
8
-
9
-
10
-
11
-
12
-
13
-
 14
14 -
 15
15 -
 16
16 -
 17
17 -
 18
18 -
 19
19 -
 20
20 -
 21
21 -
 22
22 -
 23
23 -
 24
24 -
25
-
26
-
27
-
28
-
29
-
30
-
31
-
32
-
33
-
34
-
35
-
36
-
37
-
38
-
39
-
40
-
41
-
42
-
43
-
44
 |
 |

Chapter 2
19
System Board Removal/Replacement
Removing the Side Panel
Removing the Side Panel
1.
Remove the two T-15 Torx thumbscrews located in the top and bottom
right edge of the back side of the workstation, as shown below.
Figure 2-2
Opened Side Panel
2.
Remove the left side panel by grasping the back edge of the panel and
rotating the panel outward as shown above. Unhinge the panel and
pull it away from the workstation. Set the panel and its screws aside.
NOTE
Only the left side panel is removed. The left side panel is the one on the
left when facing the front of the workstation.
Side-Panel Thumbscrew
Side-Panel Hook
2
Hinge Slots