HP Xw6600 HP Workstations - Second Xeon Processor Installation
HP Xw6600 - Workstation - 2 GB RAM Manual
 |
UPC - 883585731121
View all HP Xw6600 manuals
Add to My Manuals
Save this manual to your list of manuals |
HP Xw6600 manual content summary:
- HP Xw6600 | HP Workstations - Second Xeon Processor Installation - Page 1
processor without corresponding memory results in an unsupported configuration. • Mixing Unbuffered and Registered DIMMS is not supported. All DIMMS in the system must be either Unbuffered or Registered. • See the workstation service guide at http://www.hp.com/support/workstation_manuals for rules - HP Xw6600 | HP Workstations - Second Xeon Processor Installation - Page 2
, be sure you discharge static electricity by briefly touching a grounded metal object. CAUTION: To prevent damage to the workstation, observe the following Electrostatic Discharge (ESD) precautions while performing the system parts removal and replacement procedures: - Work on a static-free - HP Xw6600 | HP Workstations - Second Xeon Processor Installation - Page 3
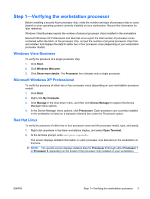
or cores (based on your operating system) currently installed on your workstation. Record this information for later reference. Windows Vista Business reports the number of physical processor chips installed in the workstation. Microsoft Windows XP Professional and Red Hat Linux report the total - HP Xw6600 | HP Workstations - Second Xeon Processor Installation - Page 4
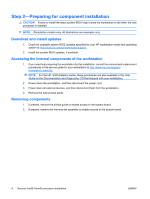
. 2. Install the system BIOS updates, if available. Accessing the internal components of the workstation 1. If you need help preparing the workstation for this installation, consult the removal and replacement procedures in the service guide for your workstation at http://www.hp.com/support - HP Xw6600 | HP Workstations - Second Xeon Processor Installation - Page 5
when removing or replacing a processor: - Installing a processor incorrectly can damage the system board. Contact an HP authorized reseller or service provider to install the processor. If you plan to install the processor yourself, read all of the instructions carefully before you begin. - Failure - HP Xw6600 | HP Workstations - Second Xeon Processor Installation - Page 6
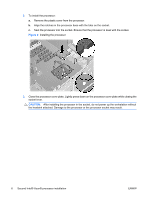
: a. Remove the plastic cover from the processor. b. Align the notches in the processor base with the tabs on the socket. c. Seat the processor into the socket. Ensure that the processor is level with the socket. Figure 2 Installing the processor 3. Close the processor cover plate. Lightly press - HP Xw6600 | HP Workstations - Second Xeon Processor Installation - Page 7
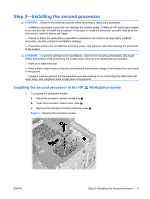
the second processor in HP xw series Workstations After preparing the workstation for component installation, perform the following steps to install the processor: 1. Remove the processor socket protective cover. Figure 3 Removing the socket protective cover 2. If there is a plastic plug in the - HP Xw6600 | HP Workstations - Second Xeon Processor Installation - Page 8
level with the socket. Figure 5 Installing the processor 5. Close the processor cover plate. Lightly press down on the processor cover plate while closing the socket lever. CAUTION: After installing the processor in the socket, do not power up the workstation without the heatsink attached. Damage to - HP Xw6600 | HP Workstations - Second Xeon Processor Installation - Page 9
touch the exposed thermal grease when handling the processor heatsink. 2. To install the heatsink: a. Align the heatsink mounting posts with their respective threaded mounting holes on the system connector on the system board 2. Figure 6 Installing the heatsink in HP Workstation series 3. To - HP Xw6600 | HP Workstations - Second Xeon Processor Installation - Page 10
the HP xw Workstation series CAUTION: Ensure that the second heatsink does not crush the electrical wires of the first heatsink fan. 1. Remove and discard the thermal grease protective liner from the underside of the new heatsink, and then set the heatsink over the processor. NOTE: Do not touch the - HP Xw6600 | HP Workstations - Second Xeon Processor Installation - Page 11
on the system board 2. Figure 8 Installing the heatsink in the HP xw Workstation series 3. To access the mounting screws: ● Use a Torx screwdriver to access the heatsink mounting screws. ● If installing a high performance heatsink in an HP xw8600 Workstation, use a long blade T-15 torx driver to - HP Xw6600 | HP Workstations - Second Xeon Processor Installation - Page 12
5. Restore power to the workstation and all external devices. Step 6-Configuring the operating system and verifying the processor upgrade This section explains the second processor configuration and verification process for Windows Vista Business, Microsoft Windows XP Professional, and Red Hat Linux - HP Xw6600 | HP Workstations - Second Xeon Processor Installation - Page 13
starts, Windows XP Professional detects the new processor and silently installs it without sending any prompt or information to the user. After you install the processor upgrade, you see twice as many processors as before the upgrade. NOTE: Microsoft Windows XP Professional counts the total number - HP Xw6600 | HP Workstations - Second Xeon Processor Installation - Page 14
This document is available in Japanese. See http://www.hp.com/support/workstation_manuals, then select your workstation product and select Japanese from the drop down Manual Language menu. http://www.hp.com/support/workstation_manuals Manual Language Japanese 14 Second Intel® Xeon® processor
-
 1
1 -
 2
2 -
 3
3 -
 4
4 -
 5
5 -
 6
6 -
 7
7 -
8
-
9
-
10
-
11
-
12
-
13
-
14
 |
 |
Second Intel® Xeon® processor installation
Introduction
This document describes how to install a second Intel® Xeon® processor in HP
600 and
800
Workstations, and HP xw6000 and xw8000 series Workstations with Land Grid Array (LGA) processor
sockets.
Kit contents
●
Intel® Xeon® processor
●
Processor heatsink
●
Warranty information
●
Installation instructions
Tools required
●
Static strap (to prevent possible damage from static electricity)
●
Static-free mat (to prevent possible damage from static electricity)
●
T-15 Torx screwdriver (Long blade required for some installations)
Before you begin
To view
QuickSpecs
and determine the compatibility of this product with your HP workstation, see
go/productbulletin
.
CAUTION:
To prevent loss of data, the second processor must be identical to the processor currently
installed. The second processor must be the same speed, cache, size, and type as the primary
processor.
CAUTION:
Additional memory is required when adding a second processor to HP
600 and
800
Workstations
• Adding a second processor without corresponding memory results in an unsupported configuration.
• Mixing Unbuffered and Registered DIMMS is not supported. All DIMMS in the system must be either
Unbuffered or Registered.
• See the workstation service guide at
support/workstation_manuals
for rules and
procedures regarding DIMM installation.
© 2006–2009 Hewlett-Packard Development Company, L.P. Intel and Xeon are U.S.
registered trademarks of Intel Corporation. Microsoft, Windows, XP, and Windows Vista
are U.S. registered trademarks of Microsoft Corporation. Printed in the U.S.
ENWW
Introduction
1