HP Xw6600 HP Workstations - Second Xeon Processor Installation - Page 11
HP Xw6600 - Workstation - 2 GB RAM Manual
 |
UPC - 883585731121
View all HP Xw6600 manuals
Add to My Manuals
Save this manual to your list of manuals |
Page 11 highlights
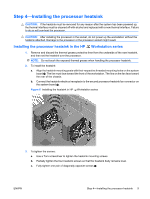
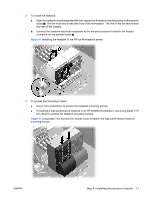
2. To install the heatsink: a. Align the heatsink mounting posts with their respective threaded mounting holes on the system board . The fan must face toward the front of the workstation. The fins on the fan face toward the rear of the chassis. b. Connect the heatsink electrical receptacle to the second processor heatsink fan header connector on the system board 2. Figure 8 Installing the heatsink in the HP xw Workstation series 3. To access the mounting screws: ● Use a Torx screwdriver to access the heatsink mounting screws. ● If installing a high performance heatsink in an HP xw8600 Workstation, use a long blade T-15 torx driver to access the heatsink mounting screws. Figure 9 Long blade Torx screwdriver access route to tighten the high performance heatsink mounting screws ENWW Step 4-Installing the processor heatsink 11
-
 1
1 -
2
-
3
-
4
-
5
-
 6
6 -
 7
7 -
 8
8 -
 9
9 -
 10
10 -
 11
11 -
 12
12 -
 13
13 -
 14
14
 |
 |
