HP Xw6600 HP Workstations - Second Xeon Processor Installation - Page 7
Installing the second processor in HP xw series Workstations
 |
UPC - 883585731121
View all HP Xw6600 manuals
Add to My Manuals
Save this manual to your list of manuals |
Page 7 highlights
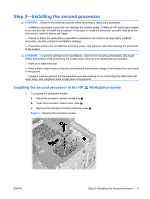
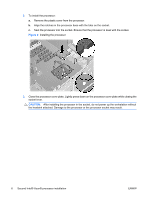
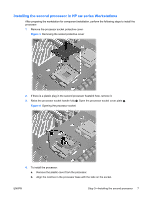
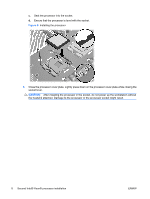
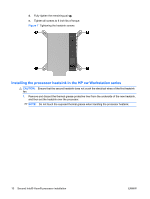
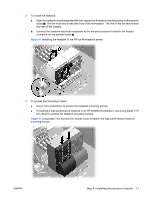
Installing the second processor in HP xw series Workstations After preparing the workstation for component installation, perform the following steps to install the processor: 1. Remove the processor socket protective cover. Figure 3 Removing the socket protective cover 2. If there is a plastic plug in the second processor heatsink hole, remove it. 3. Raise the processor socket handle fully . Open the processor socket cover plate 2. Figure 4 Opening the processor socket 4. To install the processor: a. Remove the plastic cover from the processor. b. Align the notches in the processor base with the tabs on the socket. ENWW Step 3-Installing the second processor 7
-
 1
1 -
 2
2 -
 3
3 -
 4
4 -
 5
5 -
 6
6 -
 7
7 -
 8
8 -
 9
9 -
 10
10 -
 11
11 -
 12
12 -
13
-
14
 |
 |

Installing the second processor in HP xw series Workstations
After preparing the workstation for component installation, perform the following steps to install the
processor:
1.
Remove the processor socket protective cover.
Figure 3
Removing the socket protective cover
2.
If there is a plastic plug in the second processor heatsink hole, remove it.
3.
Raise the processor socket handle fully
. Open the processor socket cover plate
2
.
Figure 4
Opening the processor socket
4.
To install the processor:
a.
Remove the plastic cover from the processor.
b.
Align the notches in the processor base with the tabs on the socket.
ENWW
Step 3—Installing the second processor
7