HP Z210 HP Workstations - CRU Dataport DX115 kit installation - Page 6
Rotate the drive cage to its upright position.
 |
View all HP Z210 manuals
Add to My Manuals
Save this manual to your list of manuals |
Page 6 highlights
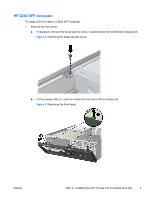
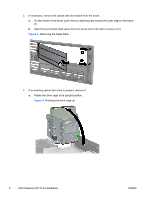
2. If necessary, remove the optical disk drive blank from the bezel: a. On the inside of the bezel, push the two retaining tabs toward the outer edge of the bezel (1) b. Slide the bezel blank back away from the bezel and to the left to remove it (2). Figure 4 Removing the bezel blank 3. If an existing optical disk drive is present, remove it: a. Rotate the drive cage to its upright position. Figure 5 Rotating the drive cage up 6 CRU Dataport DX115 kit installation ENWW
-
 1
1 -
 2
2 -
 3
3 -
 4
4 -
 5
5 -
 6
6 -
 7
7 -
 8
8 -
 9
9 -
 10
10 -
 11
11 -
 12
12 -
13
-
14
-
15
-
16
-
17
-
18
-
19
 |
 |

2.
If necessary, remove the optical disk drive blank from the bezel:
a.
On the inside of the bezel, push the two retaining tabs toward the outer edge of the bezel
(1)
b.
Slide the bezel blank back away from the bezel and to the left to remove it (2).
Figure 4
Removing the bezel blank
3.
If an existing optical disk drive is present, remove it:
a.
Rotate the drive cage to its upright position.
Figure 5
Rotating the drive cage up
6
CRU Dataport DX115 kit installation
ENWW