HP Z600 HP Z600 and Z800 Workstations - Sliding rack-mount kit installation
HP Z600 - Workstation - 6 GB RAM Manual
 |
UPC - 884962074053
View all HP Z600 manuals
Add to My Manuals
Save this manual to your list of manuals |
HP Z600 manual content summary:
- HP Z600 | HP Z600 and Z800 Workstations - Sliding rack-mount kit installation - Page 1
kit on an HP Z600 Workstation and an HP Z800 Workstation. It also describes how to install the workstation into a rack. For Legacy Rack Customers: Owners of earlier model racks (E3660B, E3661B, E3662B, E7590A, J1450B or J1487A/B) must also purchase the HP Legacy Rack Adapter, part number WD587AA - HP Z600 | HP Z600 and Z800 Workstations - Sliding rack-mount kit installation - Page 2
Guide. It describes proper workstation setup, posture, health, and work habits for computer users, and provides important electrical and mechanical safety information. This guide is located at http://www.hp to the workstation, observe the NOTE: HP accessories are for use in HP Workstation products. - HP Z600 | HP Z600 and Z800 Workstations - Sliding rack-mount kit installation - Page 3
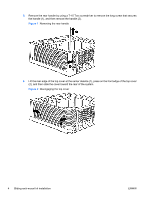
NOTE: All illustrations are examples only. Workstation models vary. For product-specific information, see the service guide for your HP workstation at http://www.hp.com/support/workstation_manuals before beginning installation. To prepare the workstation for component installation: 1. Power down the - HP Z600 | HP Z600 and Z800 Workstations - Sliding rack-mount kit installation - Page 4
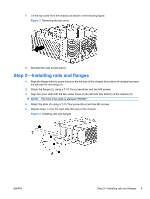
front edge of the top cover (2), and then slide the cover toward the rear of the system. Figure 2 Disengaging the top cover 4 Sliding rack-mount kit installation ENWW - HP Z600 | HP Z600 and Z800 Workstations - Sliding rack-mount kit installation - Page 5
on the left side (the bottom) of the chassis (3). NOTE: The front inner slide is stamped "FRONT." 4. Attach the slide (4) using a T-15 Torx screw driver and two M4 screws. 5. Repeat steps 1-4 for the right side (the top) of the chassis. Figure 4 Installing rails and flanges ENWW Step 2-Installing - HP Z600 | HP Z600 and Z800 Workstations - Sliding rack-mount kit installation - Page 6
-party racks 1. Remove the slide adjustment attachment (1). 2. Adjust the rail to the desired length (2). 3. Insert the slide adjustment attachment (3). Figure 5 Adjusting slides 6 Sliding rack-mount kit installation ENWW - HP Z600 | HP Z600 and Z800 Workstations - Sliding rack-mount kit installation - Page 7
hole and square hole HP racks These instructions apply to racks such as standard HP racks. NOTE: To determine the appropriate alignment for a workstation that requires a 4U space (HP Z600 Workstations) or a 5U space (HP Z800 Workstations), see the two Figure 12 Mounting reference guides on page 11 - HP Z600 | HP Z600 and Z800 Workstations - Sliding rack-mount kit installation - Page 8
the appropriate alignment for a workstation that requires a 4U space (HP Z600 Workstations) or a 5U space (HP Z800 Workstations), see the two Figure 12 Mounting reference guides on page 11. 1. 6. Continue with Step 4-Mounting into a rack on page 10. 8 Sliding rack-mount kit installation ENWW - HP Z600 | HP Z600 and Z800 Workstations - Sliding rack-mount kit installation - Page 9
Installing on earlier HP racks NOTE: The parts for this procedure are available separately in adapter kit number WD587AA. 1. Extend the rails (1). for a workstation which requires a 4U space (Z600 Workstations) or a 5U space (HP Z800 Workstations), see Figure 12 Mounting reference guides on page - HP Z600 | HP Z600 and Z800 Workstations - Sliding rack-mount kit installation - Page 10
to properly align and install the workstation and rails. 1. Insert the inner rails into the outer rails. 2. Push the workstation to slide it completely into the found on the side of the outer rail. 3. Secure the workstation into the rack by tightening the thumb screws found on the mounting flanges. Figure - HP Z600 | HP Z600 and Z800 Workstations - Sliding rack-mount kit installation - Page 11
line of the slides (1). 4. Mount the rails on the rack. Figure 12 Mounting reference guides 4U Mounting reference guide HP Z600 Workstations 5U Mounting reference guide HP Z800 Workstations Step 5-Reassembling the workstation 1. Reconnect external devices and power cords. 2. Restore power to the - HP Z600 | HP Z600 and Z800 Workstations - Sliding rack-mount kit installation - Page 12
is available in Japanese. See http://www.hp.com/support/workstation_manuals, then select your workstation product and select Japanese from the drop down Manual Language menu. http://www.hp.com/support/workstation_manuals Manual Language Japanese 12 Sliding rack-mount kit installation ENWW
-
 1
1 -
 2
2 -
 3
3 -
 4
4 -
 5
5 -
 6
6 -
 7
7 -
8
-
9
-
10
-
11
-
12
 |
 |
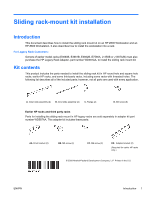
Sliding rack-mount kit installation
Introduction
This document describes how to install the sliding rack mount kit on an HP Z600 Workstation and an
HP Z800 Workstation. It also describes how to install the workstation into a rack.
For Legacy Rack Customers:
Owners of earlier model racks (E3660B, E3661B, E3662B, E7590A, J1450B or J1487A/B) must also
purchase the HP Legacy Rack Adapter, part number WD587AA, to install the sliding rack mount kit.
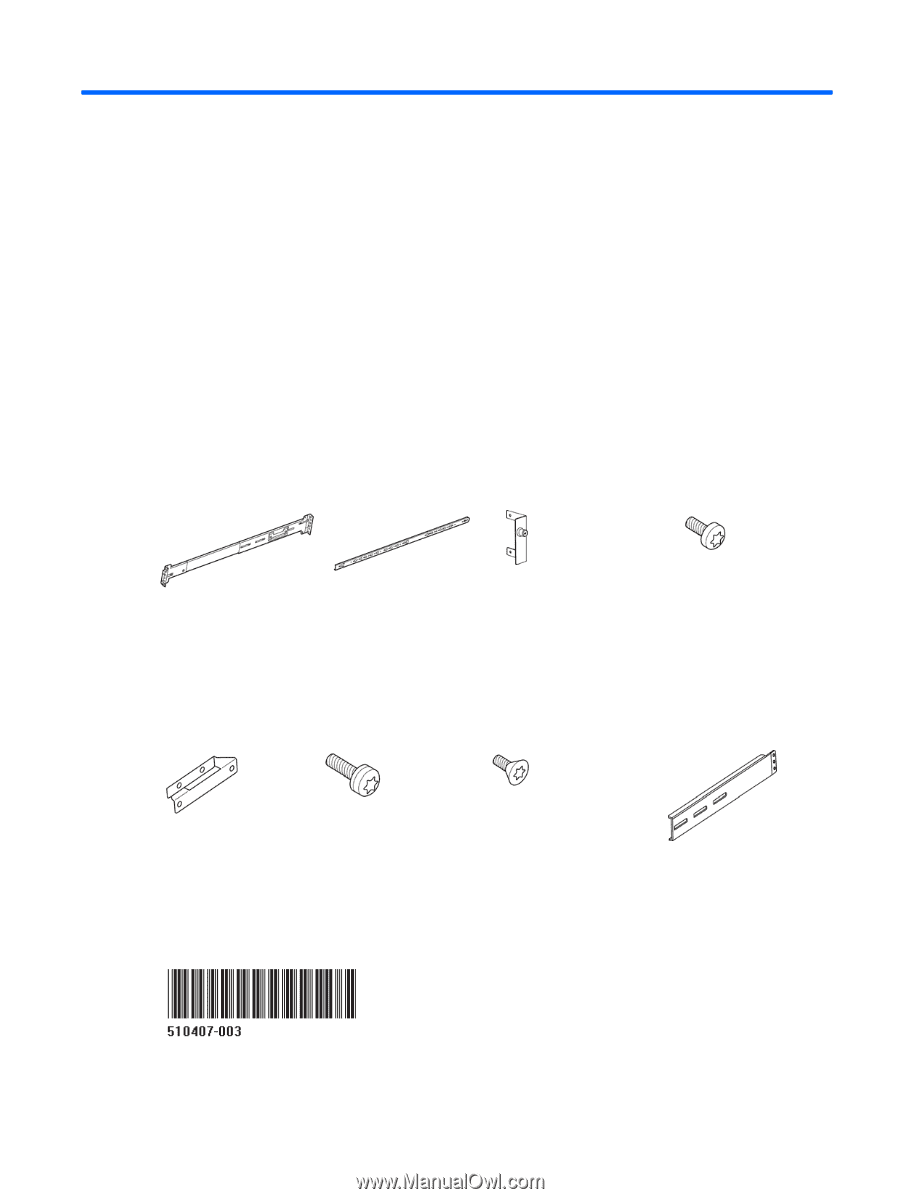
Kit contents
This product includes the parts needed to install the sliding rack kit in HP round hole and square hole
racks, earlier HP racks, and some third-party racks, including some racks with threaded holes. The
following list describes all of the included parts; however, not all parts are used with every application.
A.
Outer slide assembly (2)
B.
Inner slide assembly (2)
C.
Flange (2)
D.
M4 screw (8)
Earlier HP racks and third party racks
Parts for installing the sliding rack mount in HP legacy racks are sold separately in adapter kit part
number WD587AA. This adapter kit includes these parts:
AA.
Front bracket (2)
BB.
M5 screw (4)
CC.
M6 screw (2)
DD.
Adapter bracket (2)
(Required for earlier HP racks
only.)
© 2009 Hewlett-Packard Development Company, L.P. Printed in the U.S.
ENWW
Introduction
1