HP Z600 HP Z600 and Z800 Workstations - Sliding rack-mount kit installation - Page 3
Tools required, Step 1-Preparing the workstation
 |
UPC - 884962074053
View all HP Z600 manuals
Add to My Manuals
Save this manual to your list of manuals |
Page 3 highlights
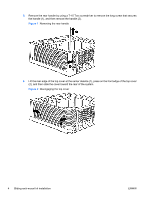
Tools required Round hole and square hole racks ● T-15 Torx screwdriver Threaded hole racks ● T-15 Torx screwdriver ● Flat head screwdriver ● Cross-tip screwdriver For earlier HP racks including E3660B, E3661B, E3662B, J1450B, J1487A, J1487B ● T-15 Torx screwdriver ● T-25 Torx screwdriver ● M10 socket wrench Step 1-Preparing the workstation NOTE: All illustrations are examples only. Workstation models vary. For product-specific information, see the service guide for your HP workstation at http://www.hp.com/support/workstation_manuals before beginning installation. To prepare the workstation for component installation: 1. Power down the workstation and all external devices. 2. Disconnect the workstation power cord. 3. Disconnect all connections to external devices. 4. Remove the side access panel. ENWW Tools required 3
-
 1
1 -
 2
2 -
 3
3 -
 4
4 -
 5
5 -
 6
6 -
 7
7 -
 8
8 -
 9
9 -
10
-
11
-
12
 |
 |
