HP Z600 HP Z600 and Z800 Workstations - Sliding rack-mount kit installation - Page 8
Attach the front slide mounting bracket to the front rack column using, screws provided by the rack
 |
UPC - 884962074053
View all HP Z600 manuals
Add to My Manuals
Save this manual to your list of manuals |
Page 8 highlights
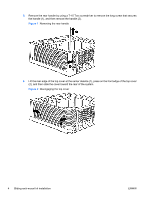
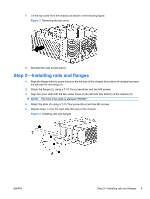
Installing on threaded hole racks NOTE: To determine the appropriate alignment for a workstation that requires a 4U space (HP Z600 Workstations) or a 5U space (HP Z800 Workstations), see the two Figure 12 Mounting reference guides on page 11. 1. Remove the three pins from the rear slide mounting bracket, using a flat blade screwdriver (1). 2. Remove the three pins and two nuts from the front slide mounting bracket (2). 3. Attach the rear slide mounting bracket to the rear rack column, using screws provided by the rack manufacturer (3). 4. Attach the front slide mounting bracket to the front rack column using, screws provided by the rack manufacturer (4). 5. Adjust the rear slide (5) if necessary. Figure 7 Installing on threaded hole racks 6. Continue with Step 4-Mounting into a rack on page 10. 8 Sliding rack-mount kit installation ENWW
-
 1
1 -
2
-
 3
3 -
 4
4 -
 5
5 -
 6
6 -
 7
7 -
 8
8 -
 9
9 -
 10
10 -
 11
11 -
 12
12
 |
 |
