Hisense 55R6090G Roku User Manual - Page 30
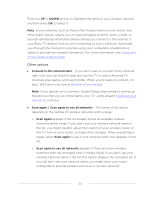
Connect to the Internet, Wireless, If you decide not to connect
 |
View all Hisense 55R6090G manuals
Add to My Manuals
Save this manual to your list of manuals |
Page 30 highlights
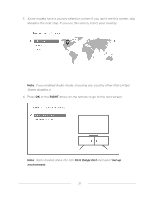
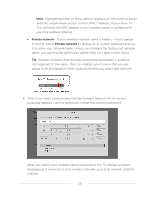
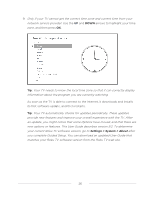
6. Only models that display the Connect to the Internet screen: Make a selection: • Wireless connection - Highlight Set up new wireless connection and press OK. The TV prompts you through wireless setup. Skip ahead to the next step for help with the process. • Wired connection - Highlight Connect to wired network and press OK. The TV immediately attempts to connect to your wired network, your local network, and then the Internet. Go to Step 9 to continue with Guided Setup. • Connect to the Internet later - If you don't want to connect to the Internet right now, you can skip this step and use the TV to watch Antenna TV channels, and to play games and watch DVDs through the devices you connect to it. When you're ready to connect, it's easy. We'll show you how in Benefits of connecting. Note: If you decide not to connect, Guided Setup skips ahead to setting up the devices that you've connected to your TV. Jump ahead to Connect your devices to complete Guided Setup. 7. On models that have wireless only, or models with both wired and wireless and you've selected Wireless: The TV scans for the wireless networks within range and displays them in order, with the strongest signals first. In addition to your own wireless signal, the TV might pick up signals from your neighbors. 23
-
 1
1 -
2
-
3
-
4
-
5
-
6
-
7
-
8
-
9
-
10
-
11
-
12
-
13
-
14
-
15
-
16
-
17
-
18
-
19
-
20
-
21
-
22
-
23
-
24
-
 25
25 -
 26
26 -
 27
27 -
 28
28 -
 29
29 -
 30
30 -
 31
31 -
 32
32 -
 33
33 -
 34
34 -
 35
35 -
36
-
37
-
38
-
39
-
40
-
41
-
42
-
43
-
44
-
45
-
46
-
47
-
48
-
49
-
50
-
51
-
52
-
53
-
54
-
55
-
56
-
57
-
58
-
59
-
60
-
61
-
62
-
63
-
64
-
65
-
66
-
67
-
68
-
69
-
70
-
71
-
72
-
73
-
74
-
75
-
76
-
77
-
78
-
79
-
80
-
81
-
82
-
83
-
84
-
85
-
86
-
87
-
88
-
89
-
90
-
91
-
92
-
93
-
94
-
95
-
96
-
97
-
98
-
99
-
100
-
101
-
102
-
103
-
104
-
105
-
106
-
107
-
108
-
109
-
110
-
111
-
112
-
113
-
114
-
115
-
116
-
117
-
118
-
119
-
120
-
121
-
122
-
123
-
124
-
125
-
126
-
127
-
128
-
129
-
130
-
131
-
132
-
133
-
134
-
135
-
136
-
137
-
138
-
139
-
140
-
141
-
142
-
143
-
144
-
145
-
146
-
147
-
148
-
149
-
150
-
151
-
152
-
153
-
154
-
155
-
156
 |
 |
