Hitachi NR90GC Service Manual - Page 19
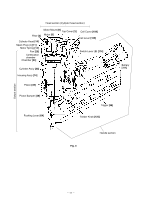
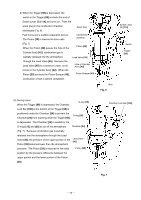
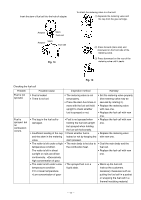
TROUBLESHOOTING GUIDE, 9-1. Problems Caused by Improper Handling, Fig. 13 - nail gun
 |
UPC - 717709008533
View all Hitachi NR90GC manuals
Add to My Manuals
Save this manual to your list of manuals |
Page 19 highlights
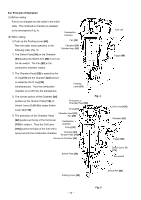
9. TROUBLESHOOTING GUIDE 9-1. Problems Caused by Improper Handling Following table shows the problems that are apt to occur. These problems are not caused by abnormality of the nailer but improper handling. Please instruct the customers to use the nailer properly according to the table. Improper handling Problem Cause Remedy The Trigger [98] is depressed insufficiently. The Pushing Lever [64] is pressed while depressing the Trigger [98] slightly. The Battery [111] is not set or set improperly. The nailer is used while the battery indicator light is red (Fig. 12). The nailer is used with the Filter [4] clogged. The fuel cell is not set or set improperly. The metering valve of the fuel cell is set improperly. The Pushing Lever [64] is pressed insufficiently. The fuel cell is short of fuel. No combustion occurs. No nail is driven. No combustion occurs. The nailer does not start. The output is decreased. The output is decreased. The nailer produces heat. No combustion occurs. No combustion occurs. No combustion occurs. No combustion occurs. The Piston [39] is lowered. The spark switch is not turned on. No electricity is sent. The number of revolutions of the Fan [20] is low. Discharging and cooling are insufficient. Return the Piston [39] to the uppermost position with a flat-blade screwdriver. Keep depressing the Trigger [98] securely about 0.5 second after combustion. Press the Pushing Lever [64] without depressing the Trigger [98], then depress the Trigger [98]. Set the Battery [111] properly to the nailer. Charge the Battery [111]. Clean the Filter [4] (Fig. 13). No fuel is fed. No fuel is fed. No fuel is fed. The switch of the Fan [20] is not turned on. No fuel is fed. Set the fuel cell properly (Fig. 14). Set the metering valve of the fuel cell properly (Fig. 15). Press the Pushing Lever [64] securely. Use a new fuel cell. Battery indicator light Fig. 12 --- 16 --- Top Cover [3] Filter [4] (Clean the Filter [4] with an air gun.) Fig. 13 Filter Cover [5]
-
 1
1 -
2
-
3
-
4
-
5
-
6
-
7
-
8
-
9
-
10
-
11
-
12
-
13
-
 14
14 -
 15
15 -
 16
16 -
 17
17 -
 18
18 -
 19
19 -
 20
20 -
 21
21 -
 22
22 -
 23
23 -
 24
24 -
25
-
26
-
27
-
28
-
29
-
30
-
31
-
32
-
33
-
34
-
35
-
36
-
37
-
38
-
39
-
40
-
41
-
42
-
43
-
44
-
45
-
46
-
47
-
48
-
49
-
50
-
51
-
52
-
53
-
54
-
55
-
56
-
57
-
58
-
59
-
60
-
61
-
62
-
63
-
64
-
65
-
66
-
67
-
68
-
69
-
70
-
71
-
72
-
73
-
74
-
75
-
76
-
77
-
78
 |
 |