Hitachi P50X902 Owners Guide - Page 13
TV Setup Wizard
 |
View all Hitachi P50X902 manuals
Add to My Manuals
Save this manual to your list of manuals |
Page 13 highlights
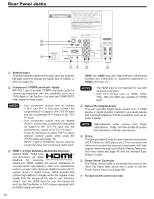
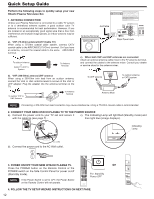
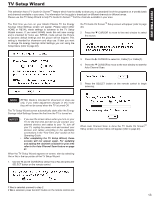
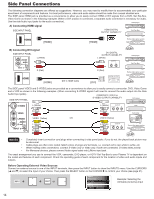
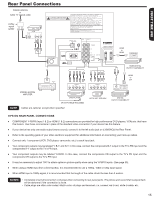
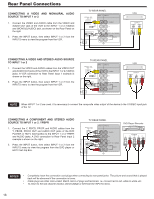
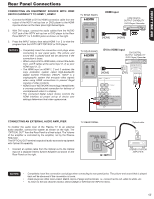
FIRST TIME USE TV Setup Wizard This television has a TV Guide On ScreenTM feature which has the ability to show you a customized list of the programs on a weekly basis and channels available in your area. The information for the guide is broadcast on different channels in different areas. Please use this TV Setup Wizard to help TV Guide On ScreenTM find the channels available in your area. The First time you turn on your Hitachi Plasma TV the Energy Savings Initial Settings screen will appear. Please select either HOME or RETAIL mode settings to advance to the TV Setup Wizard screen. If you select HOME mode this will save energy and is intended for home use. RETAIL mode will set the Picture to Dynamic default Settings and the picture will be brighter. This setting is intended for showroom and shop use. If later you want to change the Energy Savings Initial Settings you can using the Setup Menu (refer to page 48). Energy Savings Initial Settings Please Select HOME or RETAIL HOME RETAIL HOME mode meets Energy Star™ guidelines and is best for home use. RETAIL mode uses more energy and is intended for in-store display. Move SEL Select NOTE RETAIL Mode is intended for showroom or shop use only, if you make adjustment changes in this mode they will not be saved when the TV is turned Off. The TV Setup Wizard screen automatically starts after the Energy Savings Initial Settings Screen the first time the TV is turned on. NOTES • If you see the screen above when you turn on your TV for the first time and did not yet connect your external devices and cables to your TV, turn off your TV, unplug the power cord and connect your devices and cables according to the applicable connections in the "First Time Use" section of this Operating Guide. • After completing the TV Setup Wizard, these screens will not appear again. For updating and adding the channels available in your area refer to the Auto Channel Scan feature on page 41. When the TV Setup Wizard appears on-screen, start by selecting Yes or No in the top portion of the TV Setup Wizard. 1. Use the t and u CURSOR to select Yes or No and press the SELECT button on the remote control. the TV Guide On ScreenTM Setup screen will appear (refer to page 40). 2. Press the q CURSOR to move to the next window to select the source. Source: t Air u Please connect the antenna or cable to the input labeled "Air/Cable". 3. Press the u CURSOR to select Air, Cable(1) or Cable(2). 4. Press the q CURSOR to move to the next window to start the Auto Channel Scan. Auto Channel Scan : Start 5. Press the SELECT button on the remote control to begin scanning. Air Scanning Channel Number : 12 Analog Digital 12-123 Scan time may take 10 to 20 minutes Cancel When Auto Channel Scan is done the TV Guide On ScreenTM Setup screen as shown below will appear (refer to page 40). Do you want the TV to find all of the channels for the TV Guide On ScreenTM? Yes No If Yes is selected proceed to step 2. If No is selected, press the EXIT button on the remote control and 13
-
 1
1 -
2
-
3
-
4
-
5
-
6
-
7
-
 8
8 -
 9
9 -
 10
10 -
 11
11 -
 12
12 -
 13
13 -
 14
14 -
 15
15 -
 16
16 -
 17
17 -
 18
18 -
19
-
20
-
21
-
22
-
23
-
24
-
25
-
26
-
27
-
28
-
29
-
30
-
31
-
32
-
33
-
34
-
35
-
36
-
37
-
38
-
39
-
40
-
41
-
42
-
43
-
44
-
45
-
46
-
47
-
48
-
49
-
50
-
51
-
52
-
53
-
54
-
55
-
56
-
57
-
58
-
59
-
60
-
61
-
62
-
63
-
64
-
65
-
66
-
67
-
68
-
69
-
70
 |
 |
