Hotpoint HDF310PGRWW Installation Instructions - Page 11
Position Dishwasher, Secure To Countertop, Or Cabinet, Connect Water, Supply, Step 12, Or Cabinet
 |
View all Hotpoint HDF310PGRWW manuals
Add to My Manuals
Save this manual to your list of manuals |
Page 11 highlights
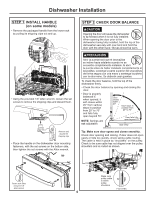
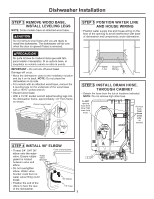
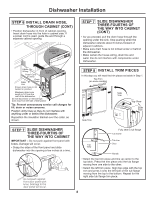
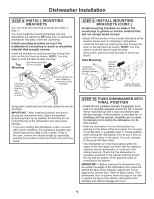
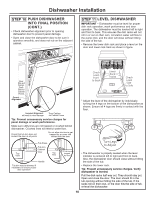
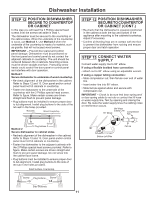
Dishwasher Installation STEP 12 POSITION DISHWASHER, SECURE TO COUNTERTOP OR CABINET In this step you will need the 2 Phillips special head screws from the screws set aside in Step 1. The dishwasher must be secured to the countertop or the cabinet sides. When the underside of the countertop is wood, use Method 1. Use Method 2 when the underside of the countertop is made of a material, such as granite, that will not accept wood screws. IMPORTANT - Prevent door panel and control panel damage. Dishwasher must be positioned so the front panel and control panel do not contact the adjacent cabinets or countertop. The unit should be centered between the 2 cabinets. Mounting screws must be driven straight and flush. Protruding screw heads could scratch the door panel or control panel and interfere with door operation. Method 1 Secure dishwasher to underside of wood countertop. • Re-check alignment of the dishwasher in the cabinet. Refer to Steps 12 and 13. Door panel and/or control panel must not hit cabinets or countertop. • Fasten the dishwasher to the underside of the countertop with the 2 Phillips special head screws. Refer to figure. Make certain screws are driven straight and flush to prevent panel damage. • Plug buttons must be installed to ensure proper door to tub alignment. Install plug buttons to the side of the tub well in the holes provided. BBrraackcektsets WWoooddCCoouunntetretorptop STEP 12 POSITION DISHWASHER, SECURE TO COUNTERTOP OR CABINET (CONT.) • Re-check that the dishwasher is squarely positioned in the cabinet at both the top and bottom of the appliance after mounting to the cabinets/countertop. Adjust if necessary. • Confirm all leveling legs are in contact with the floor to prevent the dishwasher from rocking and ensure proper door and latch operation STEP 13 CONNECT WATER SUPPLY Connect water supply line to 90° elbow. If using a flexible braided hose connection: • Attach nut to 90° elbow using an adjustable wrench. If using a copper tubing connection: • Slide compression nut, then ferrule over end of water line. • Insert water line into 90° elbow. • Slide ferrule against elbow and secure with compression nut. IMPORTANT - Check to be sure that door spring and/ or door spring cable do not rub or contact the fill hose or water supply line. Test by opening and closing the door. Re-route the water supply lines if a rubbing noise or interference occurs. Hot Water Supply Line 90° Elbow Compression Nut Screw Screw Plug buttons Method 2 Secure dishwasher to cabinet sides. • Recheck alignment of the dishwasher in the cabinet. Refer to Steps 12 and 13. Door panel and/or control panel must not hit cabinets or countertop. • Fasten the dishwasher to the adjacent cabinets with the 2 Phillips special head screws provided. Refer to figure. Make certain screws are driven straight and flush to prevent panel damage. Do not screw into the cabinet face frame. • Plug buttons must be installed to ensure proper door to tub alignment. Install plug buttons to the side of the tub in the holes provided. Solid Surface Countertop Screw Plug buttons Screw Side Brackets 11 Bottom Left Side Ferrule
-
 1
1 -
2
-
3
-
4
-
5
-
 6
6 -
 7
7 -
 8
8 -
 9
9 -
 10
10 -
 11
11 -
 12
12 -
 13
13 -
 14
14 -
 15
15 -
 16
16 -
17
-
18
-
19
-
20
-
21
-
22
-
23
-
24
-
25
-
26
-
27
-
28
-
29
-
30
-
31
-
32
 |
 |
