Hotpoint HDF310PGRWW Installation Instructions - Page 15
Literature, Install Toekick, Check The Following, Step 19, Step 20, Step 21
 |
View all Hotpoint HDF310PGRWW manuals
Add to My Manuals
Save this manual to your list of manuals |
Page 15 highlights
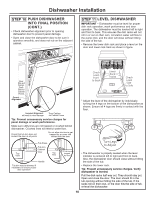
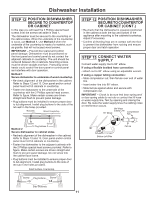
Dishwasher Installation STEP 19 INSTALL TOEKICK NOTE: On some models the toekick may come pre-installed. • Remove the 2 screws installed on the front brace. STEP 20 CHECK THE FOLLOWING • Tub trim does not interfere with the door • Dishwasher is square and level at both the top and bottom of the cabinet opening, with no twisting or distortion of the tub or door • All 4 legs of the dishwasher are firmly in contact with the floor • Drain hose is not pinched between the dishwasher and adjacent cabinets or walls • Tub trim is fully seated on the tub flange Remove these two screws • Place toekick against the legs of the dishwasher. STEP 21 LITERATURE • Be sure to leave complete literature package, these Installation Instructions and product samples and/or coupons with the consumer. Toekick Attachment Screws • Align the toekick with the bottom edge and make sure it is against the floor. • Insert and tighten the 2 toekick attachment screws. The toekick should stay in contact with the floor. NOTE: Be careful not to over-tighten the screws in the toekick. • When reinstalling the toekick, on models with a sound barrier, ensure that the bottom edge is flush with the floor. Any excess material should be tucked up behind the outer door. Tip: Reduce sound from under the dishwasher. Make sure toekick is against floor. 15
-
 1
1 -
2
-
3
-
4
-
5
-
6
-
7
-
8
-
9
-
 10
10 -
 11
11 -
 12
12 -
 13
13 -
 14
14 -
 15
15 -
 16
16 -
 17
17 -
 18
18 -
 19
19 -
 20
20 -
21
-
22
-
23
-
24
-
25
-
26
-
27
-
28
-
29
-
30
-
31
-
32
 |
 |
