Hotpoint HDF310PGRWW Installation Instructions - Page 7
Remove Wood Base
 |
View all Hotpoint HDF310PGRWW manuals
Add to My Manuals
Save this manual to your list of manuals |
Page 7 highlights
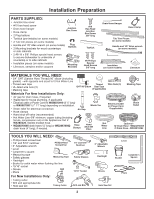
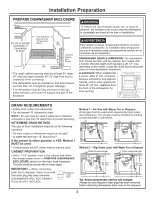
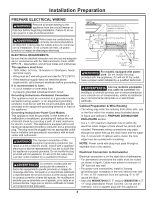
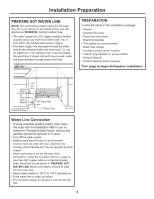
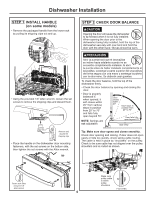
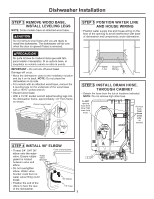
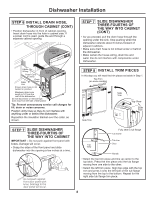
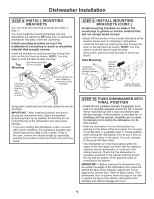
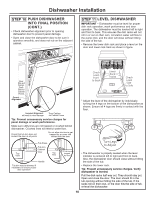
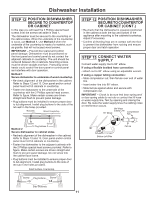
Dishwasher Installation STEP 3 REMOVE WOOD BASE, INSTALL LEVELING LEGS NOTE: Some models have an attached wood base. CAUTION Do not remove wood base until you are ready to install the dishwasher. The dishwasher will tip over when the door is opened if base is removed. PRECAUCIÓN No quite la base de madera hasta que esté listo para instalar el lavaplatos. Si se quita la base, el lavaplatos se volcará cuando se abra la puerta. IMPORTANT - Do not kick off wood base! Damage will occur. • Move the dishwasher close to the installation location and lay it on its back. NOTE: Do not place the dishwasher on its side. • For models with an attached wood base, remove the 4 leveling legs on the underside of the wood base with a 15/16" socket wrench. • Discard wood base. • With a 15/16" socket wrench adjust leveling legs into the dishwasher frame, approximately 1/2" from frame as shown. Discard wood base Approx 1/2" STEP 5 POSITION WATER LINE AND HOUSE WIRING • Position water supply line and house wiring on the floor of the opening to avoid interference with base of dishwasher and components under dishwasher. 4" 4" 6" 6" Water House Line Wiring STEP 6 INSTALL DRAIN HOSE, THROUGH CABINET • Detach the hose from the tub at locations indicated. NOTE: Do not remove high drain loop. Do NOT remove hose from here (high drain loop area). Remove hose, from these areas only, as needed STEP 4 INSTALL 90° ELBOW • Thread 3/4" GHT 90° elbow onto the water valve. Ensure rubber gasket is located between valve and Water Valve Bracket elbow. • Do not overtighten elbow. Water valve bracket could bend or water valve fitting could break. • Position the end of the elbow to face the rear of the dishwasher. Front of dishwasher 90° Elbow Fill Hose 7
-
 1
1 -
 2
2 -
 3
3 -
 4
4 -
 5
5 -
 6
6 -
 7
7 -
 8
8 -
 9
9 -
 10
10 -
 11
11 -
 12
12 -
13
-
14
-
15
-
16
-
17
-
18
-
19
-
20
-
21
-
22
-
23
-
24
-
25
-
26
-
27
-
28
-
29
-
30
-
31
-
32
 |
 |
