Hotpoint HDF310PGRWW Installation Instructions - Page 14
Dishwasher Wet Test, Position Sound, Barrier And Insulation, On Some Models, Step 17, Step 18
 |
View all Hotpoint HDF310PGRWW manuals
Add to My Manuals
Save this manual to your list of manuals |
Page 14 highlights
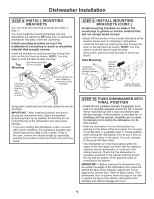
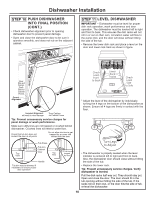
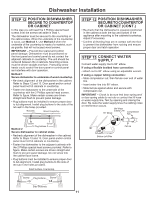
Dishwasher Installation STEP 17 DISHWASHER WET TEST • Turn on power supply or plug power cord into outlet, if equipped. • Select a cycle to run and push the Start/Reset pad. • Ensure the door is latched. Dishwasher should start. • Check to be sure that water enters the dishwasher. If water does not enter the dishwasher, check to be sure that water and power are turned on. • Check for leaks under the dishwasher. If a leak is found, turn off power at the breaker, and then tighten water connections. Restore power after leak is corrected. NOTE: A small amount of water may splash out of the fill funnel, on the right side of the tub, during the first use after installation. Splash-out is most likely to occur if there is air in the water supply line from new construction or if the valve has been closed for an extended time. • Check for leaks around the door. A leak around the door could be caused by door rubbing or hitting against adjacent cabinets. Reposition the dishwasher if necessary. See Step 12. • Press and hold the Start/Reset pad for 3 seconds to cancel the cycle. The unit will begin to drain. Check drain lines. If leaks are found, turn off power at the breaker and correct plumbing as necessary. Restore power after corrections are made. See Steps 6, 7, 8, 9 and 16. • Open dishwasher door and make sure all of the water has drained. If not, check that disposer plug has been removed and/or air gap is not plugged. Also check drain hose to be sure it is not kinked underneath or behind dishwasher. See Step 16. • Press Start/Reset pad once again and run dishwasher through another cycle. Check for leaks and correct if required. • Repeat these steps as necessary. STEP 18 POSITION SOUND BARRIER AND INSULATION (on some models) Skip this step if the sound barrier is assembled to the dishwasher. • Locate the sound insulation package inside the dishwasher. • Locate the control box. Control Box Junction Box Cover • Apply the insulation to the underside of the control box and flush with its front face as shown. Junction Box Cover (on some models) Insulation shown correctly placed along the bottom edge of the control box, the dishwasher bottom and flush with the front face. If the insulation has an extension piece (on some models) follow these additional steps: • Open door all the way, if the door doesn't stay fully open, adjust the insulation panel. • Align the screw holes with the screw holes on the legs of the dishwasher. • Ensure vent opening is not blocked by insulation. Vent opening should be properly aligned with cutout in the insulation 14
-
 1
1 -
2
-
3
-
4
-
5
-
6
-
7
-
8
-
 9
9 -
 10
10 -
 11
11 -
 12
12 -
 13
13 -
 14
14 -
 15
15 -
 16
16 -
 17
17 -
 18
18 -
 19
19 -
20
-
21
-
22
-
23
-
24
-
25
-
26
-
27
-
28
-
29
-
30
-
31
-
32
 |
 |
