Husqvarna AUTOMOWER 550 Owner Manual - Page 23
Control panel, 12 Automower, Connect menu
 |
View all Husqvarna AUTOMOWER 550 manuals
Add to My Manuals
Save this manual to your list of manuals |
Page 23 highlights
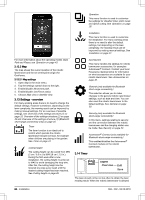
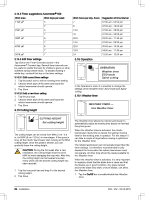
13. When the pairing between the robotic lawnmower and the charging station has been confirmed, select Pair to connect the robotic lawnmower to your Husqvarna account. 14. When the pairing between the robotic lawnmower and the Husqvarna account has been confirmed, select Enable to activate the theft protection in GeoFence. If GeoFence fails, select Skip and try later. See GeoFence on page 31. 15. Name your robotic lawnmower, and select Done. 3.10.2 Pairing with the Automower® Connect app If the first start-up process already has been carried through, the next operator follows the normal pairing process. The normal pairing process between the Automower® Connect app and the robotic lawnmower involves the following steps: 1. Download the Automower® Connect app and create an account. See Automower® Connect on page 21. 2. Log in to your Automower® Connect account in the app. 3. Enable Bluetooth® mode on your mobile device. 4. Set the Main switch to position 1 on the robotic lawnmower. Note: The robotic lawnmower is available for pairing for 3 minutes. If pairing has not been successful within this time period, turn off the robotic lawnmower (Main switch, position 0). Wait until the LED indicator lamp goes out, and then set the Main switch to position 1 again. 5. Select My mowers in the Automower® Connect app, and then select the plus sign (+). 6. Select model. The Automower® Connect app is now searching for available robotic lawnmowers within short-range. 7. Select robotic lawnmower. 8. Enter the PIN code of the robotic lawnmower. 9. Press Pair to connect the robotic lawnmower to your Husqvarna account. 10. Name your robotic lawnmower, and select Done. 3.10.3 Guide calibration When first start-up sequence and pairing have been carried out, press the START button on top of the robotic lawnmower. The robotic lawnmower then backs out of the charging station, and starts to calibrate the guide wire signal to create as wide guide corridor as possible. This prevents tracks from forming along the guide wire. When this is completed, mowing can begin. 3.11 Control panel Automower® 520 and Automower® 550 do not have a keypad or a display. The commands and settings for the robotic lawnmower are therefore done in the Automower® Connect app. The only command that is possible to do on the robotic lawnmower is pressing the START and STOP button. 3.11.1 START and STOP button • The START button on top of the robotic lawnmower is used to activate the robotic lawnmower. When pressing the START button, the robotic lawnmower starts to operate, and the operating mode in Automower® Connect is changed to Mowing in the Dashboard view. • The STOP button is used to immediately stop the robotic lawnmower from operating. When pressing the STOP button, the operating mode in Automower® Connect is changed to Stopped in the Dashboard view. 3.11.2 The LED indicator lamp on the robotic lawnmower The LED indicator lamp on the robotic lawnmower shows the current status: • Solid green light: The robotic lawnmower is either mowing the lawn or leaving the charging station. • Solid blue light: The robotic lawnmower is either paused or parked, or is searching for the charging station. • Solid yellow light: The STOP button on top of the robotic lawnmower has been pressed. • Solid red light: The robotic lawnmower has stopped due to an error. Note: Clear the error by pressing the STOP button, and then activate the robotic lawnmower by pressing the START button. • Flashing yellow light: The PIN code needs to be confirmed in the Automower® Connect app before the robotic lawnmower can be activated. 3.12 Automower® Connect menu The main menu in Automower® Connect offers 4 options: • Dashboard • Map • Settings • Messages (only available for Bluetooth short-range connectivity) 3.12.1 Dashboard The dashboard shows the current status of the robotic lawnmower both visually and in text. It is very easy to control the robotic lawnmower by tapping the controls, for example Park. In the lower part of the dashboard there are shortcuts to the Timer settings and the Map. The dashboard also shows symbols according to below: 1. The battery status shows the remaining battery charge. A flash is shown over the battery symbol when the robotic lawnmower charges its battery. A plug is shown over the battery symbol when the robotic lawnmower is standing in the charging station without charging. 2. Cutting height. 362 - 002 - 06.02.2018 Installation - 23
-
 1
1 -
2
-
3
-
4
-
5
-
6
-
7
-
8
-
9
-
10
-
11
-
12
-
13
-
14
-
15
-
16
-
17
-
 18
18 -
 19
19 -
 20
20 -
 21
21 -
 22
22 -
 23
23 -
 24
24 -
 25
25 -
 26
26 -
 27
27 -
 28
28 -
29
-
30
-
31
-
32
-
33
-
34
-
35
-
36
-
37
-
38
-
39
-
40
-
41
-
42
-
43
-
44
-
45
-
46
-
47
-
48
-
49
-
50
-
51
-
52
-
53
-
54
-
55
-
56
-
57
-
58
-
59
-
60
-
61
-
62
-
63
-
64
 |
 |