Husqvarna AUTOMOWER 550 Owner Manual - Page 52
Finding breaks in the loop wire
 |
View all Husqvarna AUTOMOWER 550 manuals
Add to My Manuals
Save this manual to your list of manuals |
Page 52 highlights
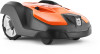
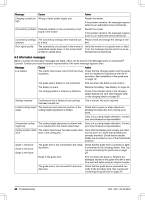
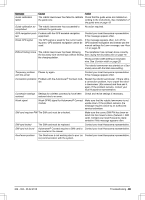
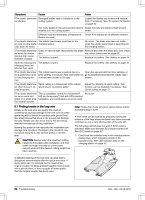
Symptoms Cause Action The robotic lawnmow- Damaged blades lead to imbalance in the er vibrates. cutting system. Inspect the blades and screws and replace them if necessary. See To replace the blades on page 44. Too many blades in the same position lead to Check that only one blade is fitted at each imbalance in the cutting system. screw. Different versions (thickness) of Husqvarna Check if the blades are of different versions. blades are used. The robotic lawnmow- The robotic lawnmower searches for the er runs, but the blade charging station. disc does not rotate. No action. The blade disc does not rotate when the robotic lawnmower is searching for the charging station. The robotic lawnmow- Grass or other foreign object blocks the blade Remove and clean the blade disc. See Clean er mows for shorter disc. the robotic lawnmower on page 43. periods than usual between charges. The battery is spent. Replace the battery. See Battery on page 44. Both the mowing and The battery is spent. charging times are shorter than usual. Replace the battery. See Battery on page 44. The robotic lawnmow- The robotic lawnmower is parked due to a Open the app and edit the timer settings, or er is parked for hours timer setting, or because Park until further no- go to Dashboard and start the robotic lawn- in the charging sta- tice has been chosen in the app. mower. tion. The robotic lawnmow- Spiral cutting is a natural part of the robotic er often moves in cir- lawnmower's movement patter. cles or spirals. Adjust the intensity of spiral cutting. This function can be disabled if necessary. See Spiral cutting on page 27. The robotic lawnmow- This is completely normal for Automower® er turns round and 520 and Automower® 550 with GPS assisted stays on a small area navigation, and contributes to an even result. for several minutes. No action. 6.7 Finding breaks in the loop wire Breaks in the loop wire are usually the result of unintentional physical damage to the wire such as when gardening with a shovel. In countries with ground frost, also sharp stones that move in the ground can damage the wire. Breaks can also occur due to the wire being stretched excessively during installation. Mowing the grass too low right after the installation can damage wire insulation. Damage to the insulation may not cause disruptions until several weeks or months later. CAUTION: Always select the maximum cutting height the first weeks after installation and then lower the height one step at a time every second week until the desired cutting height has been reached. Note: Please first check all known splices before further troubleshooting is done. A wire break can be located by gradually halving the distance of the loop where the break may have occurred until there is only a very short section of the wire left. The following method does not work if ECO mode is activated. Make sure first that ECO mode is turned off. See ECO mode on page 27. 1. Check that the indicator lamp in the charging station flashes blue, which indicates a break in the boundary loop. See LED indicator lamp on the charging station on page 50. A defective splicing of the loop wire can also lead to disruptions several weeks after the splice was done. A faulty splice can, for example, be the result of the original coupler not being pressed together hard enough with a pair of pliers, or that a coupler of lower quality than the original coupler has been used. 52 - Troubleshooting 362 - 002 - 06.02.2018
-
 1
1 -
2
-
3
-
4
-
5
-
6
-
7
-
8
-
9
-
10
-
11
-
12
-
13
-
14
-
15
-
16
-
17
-
18
-
19
-
20
-
21
-
22
-
23
-
24
-
25
-
26
-
27
-
28
-
29
-
30
-
31
-
32
-
33
-
34
-
35
-
36
-
37
-
38
-
39
-
40
-
41
-
42
-
43
-
44
-
45
-
46
-
 47
47 -
 48
48 -
 49
49 -
 50
50 -
 51
51 -
 52
52 -
 53
53 -
 54
54 -
 55
55 -
 56
56 -
 57
57 -
58
-
59
-
60
-
61
-
62
-
63
-
64
 |
 |