Husqvarna Z246 Owners Manual - Page 26
Battery, Important Information, Warning, Caution
 |
View all Husqvarna Z246 manuals
Add to My Manuals
Save this manual to your list of manuals |
Page 26 highlights
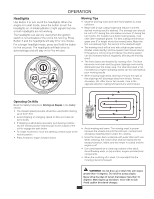
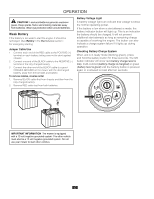
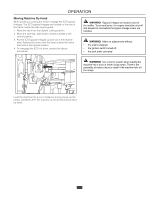
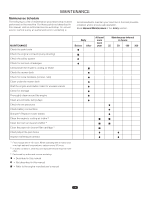
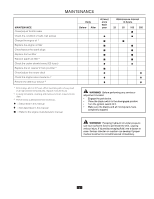
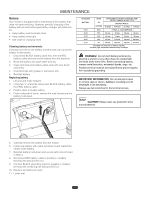
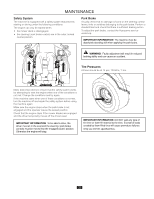
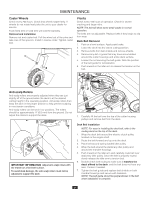
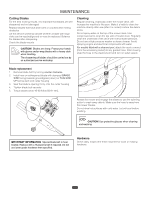
MAINTENANCE Battery Your mower is equipped with a maintenance free battery that does not need servicing. However, periodic charging of the battery with an automotive type battery charger will extend its life. • Keep battery and terminals clean. • Keep battery bolts tight. • See chart for charging times. Cleaning battery and terminals Corrosion and dirt on the battery and terminals can cause the battery to lose power. 1. Disconnect BLACK battery cable first, then the RED battery cable and remove the battery from the machine. 2. Rinse the battery with plain water and dry. 3. Clean terminals and battery cable ends with wire brush until shiny. 4. Coat terminals with grease or petroleum jelly. 5. Reinstall battery. Replacing battery 1. Lift seat and rotate forward. 2. Using two ½" wrenches disconnect BLACK battery cable then RED battery cable. 3. Position deck to lowest setting. 4. Front underside of frame, remove the nuts that secure the battery hold-down. STANDARD BATTERY STATE OF CHARGE APPROXIMATE BATTERY CHARGING TIME* TO FULL CHARGE AT 80OF / 27OC Maximum Rate at: 50 Amps 30 Amps 20 Amps 10 Amps 12.6V 100% - FULL CHARGE - 12.4V 75% 20 min. 35 min. 48 min. 90 min. 12.2V 50% 45 min. 75 min. 95 min. 180 min. 12.0V 25% 65 min. 115 min. 145 min. 280 min. 11.8V 0% 85 min. 150 min. 195 min. 370 min. *Charging time depends on battery capacity, condition, age, temperature and efficiency of charger WARNING! Do not short battery terminals by allowing a wrench or any other object to contact both terminals at the same time. Before connecting battery, remove metal bracelets, wristwatch bands, rings, etc. Positive terminal must be connected first to prevent sparks from accidental grounding. IMPORTANT INFORMATION Do not attempt to open or remove caps or covers. Adding or checking level of electrolyte is not necessary. Always use two wrenches for the terminal screws. CAUTION! Always wear eye protection when around batteries. 5. Carefully remove the battery from the mower. 6. Install new battery with cable terminals routed toward the center of the battery. 7. Reinstall battery hold-down and secure with nuts removed in Step 4. 8. Reconnect RED battery cable to positive (+) battery terminal with bolt and hex nut. 9. Connect BLACK grounding cable to negative (-) battery terminal with remaining hex bolt and hex nut 10. Replace terminal boot cover. 11. Lower seat 26
-
 1
1 -
2
-
3
-
4
-
5
-
6
-
7
-
8
-
9
-
10
-
11
-
12
-
13
-
14
-
15
-
16
-
17
-
18
-
19
-
20
-
 21
21 -
 22
22 -
 23
23 -
 24
24 -
 25
25 -
 26
26 -
 27
27 -
 28
28 -
 29
29 -
 30
30 -
 31
31 -
32
-
33
-
34
-
35
-
36
-
37
-
38
-
39
-
40
-
41
-
42
-
43
-
44
 |
 |
