IBM 494419X User Guide - Page 15
Auto Setup for Windows 2003, Windows Me or Windows XP, Windows
 |
UPC - 000435852625
View all IBM 494419X manuals
Add to My Manuals
Save this manual to your list of manuals |
Page 15 highlights
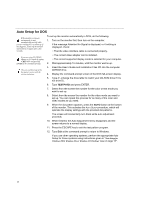
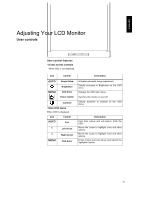
ENGLISH Auto Setup for Windows 2003, Windows Me,Windows XP or Windows Vista To set up the monitor automatically in Windows 2003, Windows Me, Windows XP or Windows Vista do the following: 1. Turn on the monitor first; then the computer. If the monitor is in power saving mode, it may automatically turn off while you are waiting for it to warm up. If the message Attention No Signal is displayed, or if nothing is displayed, check: • That the video interface cable is connected properly. • The correct video adapter card is installed. • The correct supported display mode is selected for your computer. The size and diversity of the dot pattern varies with the screen 2. resolution. 3. • If the message "Input not supported" is displayed, configure your computer for 1280 ×1024@60HZ Wait approximately 15 minutes, until the monitor warms up. Drag the icon bar and tool bar, if they are displayed, to the bottom of the screen. 4. Insert the User's Guide and Installation CD into the computer CDROM drive. 5. Check the operating system installed on your computer and follow the instructions from the table below. Operating System Operating system installation steps Step1 Step2 Step3 Windows 2003, Windows XP, Window 2000 server Select START Select RUN Type D:\TESTPAT (change the drive letter to match your CD-ROM drive if it is not drive D) and press ENTER 6. When the test pattern appears, press the AUTO button at the bottom of the monitor. This activates the AUTO SETUP procedure, which will optimize the display settings with the provided test patterns. The screen will momentarily turn black while auto adjustment proceeds. 7. When finished, the Auto Adjustment menu disappears and the screen returns to a normal display. 8. Press the ESC key to return to Windows. You have completed the monitor setup for Windows. If you are using the DOS operating system, go to Auto Setup for DOS on page 13. 14
-
 1
1 -
2
-
3
-
4
-
5
-
6
-
7
-
8
-
9
-
 10
10 -
 11
11 -
 12
12 -
 13
13 -
 14
14 -
 15
15 -
 16
16 -
 17
17 -
 18
18 -
 19
19 -
 20
20 -
21
-
22
-
23
-
24
-
25
-
26
-
27
-
28
-
29
-
30
 |
 |
