IBM 8840 Installation Guide - Page 34
xSeries, Installation, Guide
 |
UPC - 000435863799
View all IBM 8840 manuals
Add to My Manuals
Save this manual to your list of manuals |
Page 34 highlights
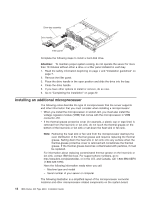
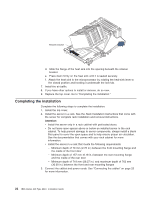
Attention: v A startup (boot) processor must always be installed in socket J22 on the system board. v To ensure proper server operation when you install an additional microprocessor, use microprocessors that have the same cache size and type, and the same clock speed. Microprocessor internal and external clock frequencies must be identical. Complete the following steps to install an additional microprocessor: 1. Read the safety information beginning on page v and "Installation guidelines" on page 7. 2. Turn off the server and peripheral devices, and disconnect the power cords and all external cables, if necessary; then, remove the top cover. 3. Remove the air baffle and the microprocessor baffle. 4. Install a VRM in the VRM connector (J72). 5. Install the microprocessor: a. Touch the static-protective package containing the microprocessor to any unpainted metal surface on the server. Then, remove the microprocessor from the package. b. Remove the protective cover, tape, or label from the surface of the microprocessor socket, if present. Attention: You must ensure that the locking lever on the microprocessor socket is in the fully open position before you insert the microprocessor in the socket. Failure to do so might result in permanent damage to the microprocessor, microprocessor socket, and system board. c. Rotate the locking lever on the microprocessor socket from its closed and locked position until it stops or clicks in the fully open position (approximately 135° angle). Attention: v Do not use excessive force when pressing the microprocessor into the socket. v Make sure that the microprocessor is oriented and aligned with pin number 1 in the socket before you try to close the lever. d. Center the microprocessor over the microprocessor socket. Align the triangle on the corner of the microprocessor with the triangle on the corner of the socket and carefully press the microprocessor into the socket. 20 IBM xSeries 346 Type 8840: Installation Guide
-
 1
1 -
2
-
3
-
4
-
5
-
6
-
7
-
8
-
9
-
10
-
11
-
12
-
13
-
14
-
15
-
16
-
17
-
18
-
19
-
20
-
21
-
22
-
23
-
24
-
25
-
26
-
27
-
28
-
 29
29 -
 30
30 -
 31
31 -
 32
32 -
 33
33 -
 34
34 -
 35
35 -
 36
36 -
 37
37 -
 38
38 -
 39
39 -
40
-
41
-
42
-
43
-
44
-
45
-
46
-
47
-
48
-
49
-
50
-
51
-
52
-
53
-
54
-
55
-
56
-
57
-
58
-
59
-
60
-
61
-
62
-
63
-
64
-
65
-
66
-
67
-
68
-
69
-
70
-
71
-
72
-
73
-
74
-
75
-
76
-
77
-
78
-
79
-
80
-
81
-
82
-
83
-
84
-
85
-
86
-
87
-
88
-
89
-
90
-
91
-
92
-
93
-
94
-
95
-
96
-
97
-
98
-
99
-
100
-
101
-
102
-
103
-
104
-
105
-
106
-
107
-
108
 |
 |