IBM 8862 User Manual - Page 36
Installing, hot-swap, power, supply
 |
UPC - 000435172679
View all IBM 8862 manuals
Add to My Manuals
Save this manual to your list of manuals |
Page 36 highlights
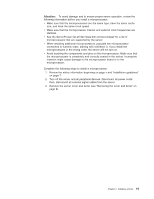
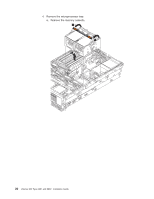
Note: When the memory cassette is fully seated and the handle is all the way down, two black pins protrude through the blue insert on the handle. Indicator pins PS2 PS1 13. If you have other options to install or remove, do so now; otherwise, go to "Completing the installation" on page 26. Installing a hot-swap power supply The following notes describe information that you must consider when installing a hot-swap power supply in the server: v The server comes with a minimum of one power supply and supports up to two power supplies. 24 xSeries 365 Type 8861 and 8862: Installation Guide
-
 1
1 -
2
-
3
-
4
-
5
-
6
-
7
-
8
-
9
-
10
-
11
-
12
-
13
-
14
-
15
-
16
-
17
-
18
-
19
-
20
-
21
-
22
-
23
-
24
-
25
-
26
-
27
-
28
-
29
-
30
-
 31
31 -
 32
32 -
 33
33 -
 34
34 -
 35
35 -
 36
36 -
 37
37 -
 38
38 -
 39
39 -
 40
40 -
 41
41 -
42
-
43
-
44
-
45
-
46
-
47
-
48
-
49
-
50
-
51
-
52
-
53
-
54
-
55
-
56
-
57
-
58
-
59
-
60
-
61
-
62
-
63
-
64
-
65
-
66
-
67
-
68
-
69
-
70
-
71
-
72
-
73
-
74
-
75
-
76
-
77
-
78
-
79
-
80
-
81
-
82
-
83
-
84
-
85
-
86
-
87
-
88
-
89
-
90
-
91
-
92
-
93
-
94
-
95
-
96
-
97
-
98
-
99
-
100
-
101
-
102
-
103
-
104
 |
 |

Note:
When
the
memory
cassette
is
fully
seated
and
the
handle
is
all
the
way
down,
two
black
pins
protrude
through
the
blue
insert
on
the
handle.
PS2
PS1
Indicator pins
13.
If
you
have
other
options
to
install
or
remove,
do
so
now;
otherwise,
go
to
“Completing
the
installation”
on
page
26.
Installing
a
hot-swap
power
supply
The
following
notes
describe
information
that
you
must
consider
when
installing
a
hot-swap
power
supply
in
the
server:
v
The
server
comes
with
a
minimum
of
one
power
supply
and
supports
up
to
two
power
supplies.
24
xSeries
365
Type
8861
and
8862:
Installation
Guide