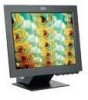
IBM 9512AB1 User Guide
IBM 9512AB1 - T 541 - 15" LCD Monitor Manual
 |
UPC - 087944770640
View all IBM 9512AB1 manuals
Add to My Manuals
Save this manual to your list of manuals |
IBM 9512AB1 manual content summary:
- IBM 9512AB1 | User Guide - Page 1
ENGLISH T541 Flat Panel Monitor User Guide - IBM 9512AB1 | User Guide - Page 2
to the Monitor Safety and Warranty manual that comes with this monitor. This publication services that are not announced in your country. Requests for copies of this publication and for technical information about IBM products should be made to your IBM Authorized Dealer or IBM Retailer. No part - IBM 9512AB1 | User Guide - Page 3
T541 Flat Panel Monitor User Guide Contents Setting up the monitor 2 System Hardware Requirements 2 Handling Instructions 2 Monitor Installation ...3 Connecting your Monitor 3 Switching on your Monitor 4 Monitor Driver Installation 5 Driver installation for Windows 95 or Windows 98 5 Driver - IBM 9512AB1 | User Guide - Page 4
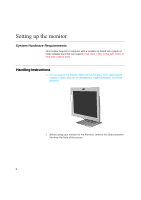
Setting up the monitor System Hardware Requirements This monitor requires a computer with a suitable on-board sub-system or Video Adapter card that can support XGA 1024 x 768, SVGA 800 x 600, or VGA 640 x 480 at 60Hz. Handling Instructions 1. Do not support the monitor within the screen area. The - IBM 9512AB1 | User Guide - Page 5
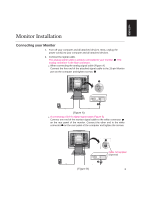
. The analog connector is the blue connector. When connecting the analog signal cable (Figure A) Connect the free end of the attached signal cable to the 15-pin Monitor port on the computer and tighten screws. (Figure A) If connecting a DVI-D digital signal cable (Figure B) Connect one end of the - IBM 9512AB1 | User Guide - Page 6
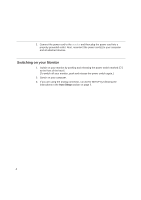
and releasing the power switch marked [ ] at the front of the bezel. [To switch off your monitor, push and release the power switch again.] 2. Switch on your computer. 3. If you are using the analog connector, run AUTO SETUP by following the instructions in the Auto Setup section on page 8. 4 - IBM 9512AB1 | User Guide - Page 7
so that I can choose a specific driver" and then select the NEXT button. 7. Insert the Setup CD into the CD driver: and click the HAVE DISK button. 8. Click OK. 9. Ensure that the CD drive letter is selected, and then select the 'Drivers' folder. 10.Choose IBM T541 monitor and Click OK. The files - IBM 9512AB1 | User Guide - Page 8
so that I can choose a specific driver" and then Click the NEXT button. 12.Insert the Setup CD into the CD drive : and click the HAVE DISK button. 13.Click OK. 14.Ensure that the CD drive letter is selected, and then select the 'Drivers' folder. 15.Choose IBM T541 monitor and Click OK. The files - IBM 9512AB1 | User Guide - Page 9
from a list or Specific location(Advanced)" and then Click the NEXT button. 12.Insert the Setup CD into the CD drive : and click the HAVE DISK button. 13.Click OK. 14.Ensure that the CD drive letter is selected, and then select the 'Drivers' folder. 15.Choose IBM T541 monitor and Click OK. The - IBM 9512AB1 | User Guide - Page 10
does not replace or modify the display drivers. i The Auto Setup instructions require the monitor to be warmed up for 15 minutes. This is not required for normal operation. i If your computer does not run with the setup CD shipped with the monitor, refer to Manual Setup on page 11. i The AUTO SETUP - IBM 9512AB1 | User Guide - Page 11
bottom of the screen. 4. Insert the CD labelled 'IBM Monitor CD' into the CD drive. i The size and diversity of the dot pattern varies with the screen resolution. 5. Check the operating system installed on your computer and follow the instructions from the table below. Operating System Windows - IBM 9512AB1 | User Guide - Page 12
monitor and switch it on again after a few seconds. 1. Turn on the monitor first; then the computer. 2. Wait approximately 15 minutes, until the monitor warms up. 3. Insert the CD labelled 'IBM Monitor CD' into is minimised, or adjust it manually by following refer to Manual Setup on page 11. as - IBM 9512AB1 | User Guide - Page 13
image is still distorted after you perform Image Setup or the setup CD does not run on your system, perform MANUAL SETUP. 1. Have your monitor turned on for about 15 minutes, until the monitor warms up. 2. Display the image you most frequently use on the screen. 3. Press the OSD Enter button at the - IBM 9512AB1 | User Guide - Page 14
to use it. - Tilt the monitor to a comfortable viewing angle. Working Practices i This section gives advice on how you can work comfortably and reduce fatigue. Rest Take regular breaks. Vary your posture, stand up and stretch occasionally as prolonged use of computer workstations can be tiring - IBM 9512AB1 | User Guide - Page 15
any maintenance on the monitor. Clean your monitor as follows: • Gently wipe the covers and the screen with a soft cloth. • Remove finger marks and grease with a damp cloth and mild detergent. • Never use flammable cleaning materials to clean your IBM monitor or any other electrical apparatus - IBM 9512AB1 | User Guide - Page 16
Adjusting Your LCD Monitor User controls USER CONTROL FEATURES Icon Monitor controls Switches the monitors on and off. Display main OSD menu and selects highlighted menu item. i The image is already optimized for many display modes, however the user controls - IBM 9512AB1 | User Guide - Page 17
to achieve more accurate adjustments for parameters, allow the LCD monitor to warm up (be On) for at least 15 minutes before making any screen adjustment. The settings adjustable This can be done automatically or manually. It is not applicable to digital input. AUTO If AUTO is selected the - IBM 9512AB1 | User Guide - Page 18
adjustment screen. IMAGE SET-UP CONT Sub-menu(s) Controls and Adjustments MANUAL • Fine • Coarse To adjust the focus of the display. This item allows you to remove any horizontal noise and clear or sharpen the image of - IBM 9512AB1 | User Guide - Page 19
computer. • FRANCAIS • DEUTSCH • ITALIANO • ESPANOL To select OSD display duration time. (5 - 60 seconds) Information Display model name, serial number, year of manufacture and microcode level. Display all preset modes stored in the monitor. Display all user modes stored in the monitor - IBM 9512AB1 | User Guide - Page 20
monitor temporarily until you have reconfigured the computer, preferably to 1024 x 768 at 60Hz. The display mode the monitor uses is controlled by the computer. Therefore, you should refer to your computer VESA "Display Monitor Timing Specification". Version 1.0, Revision 0.8, Dated 09/17/98. 18 - IBM 9512AB1 | User Guide - Page 21
are several states as described in the table below. As an ENERGY STAR 2000® Partner, IBM has determined that this product meets the ENERGY STAR 2000® guidelines for energy efficiency. IBM recommends that you switch off your monitor at the end of each working day, or whenever you expect to leave it - IBM 9512AB1 | User Guide - Page 22
Troubleshooting If you have a problem setting up or using your monitor, you may be able to solve it yourself. Before calling your retailer or IBM, try the suggested actions that are appropriate to your problem. Problem page 19. software on your computer. • Press the to switch between analog and - IBM 9512AB1 | User Guide - Page 23
ENGLISH Problem Possible Cause Suggested Action Reference Screen is blank Display mode of and power the computer is indicator is outside the flashing green range of the every 0.5 monitor second • Reconfigure key on the computer to use a supported display mode. Further Information - IBM 9512AB1 | User Guide - Page 24
Specifications i Power consumption figures are for the monitor and the power supply combined. This color monitor (Type-model 9512-Hxx) uses a 15-inch TFT LCD DDC: Supported Display (Analog) Analog - Separate, Composite, SOG Digital-DVI 1.0 2B IBM, VESA, MAC See Factory Set Display Modes on page 18. - IBM 9512AB1 | User Guide - Page 25
ENGLISH Display Mode Ranges Addressabillty 640 x 480 640 x 480 640 x 480 640 x 350 720 x 400 800 x 600 800 x 600 800 x 600 800 x 600 832 x 624 1024 x 768 1024 x 768 1024 x 768 Refresh Rate / Range ( + / - 3%) 58.2 ~ 61.8 Hz 64.0 ~ 68.0 Hz 72.8 ~ 77.3 Hz 67.9 ~ 72.1 Hz 67.9 ~ 72.1 Hz 54.3 ~ 57.7
-
 1
1 -
 2
2 -
 3
3 -
 4
4 -
 5
5 -
 6
6 -
 7
7 -
8
-
9
-
10
-
11
-
12
-
13
-
14
-
15
-
16
-
17
-
18
-
19
-
20
-
21
-
22
-
23
-
24
-
25
 |
 |

ENGLISH
T541
Flat Panel Monitor
User Guide