IBM x3800 User Guide
IBM x3800 - System - 8865 Manual
 |
UPC - 000435948984
View all IBM x3800 manuals
Add to My Manuals
Save this manual to your list of manuals |
IBM x3800 manual content summary:
- IBM x3800 | User Guide - Page 1
IBM System x3800 Type 8865 User's Guide - IBM x3800 | User Guide - Page 2
- IBM x3800 | User Guide - Page 3
IBM System x3800 Type 8865 User's Guide - IBM x3800 | User Guide - Page 4
Note: Before using this information and the product it supports, read the general information in "Notices," on page 83. Third Edition (April 2006) © Copyright International Business Machines Corporation 2006. All rights reserved. US Government Users - IBM x3800 | User Guide - Page 5
documentation 1 Notices and statements in this document 2 Features and specifications 3 What your server offers 4 Reliability, availability, and serviceability 6 IBM Director 6 The UpdateXpress program 7 Server controls, connectors, LEDs, and power 8 Front view 8 Rear view 10 Server power - IBM x3800 | User Guide - Page 6
Utility menu choices 77 Disk Utilities 77 Using ServeRAID Manager 77 Configuring the controller 78 Viewing the configuration 79 Chapter 4. Updating IBM Director 81 Appendix. Notices 83 Edition notice 83 Trademarks 84 Important notes 84 Product recycling and disposal 85 Index 87 iv - IBM x3800 | User Guide - Page 7
, leggere le Informazioni sulla Sicurezza. Les sikkerhetsinformasjonen (Safety Information) før du installerer dette produktet. Antes de instalar este produto, leia as Informações sobre Segurança. © Copyright IBM Corp. 2006 v - IBM x3800 | User Guide - Page 8
book under statement 1. Be sure to read all caution and danger statements in this documentation before performing the instructions. Read any additional safety information that comes with the server or optional device before you install the device. vi IBM System x3800 Type 8865: User's Guide - IBM x3800 | User Guide - Page 9
damage. v Disconnect the attached power cords, telecommunications systems, networks, and modems before you open the device covers, unless instructed otherwise in the installation and configuration procedures. v Connect and disconnect cables as described in the following table when installing, moving - IBM x3800 | User Guide - Page 10
of the laser product could result in exposure to hazardous laser radiation. There are no serviceable parts inside the device. v Use of controls or adjustments or performance of procedures other optical instruments, and avoid direct exposure to the beam. viii IBM System x3800 Type 8865: User's Guide - IBM x3800 | User Guide - Page 11
Statement 4: ≥ 18 kg (39.7 lb) ≥ 32 kg (70.5 lb) CAUTION: Use safe practices when lifting. Statement 5: ≥ 55 kg (121.2 lb) CAUTION: The power control button on the device and the power switch on the power supply do not turn off the electrical current supplied to the device. The device also - IBM x3800 | User Guide - Page 12
, and energy levels are present inside any component that has this label attached. There are no serviceable parts inside these components. If you suspect a problem with one of these parts, contact a service technician. Statement 10: CAUTION: Do not place any object on top of rack-mounted devices - IBM x3800 | User Guide - Page 13
up the server and basic instructions for installing some options. v Warranty and Support Information This document is in Portable Document Format (PDF) on the IBM Documentation CD. It contains information about the terms of the warranty and about getting service and assistance. v Safety Information - IBM x3800 | User Guide - Page 14
v Problem Determination and Service Guide This document is in PDF on the IBM Documentation CD. It contains information to help you solve problems yourself, and it contains information for service technicians. Depending on the server model, additional documentation might be included on the IBM - IBM x3800 | User Guide - Page 15
IBM EXA-32 Chipset with integrated - Maximum: 240 V ac memory and I/O controller v Approximate input kilovolt-amperes (kVA): v Service processor support 50.0° to levels indicate an upper limit, below which a large number of computers will operate. 95.0°F); altitude: 0 to 2133 m (6998.0 ft) - - IBM x3800 | User Guide - Page 16
peripheral component interconnect (PCI-X) adapters. With operating-system support, you can replace a failing hot-plug PCI-X controller provides basic service-processor environmental monitoring LEDs to help you diagnose the problem and records the errors in the IBM System x3800 Type 8865: User's Guide - IBM x3800 | User Guide - Page 17
LEDs to help you diagnose problems. For more information, see the section about light path diagnostics in the Installation Guide. v Redundant connection The addition capabilities The server supports the IBM Remote Supervisor Adapter II SlimLine, which provides service-processor functions in - IBM x3800 | User Guide - Page 18
important computer design features are reliability, availability, and serviceability (RAS). The RAS features help to ensure the integrity of the data that is stored in the server, the availability of the server when you need it, and the ease with which you can diagnose and correct problems. The - IBM x3800 | User Guide - Page 19
/site.wss/document.do?lndocid= MIGR-61788. It is updated every 6 to 8 weeks. v Support for IBM and non-IBM servers, desktop computers, workstations, and mobile computers. v Support for systems-management industry standards. v Integration into leading workgroup and enterprise systems-management - IBM x3800 | User Guide - Page 20
to this connector. v Power-control button: Press this button to turn the server on and off manually. A power-control-button shield comes with the server. v Information LED: When the information LED on additional LED to help isolate the condition. If the 8 IBM System x3800 Type 8865: User's Guide - IBM x3800 | User Guide - Page 21
LOG LED on the light path diagnostics panel is lit, information about the condition is available in the baseboard management controller (BMC) log or in the system-event log. The condition might be that the BMC log is full or almost full. This LED and LEDs on the light path diagnostics panel remain - IBM x3800 | User Guide - Page 22
Connect a USB device to this connector. SP Ethernet 10/100 connector: Use this connector to connect the service processor to a network. SP Ethernet 10/100 activity LED: This LED is on the SP Ethernet 10/ connector: Connect a USB device to this connector. 10 IBM System x3800 Type 8865: User's Guide - IBM x3800 | User Guide - Page 23
supply. During typical operation, both the ac and dc power LEDs are lit. For any other combination of LEDs, see the Problem Determination and Service Guide on the IBM Documentation CD. DC power LED: This green LED provides status information about the power supply. During typical operation, both the - IBM x3800 | User Guide - Page 24
software can turn on the server. v If your operating system supports the Wake on LAN feature, the Wake on LAN feature can connected to ac power, the server can respond to requests from the service processor, such as a remote request to turn on the server. IBM System x3800 Type 8865: User's Guide - IBM x3800 | User Guide - Page 25
ways: v You can turn off the server from the operating system, if your operating system supports this feature. After an orderly shutdown of the operating system, the server will be turned off off the server through a request from the service processor. Chapter 1. The System x3800 server 13 - IBM x3800 | User Guide - Page 26
14 IBM System x3800 Type 8865: User's Guide - IBM x3800 | User Guide - Page 27
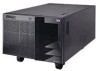
Chapter 2. Installing options This chapter provides detailed instructions for installing optional hardware devices in the server. Server components The following illustration information panel Diskette drive CD drive Microprocessor tray Rack bezel Front cover © Copyright IBM Corp. 2006 15 - IBM x3800 | User Guide - Page 28
the jumper to pins 2 and 3 to prevent a Wake on LAN packet from waking the system when the system is in the powered-off state. 16 IBM System x3800 Type 8865: User's Guide - IBM x3800 | User Guide - Page 29
Memory-card connectors The following illustration shows the connectors on the memory card. DIMM 1 DIMM 2 DIMM 3 DIMM 4 Memory-card LEDs The following illustration shows the LEDs on the memory card. Light path diagnostics button Light path diagnostics button power LED Memory card error LED DIMM 1 - IBM x3800 | User Guide - Page 30
2 error LED 4 3 Microprocessor 3 VRM connector Microprocessor 4 VRM connector VRM 4 error LED VRM 3 error LED Microprocessor 3 error LED Microprocessor 3 socket Microprocessor 4 error LED Microprocessor 4 socket 18 IBM System x3800 Type 8865: User's Guide - IBM x3800 | User Guide - Page 31
PCI-X board connectors The following illustration shows the connectors on the PCI-X board. PCI slot 1 266 MHz 64-bit PCI-X slot 2 266 MHz 64-bit PCI-X slot 3 266 MHz 64-bit PCI-X slot 4 266 MHz 64-bit PCI-X slot 5 266 MHz 64-bit PCI-X slot 6 266 MHz 64-bit Attention LED Power LED ServeRAID-8i - IBM x3800 | User Guide - Page 32
SAS-backplane connectors The following illustration shows the connectors on the SAS backplane. Front of SAS backplane SAS hard disk drive connectors Back of SAS backplane SAS signal cable SAS power 20 IBM System x3800 Type 8865: User's Guide - IBM x3800 | User Guide - Page 33
Orange can also indicate touch points on hot-swap components.) See the instructions for removing or installing a specific hot-swap component for any additional and ground wires. v For a list of supported options for the server, see http://www.ibm.com/servers/ eserver/serverproven/compat/us/. System - IBM x3800 | User Guide - Page 34
installed. v You have followed the cabling instructions that come with optional adapters. v You have problem, always use an electrostatic-discharge wrist strap or other grounding system when working inside the server with the power on. The server supports IBM System x3800 Type 8865: User's Guide - IBM x3800 | User Guide - Page 35
v While the device is still in its static-protective package, touch it to an unpainted metal part on the outside of the server for at least 2 seconds. This drains static electricity from the package and from your body. v Remove the device from its package and install it directly into the server - IBM x3800 | User Guide - Page 36
that you unlock or remove the front cover before you remove the top cover and bezel. To remove the bezel, complete the following steps: 24 IBM System x3800 Type 8865: User's Guide - IBM x3800 | User Guide - Page 37
information that you must consider when installing a hot-swap power supply in the server: v The server comes with a minimum of two power supplies and supports up to three power supplies. v The power supplies are numbered from left to right (1 through 3) as viewed from the rear of the server. Power - IBM x3800 | User Guide - Page 38
that has this label attached. There are no serviceable parts inside these components. If you suspect a problem with one of these parts, contact a service technician. Fan filler Fan error LED Fan filler in the chassis and close the power-supply handle. 26 IBM System x3800 Type 8865: User's Guide - IBM x3800 | User Guide - Page 39
supports and other information that you must consider when installing an adapter: v Locate the documentation that comes with the adapter and follow those instructions in addition to the instructions the loss of data. To avoid this potential problem, always use an electrostatic-discharge wrist strap - IBM x3800 | User Guide - Page 40
Adapter- retention latch 4. See the documentation that comes with the adapter for instructions for setting jumpers or switches and for cabling. Note: Route adapter cables before f. If necessary, remove the adapter guide before installing a full-length adapter. 28 IBM System x3800 Type 8865: User - IBM x3800 | User Guide - Page 41
Adapter guide Attention: When you install an adapter, avoid touching the components and gold-edge connectors on the adapter. Make sure that the adapter is correctly seated - IBM x3800 | User Guide - Page 42
Remote Supervisor Adapter II SlimLine An optional IBM Remote Supervisor Adapter II SlimLine can be into the connector. 8. Reinstall the I/O board in the server by aligning the board with the guides and reconnect the internal cables to the I/O board. If you have other options to install or - IBM x3800 | User Guide - Page 43
Installing a ServeRAID-8i adapter An optional ServeRAID-8i adapter can be installed only in its dedicated connector on the PCI-X board. See the following illustration for the location of the connector on the PCI-X board. The ServeRAID-8i adapter is not cabled to the server, and no rerouting of the - IBM x3800 | User Guide - Page 44
the ServeRAID documentation on the IBM ServeRAID Support CD for additional information about RAID operation and complete instructions for using ServeRAID Manager. v The server supports up to two 5.25-inch and screws for installing a full-high tape drive. 32 IBM System x3800 Type 8865: User's Guide - IBM x3800 | User Guide - Page 45
shows how to install a hot-swap hard disk drive. Filler panel Hard disk drive assembly Drive handle (open position) 5.25-inch bays for supported tape drives To install a hot-swap hard disk drive, complete the following steps: 1. Read the safety information that begins on page v, and "Installation - IBM x3800 | User Guide - Page 46
and pull it out of the server until it stops. 5. Slide the SAS backplane into the card guides on the rear of the SAS hard disk drive cage and press the backplane into place. 6. Connect the SAS cable to the I/O board and install the cable-retention clip. 34 IBM System x3800 Type 8865: User's Guide - IBM x3800 | User Guide - Page 47
must be compatible with the latest PC2-3200 SDRAM Registered DIMM specifications. For a list of the supported options for the server, see http://www.ibm.com/servers/ eserver/serverproven/compat/us/. v The server supports up to four memory cards. Each memory card holds up to four DIMMs. v There must - IBM x3800 | User Guide - Page 48
will light the system-error LED on the front of the server, indicating that there is a problem and guide you to the defective DIMM. When this occurs, first identify the defective DIMM; then, remove and LED also turns off when the release levers are opened. 36 IBM System x3800 Type 8865: User's Guide - IBM x3800 | User Guide - Page 49
Memory is an IBM technology that Check your operating system documentation to make sure that it supports memory mirroring. 2. Install DIMMs of the same size and sends an error message to light path diagnostics, which lights LEDs to guide you to the damaged DIMM. If memory mirroring is enabled, the - IBM x3800 | User Guide - Page 50
the server to halt, which could result in the loss of data. To avoid this potential problem, always use an electrostatic-discharge wrist strap or other grounding system when working inside the server with bezel" on page 23). 3. Prepare the new memory card: 38 IBM System x3800 Type 8865: User's Guide - IBM x3800 | User Guide - Page 51
feature, all the DIMMs that are installed in the server must be of the same type and speed, and the operating system must support the feature. The following instructions are for installing one pair of DIMMs. To install DIMM pairs on more than one memory card, repeat step 4 on page 40 though - IBM x3800 | User Guide - Page 52
-protective package that contains the DIMM to any unpainted metal surface on the outside of the server; then, remove the DIMM from the package. 40 IBM System x3800 Type 8865: User's Guide - IBM x3800 | User Guide - Page 53
components when the server is powered-on might cause the server to halt, which could result in the loss of data. To avoid this potential problem, always use an electrostatic-discharge wrist strap or other grounding system when working inside the server with the power on. 2. Remove the front cover - IBM x3800 | User Guide - Page 54
outside of the server; then, remove the DIMM from the package. 7. Turn the DIMM so that the DIMM keys align correctly with the slot. 42 IBM System x3800 Type 8865: User's Guide - IBM x3800 | User Guide - Page 55
components when the server is powered-on might cause the server to halt, which could result in the loss of data. To avoid this potential problem, always use an electrostatic-discharge wrist strap or other grounding system when working inside the server with the power on. 2. Remove the front cover - IBM x3800 | User Guide - Page 56
remaining DIMMs on the memory card. Memory card retention levers 10. Open the memory card retention levers on the top of the memory card. 44 IBM System x3800 Type 8865: User's Guide - IBM x3800 | User Guide - Page 57
download the most current level of BIOS code for your server, see http://www.ibm.com/support/. v Obtain an SMP-capable operating system. For a list of supported operating systems, see http://www.ibm.com/servers/eserver/serverproven/compat/us/. v You can use the Configurations/Setup Utility program - IBM x3800 | User Guide - Page 58
stops; then, push in on the microprocessor tray retention latches on each side of the tray and pull the tray out of the server. 46 IBM System x3800 Type 8865: User's Guide - IBM x3800 | User Guide - Page 59
Attention: The microprocessor tray is heavy. Pull the tray partially out of the server, reposition your hands to grasp the body of the tray, and press in on the release latches on each side of the tray; then, pull the tray out the rest of the way. Air baffle Heat sink FRONT Microprocessor FRONT - IBM x3800 | User Guide - Page 60
. If you have other microprocessors to install, do so now by repeating steps 5 through 14. 16. Install the air baffle in the microprocessor tray. 48 IBM System x3800 Type 8865: User's Guide - IBM x3800 | User Guide - Page 61
Note: Make sure that the air baffle lies flat and within the grooves on top of the microprocessor heat sinks and microprocessor baffles and that the air baffle remains in place while you close the microprocessor tray. You might find it helpful to hold the air baffle in place with your thumbs while - IBM x3800 | User Guide - Page 62
the bezel and push the top of the cover toward the server until the locking tabs snap into place; then, lock the front cover. 50 IBM System x3800 Type 8865: User's Guide - IBM x3800 | User Guide - Page 63
Lock 5. If you are installing a rack model, install the server in a rack. See the Rack Installation Instructions that come with the server for complete rack installation and removal instructions. Attention: v Install the server only in a rack cabinet with perforated doors. v Do not leave open spaces - IBM x3800 | User Guide - Page 64
in a rack (rack models only) are in the Rack Installation Instructions that come with the server. Rear view SP Ethernet 10/100 Power-supply USB 1 Video USB 2 System serial SP serial Gigabit Ethernet 1 Gigabit Ethernet 2 Mouse Keyboard IXA RS485 52 IBM System x3800 Type 8865: User's Guide - IBM x3800 | User Guide - Page 65
(SMP) server. You might have to upgrade the operating system to support SMP. For more information, see "Using the ServerGuide Setup and Installation CD the server remotely, see the Remote Supervisor Adapter II SlimLine User's Guide, which comes with the adapter, for information about setting up, - IBM x3800 | User Guide - Page 66
as a symmetric multiprocessing (SMP) server. You might have to upgrade the operating system to support SMP. For more information, see "Using the ServerGuide Setup and Installation CD" on page 61 see "Configuring the Gigabit Ethernet controller" on page 63. 54 IBM System x3800 Type 8865: User's Guide - IBM x3800 | User Guide - Page 67
startup (boot) protocols and startup order and to select operating-system wake-up support. For information about using this utility program, see "Using the PXE boot agent Manager is available as a stand-alone program and as an IBM Director extension. If a ServeRAID adapter is installed in the server - IBM x3800 | User Guide - Page 68
Change interrupt request (IRQ) settings v Enable USB legacy keyboard and mouse support v Resolve configuration conflicts Starting the Configuration/Setup Utility program To start the Configuration the firmware on the Remote Supervisor Adapter II SlimLine. 56 IBM System x3800 Type 8865: User's Guide - IBM x3800 | User Guide - Page 69
that Enabled is selected for the USB Host Controller and USB BIOS Legacy Support options. Note: If the USB host controller is disabled, the Remote . This choice is on the Configuration/Setup Utility menu only if an IBM Remote Supervisor Adapter II SlimLine is installed. v Start Options Select this - IBM x3800 | User Guide - Page 70
and the operating system supports Wake on LAN functions, options are incorrectly configured. Follow the instructions on the screen carefully. This choice is reduced memory. After the problem is corrected, you must manually enable the memory connectors. Use IBM System x3800 Type 8865: User's Guide - IBM x3800 | User Guide - Page 71
only numeric error codes. Run the diagnostic program to get more information about error codes that occur. See the Problem Determination and Service Guide on the IBM Documentation CD for instructions. Select Clear error logs to clear the BMC system event log. v Error Logs Select this choice to view - IBM x3800 | User Guide - Page 72
server and then reinstall it. See ″Replacing the battery″ in the Problem Determination and Service Guide for instructions for removing the battery. v Change the position of the power-on COM 1) SP serial (COM 2) 60 IBM System x3800 Type 8865: User's Guide 123 Default jumper 1 2 3 position 123 - IBM x3800 | User Guide - Page 73
or you can purchase the CD. To download the image, go to the IBM ServerGuide Web page at http://www.ibm.com/pc/qtechinfo/MIGR-4ZKPPT.html. To purchase the latest ServerGuide Setup and view the online overview. Not all features are supported on all server models. Chapter 3. Configuring the server 61 - IBM x3800 | User Guide - Page 74
need setup diskettes. You can use the CD to configure any supported IBM server model. The setup program provides a list of tasks that ServerGuide program stores information about the server model, service processor, hard disk drive controllers, and network IBM System x3800 Type 8865: User's Guide - IBM x3800 | User Guide - Page 75
to install your operating system, complete the following steps to download the latest operating-system installation instructions from the IBM Support Web page: 1. Go to http://www.ibm.com/support/. 2. In the Download section, click Downloads & drivers. 3. On the "Downloads and drivers" page, in the - IBM x3800 | User Guide - Page 76
support. Note: Your server does not support the setting of the selected item, follow the instructions on the screen. PXE boot agent utility menu change this setting; the server does not support any other network boot protocols. v Boot choice to use Wake on LAN support. Otherwise, enable it. If you are - IBM x3800 | User Guide - Page 77
off the server, see "Power problems" in the Problem Determination and Service Guide on the IBM Documentation CD. Installing and using latest version of the BIOS code from http://www.ibm.com/ support/. b. Update the BIOS code, following the instructions that come with the update file that you - IBM x3800 | User Guide - Page 78
serial console. See the documentation for your specific Linux operating-system type for information and instructions. Use one of the following procedures to enable SOL sessions for your Linux operating system. enable it when using a Linux operating system. 66 IBM System x3800 Type 8865: User's Guide - IBM x3800 | User Guide - Page 79
1. Add the following line to the end of the # Run gettys in standard runlevels section of the /etc/inittab file. This enables hardware flow control and enables users to log in through the SOL console. 7:2345:respawn:/sbin/agetty -h ttyS1 19200 vt102 2. Add the following line at the bottom of the / - IBM x3800 | User Guide - Page 80
-2.4.9-e.12smp.img read-only root=/dev/hda6 image=/boot/vmlinuz-2.4.9-e.12 label=linux-up initrd=/boot/initrd-2.4.9-e.12.img read-only root=/dev/hda6 68 IBM System x3800 Type 8865: User's Guide - IBM x3800 | User Guide - Page 81
Modified /etc/lilo.conf contents prompt timeout=50 default=linux-Monitor boot=/dev/hda #map=/boot/map install=/boot/boot.b #message=/boot/message linear # This will allow you to only Monitor the OS boot via SOL image=/boot/vmlinuz-2.4.9-e.12smp label=linux-Monitor initrd=/boot/initrd-2.4.9-e.12smp. - IBM x3800 | User Guide - Page 82
/initrd-2.4.9-e.12smp.img title Red Hat Enterprise Linux ES-up (2.4.9-e.12) root (hd0,0) kernel /vmlinuz-2.4.9-e.12 ro root=/dev/hda6 initrd /initrd-2.4.9-e.12.img 70 IBM System x3800 Type 8865: User's Guide - IBM x3800 | User Guide - Page 83
Modified /boot/grub/grub.conf contents #grub.conf generated by anaconda # # Note that you do not have to rerun grub after making changes to this file # NOTICE: You have a /boot partition. This means that # all kernel and initrd paths are relative to /boot/, eg. # root (hd0,0) # kernel / - IBM x3800 | User Guide - Page 84
SOL Interactive kernel (hd0,1)/boot/vmlinuz root=/dev/hda2 acpi=oldboot vga=791 console=tty1 console=ttyS1,19200 initrd (hd0,1)/boot/initrd title floppy 72 IBM System x3800 Type 8865: User's Guide - IBM x3800 | User Guide - Page 85
Modified /boot/grub/menu.lst contents root chainloader +1 title failsafe kernel (hd0,1)/boot/vmlinuz.shipped root=/dev/hda2 ide=nodma apm=off vga=normal nosmp disableapic maxcpus=0 3 initrd (hd0,1)/boot/initrd.shipped Note 1: The kernel line is shown with a line break. In your file, the entire entry - IBM x3800 | User Guide - Page 86
utility program on a server running a Windows operating system: 1. Go to http://www.ibm.com/support/, download the utility program, and create the OSA BMC Management Utility CD. 2. Insert opens. 3. Follow the prompts to complete the installation. 74 IBM System x3800 Type 8865: User's Guide - IBM x3800 | User Guide - Page 87
settings. You can also use the utility program to save the configuration to a file for use on multiple servers. Go to http://www.ibm.com/support/ to download the utility program; then, copy the bmc_cfg.exe file to a configuration utility diskette on a USB diskette drive. To start the baseboard - IBM x3800 | User Guide - Page 88
bmc_cfg and press Enter. 3. Follow the instructions on the screen. Using the baseboard management that is available from http://www.ibm.com/support/. If you have installed the OSA device driver and IBM Mapping layer, the update can be and off remotely. 76 IBM System x3800 Type 8865: User's Guide - IBM x3800 | User Guide - Page 89
that is related to the server and the globally unique identifier (GUID). Using the SAS/SATA Configuration Utility program Use the SAS/ read the instructions on the screen carefully before making a selection. Using ServeRAID Manager Use ServeRAID Manager, which is on the IBM ServeRAID Support CD, to - IBM x3800 | User Guide - Page 90
instructions that come with that adapter to view or change SCSI settings for attached devices. For additional information about RAID technology, see the ServeRAID documentation on the IBM ServeRAID Support Next. The "Configuration summary" window opens. 78 IBM System x3800 Type 8865: User's Guide - IBM x3800 | User Guide - Page 91
8. Review the information in the "Configuration summary" window. To change the configuration, click Back. 9. Click Apply; when you are asked whether you want to apply the new configuration, click Yes. The configuration is saved in the controller and in the physical drives. 10. Exit from ServeRAID - IBM x3800 | User Guide - Page 92
80 IBM System x3800 Type 8865: User's Guide - IBM x3800 | User Guide - Page 93
drop-down list, follow the instructions on the Web page to download the latest version. 2. Install the IBM Director program. 3. Download and install any applicable updates or interim fixes for the server: a. See http://www.ibm.com. b. Click Support & downloads. c. Click Downloads & drivers. d. In - IBM x3800 | User Guide - Page 94
82 IBM System x3800 Type 8865: User's Guide - IBM x3800 | User Guide - Page 95
right may be used instead. However, it is the user's responsibility to evaluate and verify the operation of any non-IBM product, program, or service. IBM may have patents or pending patent applications covering subject matter described in this document. The furnishing of this document does not - IBM x3800 | User Guide - Page 96
in the United States and other countries. Other company, product, or service names may be trademarks or service marks of others. Important notes Processor speeds indicate the internal clock speed bytes, and GB stands for approximately 1 000 000 000 bytes. 84 IBM System x3800 Type 8865: User's Guide - IBM x3800 | User Guide - Page 97
no representations or warranties with respect to non-IBM products. Support (if any) for the non-IBM products is provided by the third party, not IBM. Some software may differ from its retail version (if available), and may not include user manuals or all program functionality. Product recycling and - IBM x3800 | User Guide - Page 98
EEE on the environment and human health due to the potential presence of hazardous substances in EEE. For proper collection and treatment, contact your local IBM representative. 86 IBM System x3800 Type 8865: User's Guide - IBM x3800 | User Guide - Page 99
11 Active memory 37 PCI-X 4, 27 Active Memory 4, 37 adapter hot-plug 27 installing 27 IBM Remote Supervisor Adapter II SlimLine 30 ServeRAID-8i 31 PCI 27 PCI-X 27 Remote Supervisor Adapter II 33 illustration 33 status LED 9 heat output 3 hot-add, memory 43 © Copyright IBM Corp. 2006 87 - IBM x3800 | User Guide - Page 100
31 integrated baseboard management controller utility programs 75 network support 5 integrated functions 3 J jumpers boot recovery 16 power-on password override Wake on LAN 16 16, 60 K keyboard connector 11 88 IBM System x3800 Type 8865: User's Guide L LED error memory 17, 36 memory card 17, 36 - IBM x3800 | User Guide - Page 101
77 server power features 12 ServeRAID 5 ServerGuide features 62 NOS installation 62 Setup and Installation CD 4, 55 using 61 serviceability 6 setup with ServerGuide 62 size 3 slots 3 SMP 5 specifications 3 statements and notices 2 symmetric multiprocessing 5 system reliability guidelines 21 system - IBM x3800 | User Guide - Page 102
90 IBM System x3800 Type 8865: User's Guide - IBM x3800 | User Guide - Page 103
- IBM x3800 | User Guide - Page 104
Part Number: 31R1857 Printed in USA (1P) P/N: 31R1857
-
 1
1 -
 2
2 -
 3
3 -
 4
4 -
 5
5 -
 6
6 -
 7
7 -
8
-
9
-
10
-
11
-
12
-
13
-
14
-
15
-
16
-
17
-
18
-
19
-
20
-
21
-
22
-
23
-
24
-
25
-
26
-
27
-
28
-
29
-
30
-
31
-
32
-
33
-
34
-
35
-
36
-
37
-
38
-
39
-
40
-
41
-
42
-
43
-
44
-
45
-
46
-
47
-
48
-
49
-
50
-
51
-
52
-
53
-
54
-
55
-
56
-
57
-
58
-
59
-
60
-
61
-
62
-
63
-
64
-
65
-
66
-
67
-
68
-
69
-
70
-
71
-
72
-
73
-
74
-
75
-
76
-
77
-
78
-
79
-
80
-
81
-
82
-
83
-
84
-
85
-
86
-
87
-
88
-
89
-
90
-
91
-
92
-
93
-
94
-
95
-
96
-
97
-
98
-
99
-
100
-
101
-
102
-
103
-
104
 |
 |

IBM
System
x3800
Type
8865
User’s
Guide
±²³