IBM x3800 User Guide - Page 35
Removing, front, cover, bezel, cover, tower, model - unlock
 |
UPC - 000435948984
View all IBM x3800 manuals
Add to My Manuals
Save this manual to your list of manuals |
Page 35 highlights
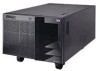
v While the device is still in its static-protective package, touch it to an unpainted metal part on the outside of the server for at least 2 seconds. This drains static electricity from the package and from your body. v Remove the device from its package and install it directly into the server without setting down the device. If it is necessary to set down the device, put it back into its static-protective package. Do not place the device on the server cover or on a metal surface. v Take additional care when handling devices during cold weather. Heating reduces indoor humidity and increases static electricity. Removing the front cover, top cover, and bezel Remove the top cover and bezel to access the inside of the server. On a tower model, you must also unlock or remove the front cover. Removing the front cover (tower model only) To remove the front cover, complete the following steps. Unlock Lock 1. Read the safety information that begins on page v and "Installation guidelines" on page 21. 2. If you are installing or replacing a non-hot-swap component, turn off the server and all peripheral devices. Disconnect the power cords; then, disconnect all external cables from the server. 3. Unlock the front cover; then, grasp the top corners of the front cover and pull it away from the server. 4. Lift the front cover to release the two tabs at the bottom edge of the cover. 5. Store the front cover in a safe place. Removing the top cover On a tower model, make sure that you unlock or remove the front cover before you remove the top cover. To remove the top cover, complete the following steps. Chapter 2. Installing options 23
-
 1
1 -
2
-
3
-
4
-
5
-
6
-
7
-
8
-
9
-
10
-
11
-
12
-
13
-
14
-
15
-
16
-
17
-
18
-
19
-
20
-
21
-
22
-
23
-
24
-
25
-
26
-
27
-
28
-
29
-
 30
30 -
 31
31 -
 32
32 -
 33
33 -
 34
34 -
 35
35 -
 36
36 -
 37
37 -
 38
38 -
 39
39 -
 40
40 -
41
-
42
-
43
-
44
-
45
-
46
-
47
-
48
-
49
-
50
-
51
-
52
-
53
-
54
-
55
-
56
-
57
-
58
-
59
-
60
-
61
-
62
-
63
-
64
-
65
-
66
-
67
-
68
-
69
-
70
-
71
-
72
-
73
-
74
-
75
-
76
-
77
-
78
-
79
-
80
-
81
-
82
-
83
-
84
-
85
-
86
-
87
-
88
-
89
-
90
-
91
-
92
-
93
-
94
-
95
-
96
-
97
-
98
-
99
-
100
-
101
-
102
-
103
-
104
 |
 |
