Insignia NS-39L700A12 User Manual (English) - Page 27
Adjusting the picture - hdtv
 |
View all Insignia NS-39L700A12 manuals
Add to My Manuals
Save this manual to your list of manuals |
Page 27 highlights
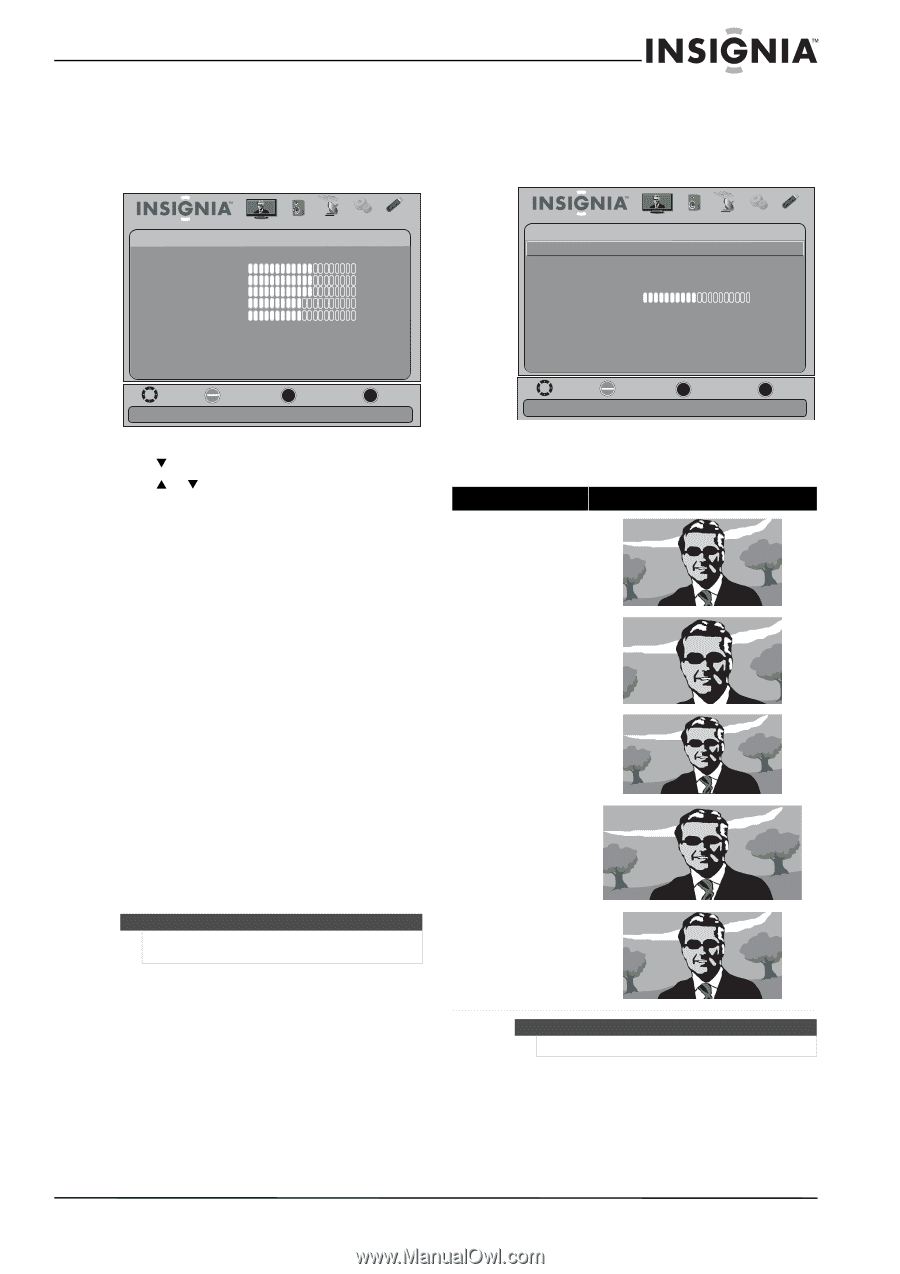
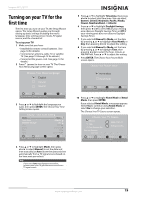
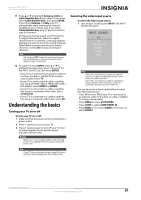
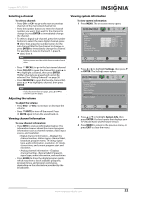
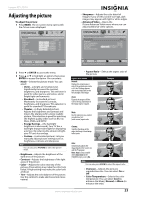
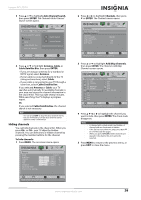
Insignia 39" LCD TV Adjusting the picture To adjust the picture: 1 Press MENU. The on-screen menu opens with the Picture menu displayed. • Sharpness-Adjusts the color detail of images. If you set this control too high, dark images may appear with light or white edges. • Advanced Video-Opens the Picture-Advanced Video menu where you can adjust additional video options. Picture Picture Mode Brightness Contrast Color T int Sharpness Advanced Video R es et Picture S ettings Audio Channels Settings USB Custom 60 60 60 0 50 Picture Picture-Advanced Video Aspect Ratio Overscan Color T emperature Noise Reduction Backlight Advanced Contrast Audio Channels Settings USB Auto On Normal Middle 30 Move OK E NTE R Select MENU Previous Adjust settings to affect picture quality EXIT Exit Move OK E NTE R S elec t MENU Previous Adjust how the picture fills the screen EXIT Exit 2 Press T or ENTER to access the menu. 3 Press S or T to highlight an option, then press ENTER to access the option. You can select: • Mode-Selects the picture mode. You can select: • Vivid-(a bright and vivid picture). Significantly increases the contrast, brightness, and sharpness. This selection is good for video games, animation, and in bright light environments. • Standard-(a standard picture). Moderately increase the contrast, brightness, and sharpness. This selection is good for standard TV broadcasts. • Theater-(a finely detailed picture). Adjusts the brightness and contrast and lowers the sharpness for a more realistic picture. This selection is good for watching the highest quality video such as Blu-ray Discs, DVDs, and HDTV. • Energy Savings-(the backlight brightness is decreased). Your TV has a backlight that provides light for displaying a picture. By reducing the amount of light, your TV uses less energy. • Custom-(customized picture). Lets you manually adjust picture settings such as brightness, contrast, and sharpness. Note You can also press PICTURE to select the picture mode. • Brightness-Adjusts the brightness of the dark areas of the picture. • Contrast-Adjusts the brightness of the light areas of the picture. • Color-Adjusts the color intensity of the picture. A low setting may make the color look faded. A high setting may make the color look artificial. • Tint-Adjusts the color balance of the picture. Use this control to make skin tones look more natural. • Aspect Ratio-Selects the aspect ratio of the picture. Aspect ratio option Normal: Displays the original aspect ratio. If the original aspect ratio is 4:3, the TV image appears with vertical black bars on the left and right of the image. Example Zoom: Expands the image to fill the screen. The top and bottom of the image may be cropped. Wide: Use this option to view content recorded in a 16:9 (wide-screen) aspect ratio. Cinema: Stretches the image at the edges, but keeps a clear image in the center. Auto: Automatically adjusts the image based on the screen size and the TV program. Note: Auto is only available when Auto Zoom in the CHANNELS menu is set to On. Note You can also press ZOOM to select the aspect ratio. • Overscan-Adjusts the picture's reproduction rate. You can select On or Off. • Color Temperature-Selects the color temperature. You can select Cool (to enhance the blues), Normal, or Warm (to enhance the reds). www.insigniaproducts.com 23
-
 1
1 -
2
-
3
-
4
-
5
-
6
-
7
-
8
-
9
-
10
-
11
-
12
-
13
-
14
-
15
-
16
-
17
-
18
-
19
-
20
-
21
-
 22
22 -
 23
23 -
 24
24 -
 25
25 -
 26
26 -
 27
27 -
 28
28 -
 29
29 -
 30
30 -
 31
31 -
 32
32 -
33
-
34
-
35
-
36
-
37
-
38
-
39
-
40
-
41
-
42
-
43
-
44
-
45
-
46
-
47
-
48
-
49
-
50
-
51
-
52
-
53
-
54
-
55
-
56
 |
 |