Insignia NS-LDVD19Q-10A User Manual (English) - Page 12
Description
 |
UPC - 600603122354
View all Insignia NS-LDVD19Q-10A manuals
Add to My Manuals
Save this manual to your list of manuals |
Page 12 highlights
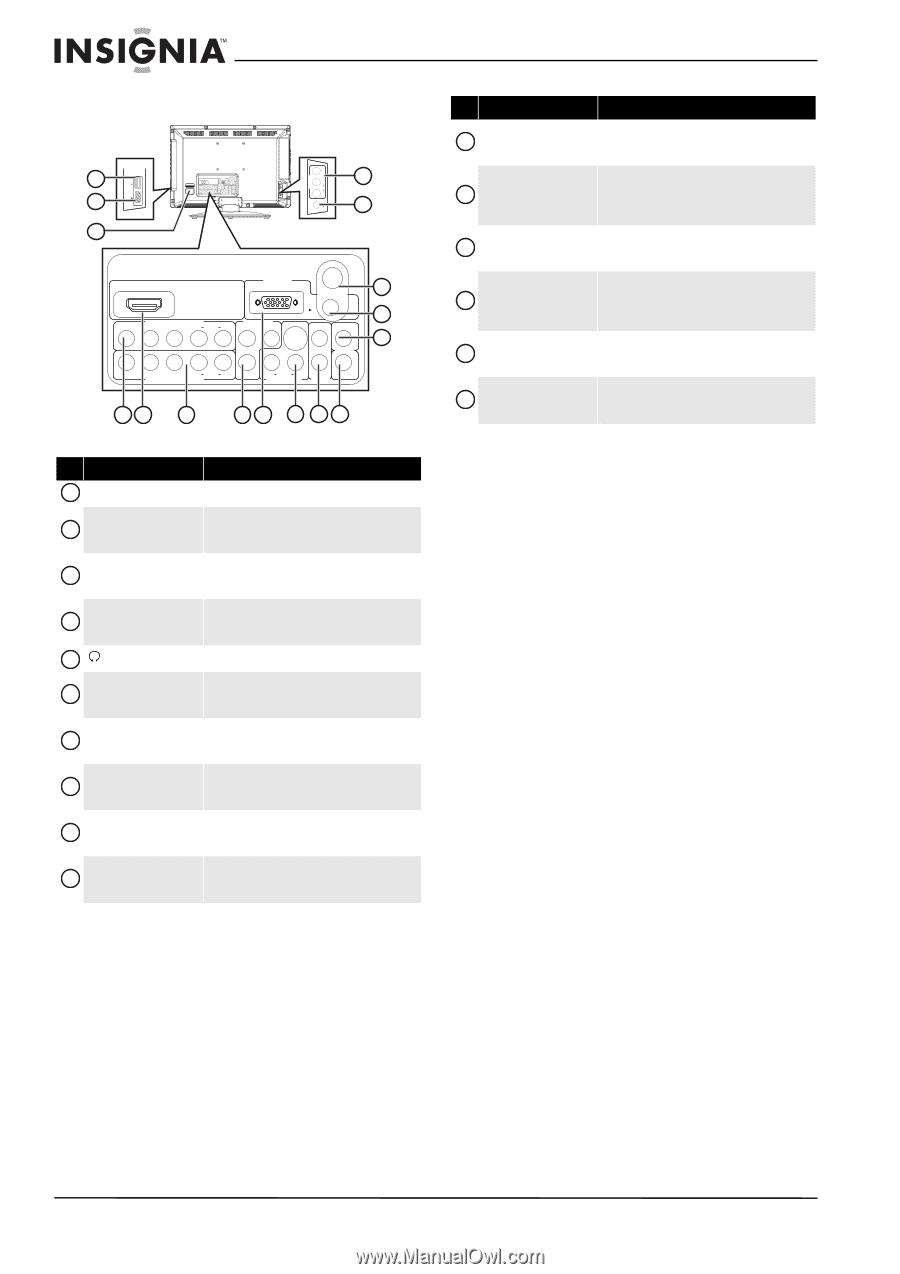
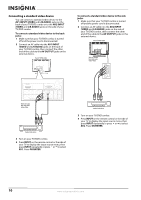
Back 1 2 3 FOR SERVICE ONLY HDMI2 INPUT ~ 120V 60Hz AC INPUT HDMI1 INPUT VGA INPUT ANT. INPUT AUDIO COMPONENT1 INPUT AV1 INPUT S-VIDEO Y CB/PB CR/PR R AUDIO L AUDIO VIDEO AUDIO COAXIAL L L OUTPUT Y CB/PB CR/PR R AUDIO L COMPONENT2 INPUT R R AUDIO L R DVD VIDEO S-VIDEO INPUT OUTPUT AV2 INPUT VIDEO 4 L AUDIO R 5 HDMI1 INPUT VGA INPUT ANT. 16 INPUT AUDIO COMPONENT1 INPUT AV1 INPUT S-VIDEO Y CB/PB CR/PR R AUDIO L AUDIO VIDEO AUDIO COAXIAL L L OUTPUT 15 14 Y CB/PB CR/PR R AUDIO L COMPONENT2 INPUT R R AUDIO L R DVD VIDEO S-VIDEO INPUT OUTPUT 67 8 9 10 11 12 13 # Jack Description S-VIDEO INPUT (S-VIDEO Connect an S-Video device to these jacks. For more 11 and L/R AUDIO) information, see "Connecting an S-Video device" on page 11. AUDIO L/R OUTPUT 12 Connect an analog audio device to these jacks to play sound from your TV/DVD combo through the external device. For more information, see "Connecting a standard sound system" on page 14. DVD VIDEO OUTPUT 13 Connect a TV to this jack to view the playback picture from the built-in DVD player. For more information, see "Connecting a TV" on page 15. COAXIAL (digital audio) Connect a digital audio device to this jack to play 14 sound from your TV/DVD combo through the external device. For more information, see "Connecting a digital sound system" on page 14. VGA AUDIO INPUT 15 Connect a computer's line out jack to this jack. For more information, see "Connecting a computer" on page 13. ANT. INPUT 16 Connect an antenna, cable TV, or satellite TV to this jack. For more information, see "Connecting an antenna, cable TV, or satellite TV" on page 9. # Jack 1 FOR SERVICE ONLY HDMI2 INPUT 2 AC INPUT 3 AV2 INPUT (VIDEO and 4 L/R AUDIO) 5 (Headphone) COMPONENT1 INPUT 6 (Y, CB/PB, CR/PR, and L/R AUDIO) HDMI1 INPUT 7 COMPONENT2 INPUT 8 (Y, CB/PB, CR/PR, and L/R AUDIO) AV1 INPUT (VIDEO and 9 L/R AUDIO) VGA INPUT 10 Description For service use only. Connect an HDMI device to this jack. For more information, see "Connecting an HDMI device" on page 12. Connect the power cord to this jack. When your TV/DVD combo is off, power still flows into it. To disconnect power, unplug the power cord. Connect a standard AV device to this jack. For more information, see "Connecting a standard video device" on page 10. Connect headphones to this jack. Connect a component video device to these jacks. For more information, see "Connecting a component video device" on page 11. Connect an HDMI device to this jack. for more information, see "Connecting an HDMI device" on page 12. Connect a component video device to these jacks. For more information, see "Connecting a component video device" on page 11. Connect a standard AV device to these jacks. For more information, see "Connecting a standard video device" on page 10. Connect a computer's video to this jack. For more information, see "Connecting a computer" on page 13. 6 www.insigniaproducts.com
-
 1
1 -
2
-
3
-
4
-
5
-
6
-
 7
7 -
 8
8 -
 9
9 -
 10
10 -
 11
11 -
 12
12 -
 13
13 -
 14
14 -
 15
15 -
 16
16 -
 17
17 -
18
-
19
-
20
-
21
-
22
-
23
-
24
-
25
-
26
-
27
-
28
-
29
-
30
-
31
-
32
-
33
-
34
-
35
-
36
-
37
-
38
-
39
-
40
-
41
-
42
-
43
-
44
-
45
-
46
-
47
-
48
-
49
-
50
-
51
-
52
-
53
-
54
-
55
-
56
 |
 |