Intel D875PBZ Product Guide - Page 41
Configuring the System for Intel® RAID Technology for Serial ATA, Creating, Deleting - reset
 |
View all Intel D875PBZ manuals
Add to My Manuals
Save this manual to your list of manuals |
Page 41 highlights
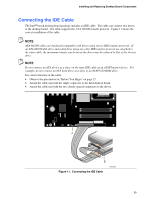
Installing and Replacing Desktop Board Components Configuring the System for Intel® RAID Technology for Serial ATA NOTE Intel RAID Technology for Serial ATA is supported with Microsoft Windows XP only. Configuring the BIOS for Intel RAID Technology for Serial ATA The SoftRAID option must be enabled in BIOS before the system can load the option ROM code for Intel RAID. 1. Enter the BIOS Setup program by pressing the key after the Power-On-Self-Test (POST) memory test begins. 2. Select the Advanced menu and then the Drive Configuration menu. 3. Switch the ATA/IDE Configuration option from Legacy to Enhanced. Next, switch the SoftRAID option to Enabled. 4. Press to save the BIOS settings and exit the BIOS Setup program. Creating, Deleting, and Resetting RAID Sets The Serial ATA RAID set must be administered in the RAID Configuration utility. During POST, the following message will appear for a few seconds: Press to enter Raid Configuration utility After the above message appears, press the and keys simultaneously. Create RAID 0 Volume 1. Select option 1 Create RAID Volume and press the key. 2. Select the stripe value for the RAID 0 array by scrolling through the available values by using the or keys and pressing the key. 3. The available values range from 8 KB to 128 KB in 8 KB increments. The stripe value should be chosen based on the planned drive usage. Some suggested selections are listed below. The default selection is 64 KB. • 16 KB - low disk usage • 64 KB - typical disk usage • 128 KB - performance disk usage 4. Press the key again to the Create Volume prompt to create the array. Confirm this selection by pressing the key after the prompt. 5. Scroll to option 4 Exit and press the key to exit the RAID Configuration utility. Confirm the exit by pressing key. 41
-
 1
1 -
2
-
3
-
4
-
5
-
6
-
7
-
8
-
9
-
10
-
11
-
12
-
13
-
14
-
15
-
16
-
17
-
18
-
19
-
20
-
21
-
22
-
23
-
24
-
25
-
26
-
27
-
28
-
29
-
30
-
31
-
32
-
33
-
34
-
35
-
 36
36 -
 37
37 -
 38
38 -
 39
39 -
 40
40 -
 41
41 -
 42
42 -
 43
43 -
 44
44 -
 45
45 -
 46
46 -
47
-
48
-
49
-
50
-
51
-
52
-
53
-
54
-
55
-
56
-
57
-
58
-
59
-
60
-
61
-
62
-
63
-
64
-
65
-
66
-
67
-
68
-
69
-
70
-
71
-
72
-
73
-
74
-
75
-
76
-
77
-
78
-
79
-
80
-
81
-
82
-
83
-
84
-
85
-
86
-
87
-
88
-
89
-
90
-
91
-
92
-
93
-
94
-
95
-
96
-
97
-
98
 |
 |