Intel D875PBZ Product Guide - Page 42
Loading the Intel® Application Accelerator 3.0 RAID Edition Driver, Configuring an Intel RAID Ready - drivers windows xp
 |
View all Intel D875PBZ manuals
Add to My Manuals
Save this manual to your list of manuals |
Page 42 highlights
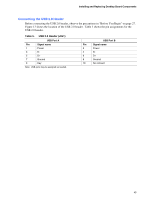
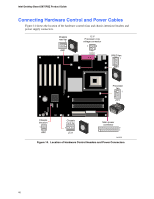
Intel Desktop Board D875PBZ Product Guide Delete RAID Volume CAUTION All data on the RAID drives will be lost. 1. Select option 2 Delete RAID Volume and press the key to delete the RAID set. 2. Press the key to delete the RAID volume. Confirm the volume deletion by pressing the key. Reset RAID Data CAUTION All data on the RAID drives and any RAID structures will be lost. 1. Select option 3 Reset RAID Data and press the key to delete the RAID set and remove any RAID structures from the drives. 2. Confirm the selection by pressing the key. Loading the Intel® Application Accelerator 3.0 RAID Edition Driver For Microsoft Windows XP, follow these steps to install the RAID driver: 1. As Windows Setup begins, press to specify the RAID driver. 2. When queried by the installation screen, press to specify an additional device. 3. Insert the floppy disk labeled Intel® Application Accelerator 3.0 RAID Edition Driver and press . 4. Press to select the Intel RAID controller. 5. Press to continue with Windows Setup. Configuring an Intel RAID Ready System The Intel Application Accelerator 3.0 RAID Edition software offers the flexibility to upgrade from a single Serial ATA drive to a two drive RAID 0 configuration when an additional Serial ATA drive is added to the system. However, several important steps must be followed at the time the system is first configured in order to take advantage of RAID when upgrading to a second Serial ATA drive. 1. The BIOS must be configured for RAID before installing Windows XP on the single Serial ATA drive. Refer to section "Configuring the BIOS for Intel RAID Technology for Serial ATA" to properly configure the BIOS. 2. Install the Intel RAID driver during Window Setup. Refer to section "Loading the Intel Application Accelerator 3.0 RAID Edition Driver" to install the driver during Windows Setup. 3. Install the operating system and then the Intel Application Accelerator 3.0 RAID Edition software. The Intel Application Accelerator 3.0 RAID Edition software is included on the Intel Express Installer CD that ships with the desktop board. 42
-
 1
1 -
2
-
3
-
4
-
5
-
6
-
7
-
8
-
9
-
10
-
11
-
12
-
13
-
14
-
15
-
16
-
17
-
18
-
19
-
20
-
21
-
22
-
23
-
24
-
25
-
26
-
27
-
28
-
29
-
30
-
31
-
32
-
33
-
34
-
35
-
36
-
 37
37 -
 38
38 -
 39
39 -
 40
40 -
 41
41 -
 42
42 -
 43
43 -
 44
44 -
 45
45 -
 46
46 -
 47
47 -
48
-
49
-
50
-
51
-
52
-
53
-
54
-
55
-
56
-
57
-
58
-
59
-
60
-
61
-
62
-
63
-
64
-
65
-
66
-
67
-
68
-
69
-
70
-
71
-
72
-
73
-
74
-
75
-
76
-
77
-
78
-
79
-
80
-
81
-
82
-
83
-
84
-
85
-
86
-
87
-
88
-
89
-
90
-
91
-
92
-
93
-
94
-
95
-
96
-
97
-
98
 |
 |