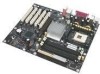
Intel D875PBZ Product Guide - Page 43
Upgrading to Serial ATA RAID 0 Configuration from a Single Drive Configuration - upgrade
 |
View all Intel D875PBZ manuals
Add to My Manuals
Save this manual to your list of manuals |
Page 43 highlights
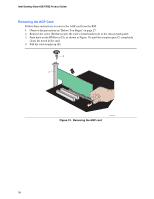
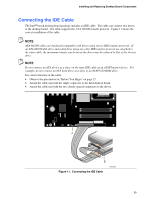
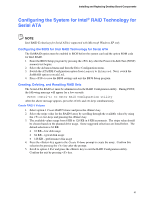
Installing and Replacing Desktop Board Components Upgrading to Serial ATA RAID 0 Configuration from a Single Drive Configuration 1. Install the second Serial ATA drive in the system. Refer to section "Connecting the Serial ATA (SATA) Cable". 2. Start the system and boot into Windows XP. 3. Launch the Intel Application Accelerator from the Start Menu (Start ´ All Programs ´ Intel Application Accelerator RAID Edition ´ Intel Application Accelerator). 4. From the Integrated RAID tab, right-click on "RAID Volume" and select "Create from Existing Disk." NOTE The RAID volume name must be in English alphanumeric ASCII characters and no more than 16 characters. 5. Select the source disk to create the RAID Volume and then press the "Next" button. 6. Enter the name of the RAID volume (default is RAID_Volume1). 7. Select the stripe value for the RAID 0 array. The available values range from 8 KB to 128 KB in 8 KB increments. The stripe value should be chosen based on the planned drive usage. Some suggested selections are listed below. The default selection is 64 KB. • 16 KB - low disk usage • 64 KB - typical disk usage • 128 KB - performance disk usage 8. Press the "Next" button to continue. 9. Confirm creation of the RAID volume by pressing the "Yes" button. 10. Reconfirm creation of the RAID volume by pressing the "Yes" button. 11. Press the "Migrate" button to begin the data migration. NOTE Data migration will take a considerable amount of time. Do not power down or reset the system during migration. 12. Reboot the system after migration completes by selecting "Yes" when prompted to do so. NOTE If an IDE hard drive is also attached to the system, the RAID volume will need to be moved up in priority in order to boot from it. After the system reboots, press the key to enter BIOS Setup. Then, navigate to the BOOT menu and select the Hard Disk Drives option. Move the RAID volume to the 1st Drive position. Press to save the BIOS settings and exit the BIOS Setup program. 43
-
 1
1 -
2
-
3
-
4
-
5
-
6
-
7
-
8
-
9
-
10
-
11
-
12
-
13
-
14
-
15
-
16
-
17
-
18
-
19
-
20
-
21
-
22
-
23
-
24
-
25
-
26
-
27
-
28
-
29
-
30
-
31
-
32
-
33
-
34
-
35
-
36
-
37
-
 38
38 -
 39
39 -
 40
40 -
 41
41 -
 42
42 -
 43
43 -
 44
44 -
 45
45 -
 46
46 -
 47
47 -
 48
48 -
49
-
50
-
51
-
52
-
53
-
54
-
55
-
56
-
57
-
58
-
59
-
60
-
61
-
62
-
63
-
64
-
65
-
66
-
67
-
68
-
69
-
70
-
71
-
72
-
73
-
74
-
75
-
76
-
77
-
78
-
79
-
80
-
81
-
82
-
83
-
84
-
85
-
86
-
87
-
88
-
89
-
90
-
91
-
92
-
93
-
94
-
95
-
96
-
97
-
98
 |
 |