Invacare TRSX52FBP User Manual - Page 45
SEAT AND BACK, Part No. 1110550, Invacare® Tracer® SX5 Wheelchair
 |
View all Invacare TRSX52FBP manuals
Add to My Manuals
Save this manual to your list of manuals |
Page 45 highlights
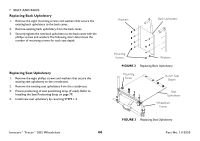
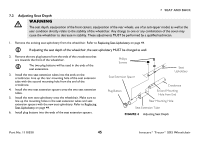
7 SEAT AND BACK 7.2 Adjusting Seat Depth ƽ WARNING The seat depth, size/position of the front casters, size/position of the rear wheels, use of an anti-tipper model, as well as the user condition directly relate to the stability of the wheelchair. Any change to one or any combination of the seven may cause the wheelchair to decrease in stability. These adjustments MUST be performed by a qualified technician. 1. Remove the existing seat upholstery from the wheelchair. Refer to Replacing Seat Upholstery on page 44. If adjusting the seat depth of the wheelchair, the seat upholstery MUST be changed as well. 2. Remove the two plug buttons from the ends of the crossbraces that are towards the front of the wheelchair. The two plug buttons will be used in the ends of the seat extensions. 3. Install the two seat extension tubes into the ends on the crossbraces. Line up the rear mounting hole of the seat extension tube with the second mounting hole from the end of the crossbrace. 4. Install the two seat extension spacers onto the two seat extension tubes. 5. Install the new seat upholstery onto the wheelchair. Make sure to line up the mounting holes in the seat extension tubes and seat extension spacers with the new seat upholstery. Refer to Replacing Seat Upholstery on page 44. 6. Install plug buttons into the ends of the seat extension spacers. Phillips Screws Seat Extension Spacer Seat Upholstery Plug Button Crossbrace Second Mounting Hole from End Rear Mounting Hole Seat Extension Tube FIGURE 4 Adjusting Seat Depth Part No. 1110550 45 Invacare® Tracer® SX5 Wheelchair
-
 1
1 -
2
-
3
-
4
-
5
-
6
-
7
-
8
-
9
-
10
-
11
-
12
-
13
-
14
-
15
-
16
-
17
-
18
-
19
-
20
-
21
-
22
-
23
-
24
-
25
-
26
-
27
-
28
-
29
-
30
-
31
-
32
-
33
-
34
-
35
-
36
-
37
-
38
-
39
-
 40
40 -
 41
41 -
 42
42 -
 43
43 -
 44
44 -
 45
45 -
 46
46 -
 47
47 -
 48
48 -
 49
49 -
 50
50 -
51
-
52
-
53
-
54
-
55
-
56
-
57
-
58
-
59
-
60
-
61
-
62
-
63
-
64
-
65
-
66
-
67
-
68
-
69
-
70
-
71
-
72
-
73
-
74
-
75
-
76
-
77
-
78
-
79
-
80
-
81
-
82
-
83
-
84
 |
 |
