Invacare TRSX52FBP User Manual - Page 46
Adjusting the Seat Width
 |
View all Invacare TRSX52FBP manuals
Add to My Manuals
Save this manual to your list of manuals |
Page 46 highlights
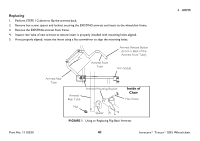
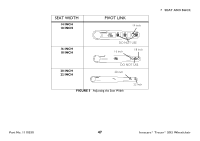
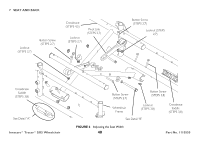
7 SEAT AND BACK 7.3 Adjusting the Seat Width For this procedure, refer to FIGURE 5 on page 47, FIGURE 6 on page 48, and FIGURE 7 on page 49. When adjusting the seat width of the wheelchair, the back and seat upholstery MUST be changed. If applicable, the headrest pillow and headrest upholstery MUST be changed as well. 1. Remove the existing back and seat upholstery from the wheelchair. Refer to Replacing Back Upholstery on page 44 and Replacing Seat Upholstery on page 44. 2. Remove the four button screws and locknuts that secure the two pivot links to the wheelchair frame and crossbraces. 3. Remove the two button screws, locknuts and crossbrace saddle that secures the bottom of the crossbrace to the wheelchair frame. Repeat for other crossbrace. 4. Remove the hex screw, coved washers, washers and locknut that secure the two crossbraces together. See Detail "B". Note the orientation of the coved washers, washers and locknut for assembling the new crossbraces. See Detail "B". 5. Assemble the two new crossbraces together with the existing hex screw, coved washers, washers and locknut. Securely tighten. Refer to Detail "B" for hardware orientation. 6. Determine the correct pivot link and mounting hole to use with the desired seat width. See chart below. 7. Secure the pivot links to the crossbraces and wheelchair frame with the four button screws and locknuts. Securely tighten. Position crossbrace saddle on wheelchair frame using the washer on the underside of the wheelchair frame as a reference. See Detail "A" for proper positioning of the crossbrace saddle. 8. Reinstall the two button screws, locknuts and crossbrace saddle that secures the bottom of the new crossbrace to the wheelchair frame. Refer to Detail "B" for hardware orientation. Repeat for opposite crossbrace. Securely tighten. 9. Install the new back and seat upholstery onto the wheelchair. Refer to Replacing Back Upholstery on page 44 and Replacing Seat Upholstery on page 44. Invacare® Tracer® SX5 Wheelchair 46 Part No. 1110550
-
 1
1 -
2
-
3
-
4
-
5
-
6
-
7
-
8
-
9
-
10
-
11
-
12
-
13
-
14
-
15
-
16
-
17
-
18
-
19
-
20
-
21
-
22
-
23
-
24
-
25
-
26
-
27
-
28
-
29
-
30
-
31
-
32
-
33
-
34
-
35
-
36
-
37
-
38
-
39
-
40
-
 41
41 -
 42
42 -
 43
43 -
 44
44 -
 45
45 -
 46
46 -
 47
47 -
 48
48 -
 49
49 -
 50
50 -
 51
51 -
52
-
53
-
54
-
55
-
56
-
57
-
58
-
59
-
60
-
61
-
62
-
63
-
64
-
65
-
66
-
67
-
68
-
69
-
70
-
71
-
72
-
73
-
74
-
75
-
76
-
77
-
78
-
79
-
80
-
81
-
82
-
83
-
84
 |
 |