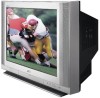
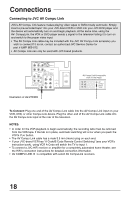
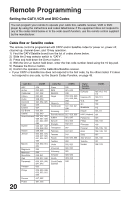
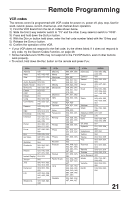
JVC AV-27F703 User Guide - Page 19
Remote Control
 |
UPC - 046838206337
View all JVC AV-27F703 manuals
Add to My Manuals
Save this manual to your list of manuals |
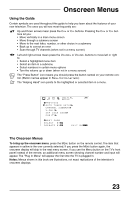
Page 19 highlights
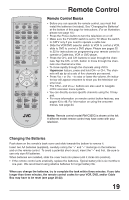
TV CATV VCR DVD 16:9 MODE POWER EZ SURF PIP CHANNEL ON/MOVE INPUT SOURCE FREEZE SWAP DISPLAY 123 SLEEP TIMER 4 5 6 HYPER SUR. 7 VIDEO STATUS 100+ 89 0 RETURN+ THEATER PRO BBE RM-C325G LIGHT MUTING V CHIP + CH VOL VOL + CH EXIT MENU PIP OFF VCR CHANNEL PREV NEXT VCR/DVD POWER TV/VCR REW PLAY FF REC STOP PAUSE OPEN/CLOSE STILL/PAUSE TV Remote Control Remote Control Basics • Before you can operate the remote control, you must first install the batteries (included). See "Changing the Batteries" at the bottom of this page for instructions. (For an illustration, please see page 10.) • Press the POWER button to turn the television on or off. • Make sure the TV/CATV switch is set to TV. Move the switch to CATV only if you need to operate a cable box. • Slide the VCR/DVD selector switch to VCR to control a VCR, slide to DVD to control a DVD player. Please see pages 20 to 22 for instructions on programming your remote control to operate a Cable box, VCR or DVD player. • Press the CH+ and CH- buttons to scan through the channels. Tap the CH+ or CH- button to move through the channels one channel at a time. • To move rapidly through the channels using JVC's Hyperscan feature, press and hold CH+ or CH-. The channels will zip by at a rate of five channels per second. • Press VOL+ or VOL - to raise or lower the volume. An indicator bar will appear onscreen to show you the television volume level. • The CH+/- and VOL+/- buttons are also used to navigate JVC's onscreen menu system. • You can directly access specific channels using the 10-key pad. • For more information on remote control button features, see pages 43 to 46. For information on using the onscreen menus, see page 24. Notes: Remote control model RM-C325G is shown at the left. A different model remote control may have come with your television. Changing the Batteries Push down on the remote's back cover and slide towards the bottom to remove it. Insert two AA batteries (supplied), carefully noting the "+" and "-" markings on the batteries and on the remote control. To avoid a potential short circuit, insert the "-" end first. Be sure to use only size AA batteries. When batteries are installed, slide the cover back into place (until it clicks into position). • If the remote control acts erratically, replace the batteries. Typical battery life is six months to one year. We recommend using alkaline batteries for longer battery life. When you change the batteries, try to complete the task within three minutes. If you take longer than three minutes, the remote control codes for your VCR, DVD, and/or Cable Box may have to be reset (see page 20-22). 19
-
 1
1 -
2
-
3
-
4
-
5
-
6
-
7
-
8
-
9
-
10
-
11
-
12
-
13
-
 14
14 -
 15
15 -
 16
16 -
 17
17 -
 18
18 -
 19
19 -
 20
20 -
 21
21 -
 22
22 -
 23
23 -
 24
24 -
25
-
26
-
27
-
28
-
29
-
30
-
31
-
32
-
33
-
34
-
35
-
36
-
37
-
38
-
39
-
40
-
41
-
42
-
43
-
44
-
45
-
46
-
47
-
48
-
49
-
50
-
51
-
52
-
53
-
54
-
55
-
56
-
57
-
58
-
59
-
60
-
61
-
62
-
63
-
64
-
65
-
66
-
67
-
68
-
69
-
70
-
71
-
72
-
73
-
74
-
75
-
76
-
77
-
78
-
79
-
80
-
81
-
82
-
83
-
84
-
85
-
86
-
87
-
88
-
89
-
90
-
91
-
92
-
93
-
94
-
95
-
96
-
97
-
98
-
99
-
100
-
101
-
102
-
103
-
104
-
105
-
106
-
107
-
108
-
109
-
110
-
111
-
112
 |
 |
