JVC DLA-M4000LU DLA-M4000LU User instruction manual (1.1MB) - Page 61
Troubleshooting
 |
View all JVC DLA-M4000LU manuals
Add to My Manuals
Save this manual to your list of manuals |
Page 61 highlights
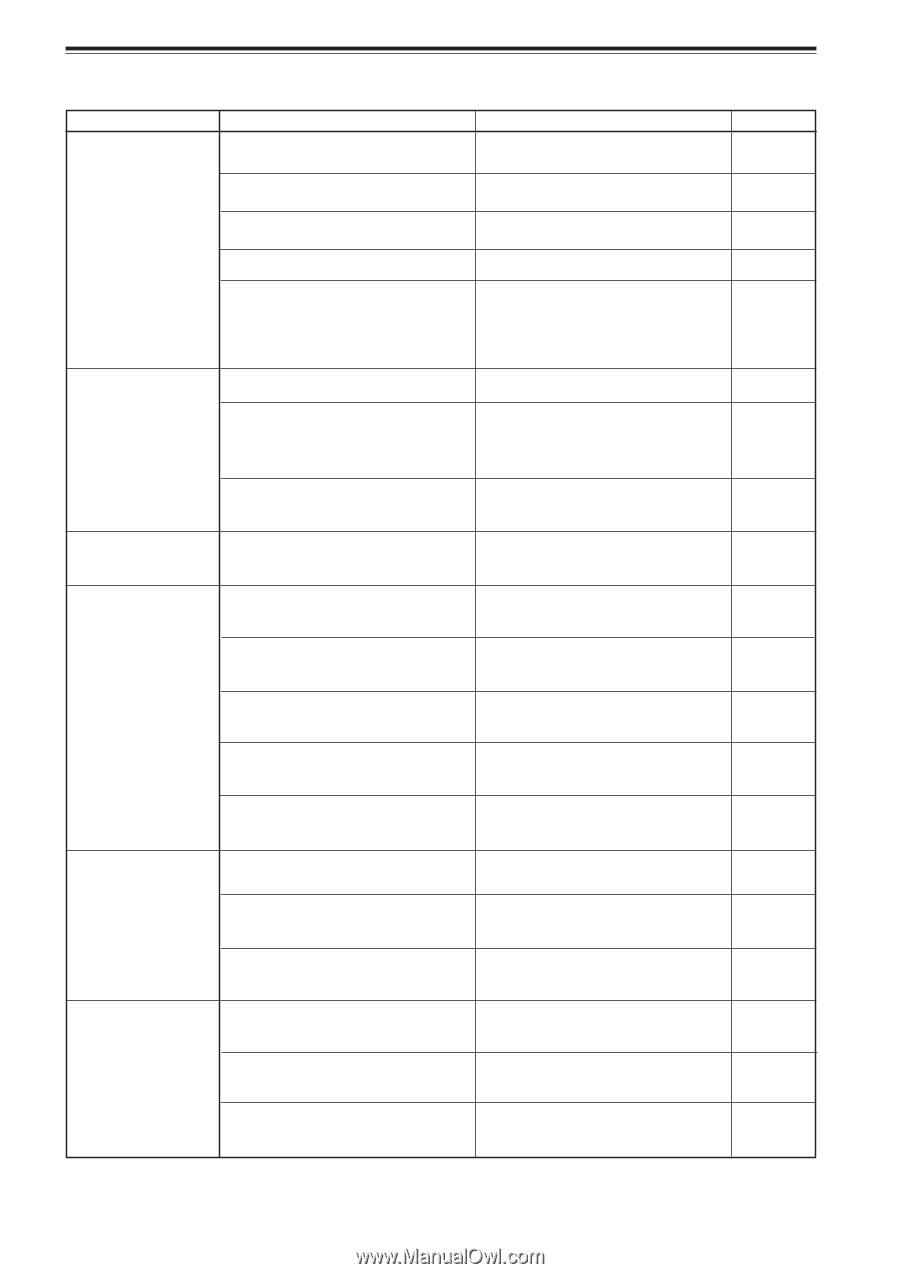
Troubleshooting Solutions to common problems related to your projector are described here. If none of the solutions presented here solves the problem, unplug the projector and consult a authorized dealer or service center. Symptom Probable cause Power is not supplied. • Is the power cord disconnected? Corrective action • Insert the power cord (plug) firmly. Page 23 • Is the main power switch turned on? • Turn on the MAIN POWER switch. • Is the correct power voltage used? • Has the breakertripped open? • Check that AC 220V - 240V is supplied. • Check that the breaker is closed. Light is not emitted, or light level is low. • Has the lamp protective function activated? (This can occur if the power is shut down due to a power failure, etc.) • Wait until the lamp has cooled down. (Turn on the main power sand let the fans cool the lamp.) About 10 minutes later, press OPERATE on the remote control. • Is the lens cap removed? • Remove the lens cap. • Is the lamp life near its end? • Check the lamp use time on the menu, and if the lamp life is near its end, arrange for a replacement lamp, or replace a little earlier. • Has the projector been moved from its • Check the installed position. installed place? 25 3, 65 ---- ---- 23 41, 59 ---- With power on, • Is the air intake or exhaust area operation starts but blocked? stops in a few minutes. Video image does not • Is the correct input selected? appear. • Turn off the MAIN POWER switch, remove any blocking objects, and turn on the MAIN POWER switch again. • Select the correct inputs with the AV and RGB buttons. 8, 9, 16 26 Video image dims. Color is poor or unstable. • Are connected devices connected correctly? • Connect connected devices correctly. • Are signals being supplied from the connected devices? • Set connected devices correctly. • Are input signals (scanning frequency, • Check if the signal is correct as input etc.) appropriate? (scanning frequency, etc.). Input the appropriate signal. • Is the source setting correctly selected? • Set the source setting to AUTO or to Isn't a wrong source (forced mode) the correct dedicated source (forced selected? mode). • Is brightness adjusted correctly? • Adjust brightness on the menu. • Is focus adjusted correctly? • Adjust focus with the remote control's FOCUS (+/-) buttons. • Is distance too short or too long? • Set the projector at the correct distance. • Are TRACKING and PHASE adjusted • Adjust TRACKING and PHASE on the correctly? menu. • Is picture quality (color density, etc.) adjusted correctly? • Adjust picture quality on the menu. • Is the correct CLAMP selected? • Select the correct CLAMP on the OPTION MENU. 20, 21 ---- 19 44, 46 38, 40 27, 30 18 30, 36 38, 40 41, 42 (To be continued on the next page) 61
-
 1
1 -
2
-
3
-
4
-
5
-
6
-
7
-
8
-
9
-
10
-
11
-
12
-
13
-
14
-
15
-
16
-
17
-
18
-
19
-
20
-
21
-
22
-
23
-
24
-
25
-
26
-
27
-
28
-
29
-
30
-
31
-
32
-
33
-
34
-
35
-
36
-
37
-
38
-
39
-
40
-
41
-
42
-
43
-
44
-
45
-
46
-
47
-
48
-
49
-
50
-
51
-
52
-
53
-
54
-
55
-
 56
56 -
 57
57 -
 58
58 -
 59
59 -
 60
60 -
 61
61 -
 62
62 -
 63
63 -
 64
64 -
 65
65 -
 66
66 -
67
-
68
 |
 |