JVC GRSXM37U Instructions - Page 5
Getting Started, Controls, Connectors And Indicators - vhs camcorder
 |
UPC - 046838017216
View all JVC GRSXM37U manuals
Add to My Manuals
Save this manual to your list of manuals |
Page 5 highlights
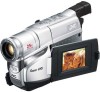
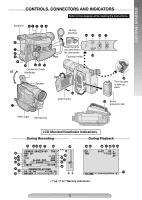
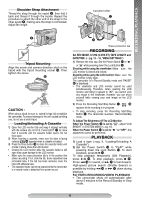
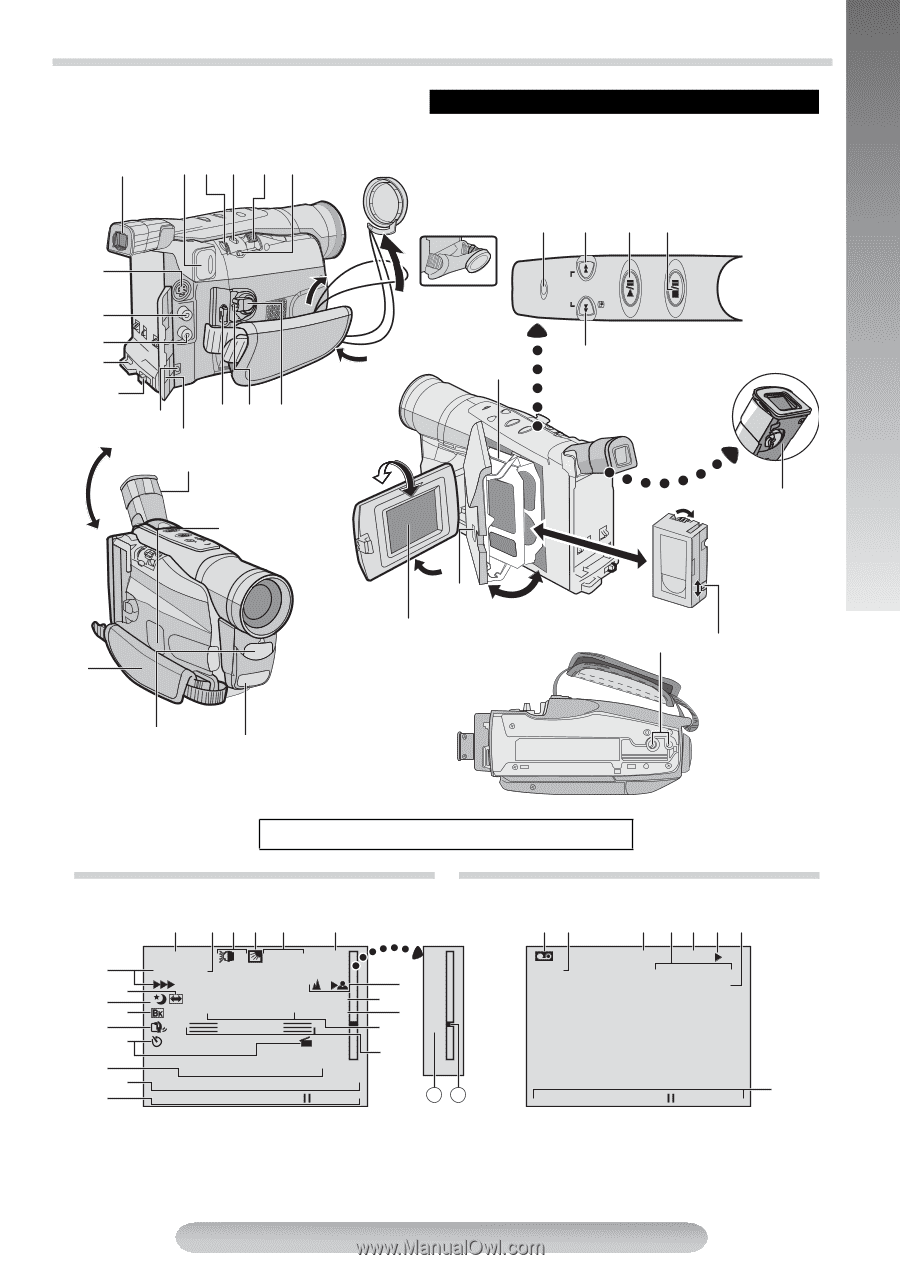
GETTING STARTED CONTROLS, CONNECTORS AND INDICATORS Refer to this diagram while reading the instructions. Eyepiece 5 1 2 3 4 6 7 8 5 9 45˚ ! "# $ Connector Cover Viewfinder Speaker - During shooting % & () Keep the lens cap attached to the camcorder Cassette holder ~ 180° 90° + LCD monitor , Turn the gear to take up slack . Erase protection tab Video Light Microphone LCD Monitor/Viewfinder Indications During Recording During Playback @ \[ ] ^ _ { | } / :; < = > 120M I N A S - ET T30 REC SP S-VHS REC PAUSE 5M I N +02 MWB 1 / 2S CONGRATULAT I ONS 25. 12. 04 11 : 45 : 18 BR I GHT ? V 0 1 2 1X 3 ba 45 TBC 6 789! S-ET SP -1 : 23 : 45 AT VOLUME ੬pg. 17 for "Warning Indications" 5
-
 1
1 -
 2
2 -
 3
3 -
 4
4 -
 5
5 -
 6
6 -
 7
7 -
 8
8 -
 9
9 -
 10
10 -
 11
11 -
12
-
13
-
14
-
15
-
16
-
17
-
18
-
19
-
20
-
21
-
22
-
23
-
24
 |
 |
5
GETTING STARTED
CONTROLS, CONNECTORS AND INDICATORS
1
R
2
B
2
E
5
5
R
0
C
M
.
I
M
I
C
1
G
I
S
N
O
2
H
N
P
N
.
T
S
G
0
–
R
4
–
V
P
A
A
H
A
T
–
S
U
U
–
S
L
–
S
R
E
A
–
–
E
T
–
E
C
I
1
–
T
O
1
–
N
:
1
S
4
–
T
+
M
/
5
–
3
0
W
2
:
–
0
2
B
S
18
+
1X
b
a
T
V
B
O
C
LUME
–
S
–
–
–
E
–
T
–
–
–
1:
–
S
2
–
P
3
–
:
–
4
A
–
5
T
+
45˚
180°
90°
1234
5
6
7
8
9
!
"#$
%
&
(
)
~
-
+
.
Eyepiece
During
shooting
Keep the lens
cap attached to
the camcorder
Cassette holder
Erase
protection tab
LCD monitor
Speaker
Viewfinder
During Recording
During Playback
LCD Monitor/Viewfinder Indications
/
:
<
;
=
>
@
\
^
{
}
[
]
_
|
V
1
0
2
3
?
45
6 789!
"
±
pg. 17 for “Warning Indications”
Video Light
5
Microphone
Turn the gear
to take up
slack
Connector Cover
Refer to this diagram while reading the instructions.
,