JVC GY-DV5000U GY-DV5000U 3-CCD Professional DV Camcorder 92 page instruction - Page 36
4 TOP MENU Screen, 11- 5 CAMERA OPERATION Menu Screen
 |
View all JVC GY-DV5000U manuals
Add to My Manuals
Save this manual to your list of manuals |
Page 36 highlights
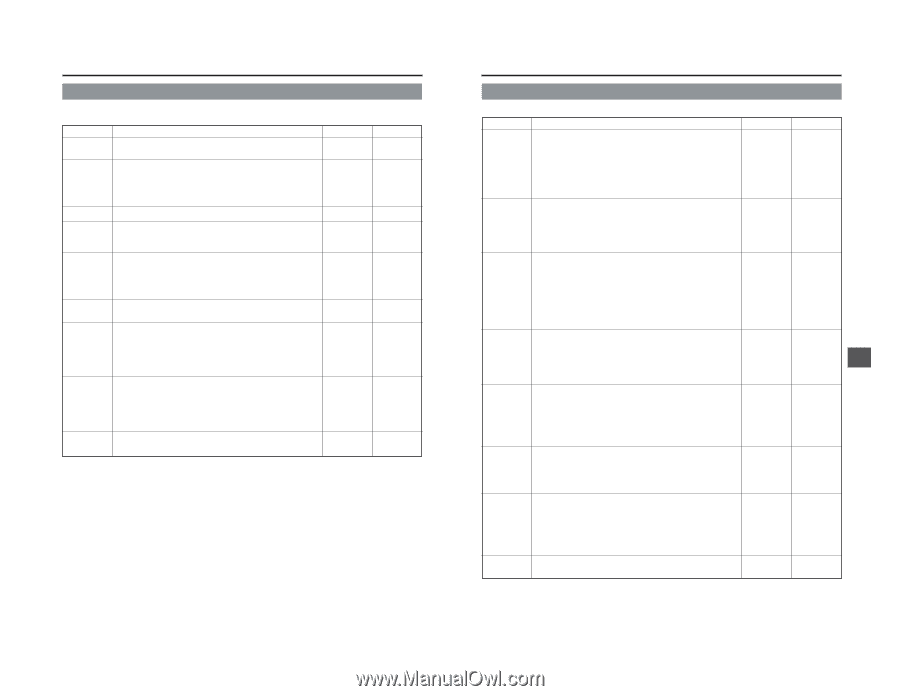
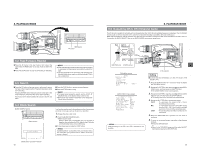
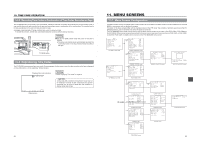
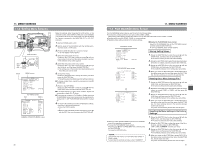
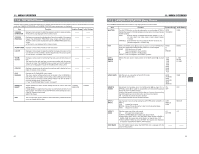
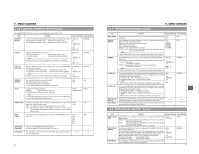
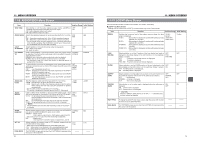
11. MENU SCREENS 11-4 TOP MENU Screen Different menu screens are displayed depending on whether the GY-DV5000 is in the Camera mode or in the VTR mode. In the VTR mode, the CAMERA OPERATION and CAMERA PROCESS menu screens are not displayed. Item Function Variation Range Initial Setting CAMERA OPERATION Displays a menu screen for setting the operation mode for camera shooting. ● This item is only displayed in the Camera mode. ----- ----- CAMERA PROCESS Displays a menu screen for adjustments of the picture quality of the camera image. The ADVANCED PROCESS menu screen and SKIN COLOR ADJUST screen can be displayed through the CAMERA PROCESS menu screen. ● This item is only displayed in the Camera mode. ----- ----- AUDIO/VIDEO Displays a menu screen related to audio and video. ----- ----- LCD/VF Displays a menu screen for selecting whether to display characters on the LCD monitor or in the viewfinder, and for adjustments of the picture quality of LCD monitor. It consists of two screens. ----- ----- TC/UB/ CLOCK Displays a menu screen for setting the time code, user's bit data, date and time. The ways that the date and time are recorded together with the display style are set here. The TIME/DATE menu screen and CLOCK ADJUST screen can be displayed through the TC/UB/CLOCK menu screen. ----- ----- OTHERS Displays a menu screen for setting other functions and to display the hour meter. It consists of two screens. ----- ----- FILE MANAGE Displays the FILE MANAGE menu screen. The menu screen setting contents can be stored in the GY-DV5000 in files (FILE CAM1 or CAM2), and the menu screen settings stored in files can be read out. The menu screen setting contents can also be reset to the initial setting values. (Individual files.) ☞ See "FILE MANAGE Menu Screen" on page 67. ----- ----- MENU ALL RESET Selects whether the menu screen settings should be reset to the initial setting values. If reset operation is performed, the power is automatically turned off and then on again. The Camera mode and VTR mode menu settings are reset. CANCEL: Reset not performed EXECUTE: Reset CANCEL EXECUTE CANCEL EXIT The normal screen returns when the SHUTTER dial is pressed while the cursor is aligned with this item. ----- ----- 68 11. MENU SCREENS 11-5 CAMERA OPERATION Menu Screen The CAMERA OPERATION menu screen is only displayed in the Camera mode. Item Function Variation Range Initial Setting SHUTTER The SHUTTER button on the right side section is used to select STEP for fixed shutter speed or V.SCAN variable scanning rate for shooting computer monitor screens. STEP :Enables setting of different fixed shutter speeds. [1/7.5, 1/ 15, 1/30, 1/60, 1/100, 1/250, 1/500, 1/1000, 1/2000, 1/4000, 1/10000] VARIABLE :Selected when shooting computer monitor screens, etc. [Variable range: 60.1 to 2084.6 Hz] STEP VARIABLE STEP FAW Selects the W.BAL switch (% on page 13) position to which the FAW (Full- Time Auto White Balance Adjustment) function is to be assigned. NONE :FAW function is not used. A :FAW is assigned to the A position. B :FAW is assigned to the B position. PRESET :FAW is assigned to the PRESET position. NONE A B PRESET NONE GAIN L GAIN M GAIN H Selects the gain value in each position of the GAIN switch (# on page 13). -3dB 0dB 3dB 6dB 9dB 12dB 15dB 18dB ALC L: 0dB M: 9dB H: 18dB LOLUX GAIN Sets the gain up value when in the LOLUX mode. (SS: Shutter speed 1/30) 24dB 24dB+SS 30dB 30dB+SS 36dB 36dB+SS 30dB SMOOTH TRANS Smoothens the transition when the GAIN switch (# on page 13), or WHT.BAL switch (% on page 13) is switched over and achieves gradual change in place of sudden change. However, the smooth transition function does not function when switching the GAIN switch set in ALC, FAS button and the LOLUX button. ON :Activates the smooth transition function. OFF :Deactivates the smooth transition function. ON OFF OFF SPOT L/ BACK L Sets the level of auto iris when setting the AUTO IRIS switch to BACK L or SPOT L. LOW : Lowers the iris level. MIDDLE : Opens/Closes the iris by 1 step from the standard state. HIGH : Raises the iris level. LOW MIDDLE HIGH MIDDLE ASPECT Sets the image size of the video signal. 4:3 4:3 RATIO 4:3 :4:3 aspect ratio image output. LETTER LETTER :LETTER BOX (16:9 aspect ratio) image output. ● When setting DATE REC in the TIME/DATE menu screen to BARS or BARS+CAM, the screen size will be fixed at an aspect ratio of 4:3. ● When ASPECT RATIO is set to LETTER, 16:9 aspect ratio distinction ID signal is outputted from the Y/C OUT terminal. PAGE BACK The TOP MENU returns when the SHUTTER dial is pressed with the cursor at this position. ----- ----- 69
-
 1
1 -
2
-
3
-
4
-
5
-
6
-
7
-
8
-
9
-
10
-
11
-
12
-
13
-
14
-
15
-
16
-
17
-
18
-
19
-
20
-
21
-
22
-
23
-
24
-
25
-
26
-
27
-
28
-
29
-
30
-
 31
31 -
 32
32 -
 33
33 -
 34
34 -
 35
35 -
 36
36 -
 37
37 -
 38
38 -
 39
39 -
 40
40 -
 41
41 -
42
-
43
-
44
-
45
-
46
-
47
-
48
-
49
 |
 |