JVC GY-DV5000U GY-DV5000U 3-CCD Professional DV Camcorder 92 page instruction - Page 42
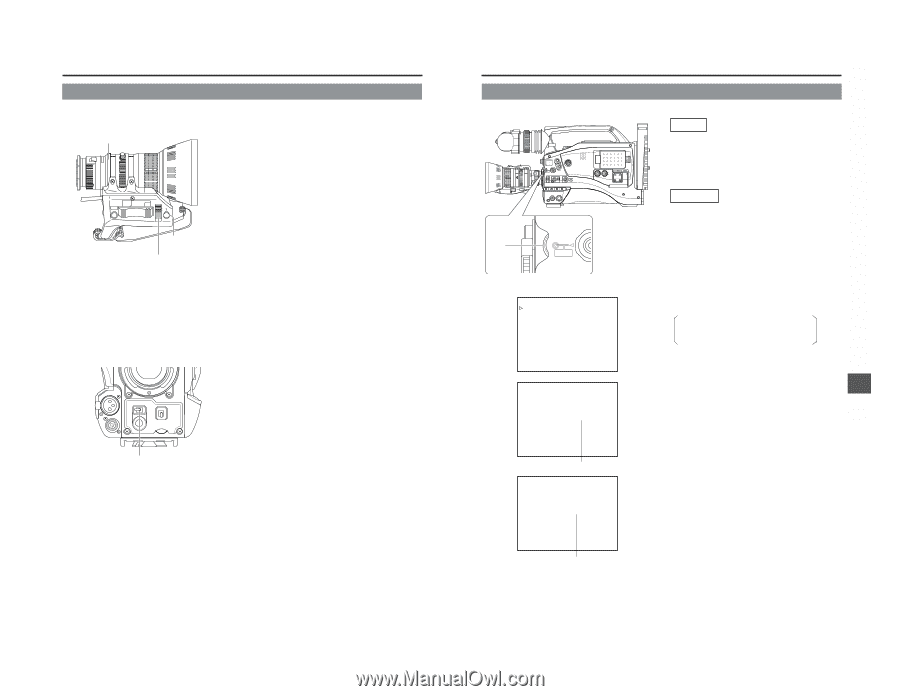
2 IRIS (Brightness) Adjustment, 12- 3 Adjusting the Shutter Speed, ADJUSTMENT OF LENS IRIS
 |
View all JVC GY-DV5000U manuals
Add to My Manuals
Save this manual to your list of manuals |
Page 42 highlights
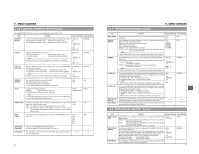
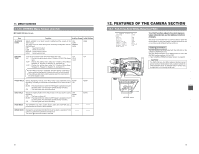
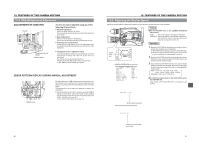
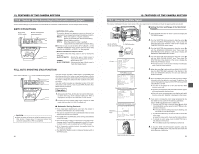
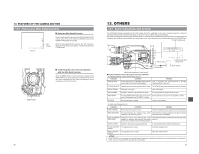
12. FEATURES OF THE CAMERA SECTION 12-2 IRIS (Brightness) Adjustment ADJUSTMENT OF LENS IRIS Iris ring RET M A W T The lens iris can be adjusted using any of the following three methods. ● Automatic adjustment Set the iris mode switch to "A" (Auto). The iris is adjusted automatically according to the brightness of the object. ● Manual adjustment Set the iris mode switch to "M" (Manual). The iris can be adjusted manually by rotating the iris ring. ● Temporary auto iris adjustment During manual iris adjustment, the auto iris adjustment mode is activated only while this temporary auto iris button is held depressed. Temporary auto iris button Iris mode switch Ⅲ Changing the auto iris adjustment setup Under special lighting conditions such as backlight, it is often appropriate to change the value set by the auto iris adjustment. This can be done by the following method. ● Setting the AUTO IRIS LEVEL switch of the camera ☞ See "SWITCH FUNCTIONS" on page 84. ZEBRA PATTERN DISPLAY DURING MANUAL ADJUSTMENT OFF ZEBRA ON SKIN AREA AUTO WHITE ACCU FOCUS VTR AUDIO LEVELE CH-1 5 ZEBRA switch By setting the switch to ON, oblique stripes (zebra pattern) can be imposed on the viewfinder or LCD areas having luminance levels in accordance with the menu settings made for the video signal. The zebra pattern can be used as a reference for manual iris adjustment. ● The initial setting is 70 to 80%. However, using the ZEBRA setting on the LCD/VF (1/2) menu screen, zebra patterns can be displayed in the sections with a luminance level of 85 to 95%, over 95% and over 100%. ☞ See "LCD/VF Menu Screen" on page 73. 80 12. FEATURES OF THE CAMERA SECTION 12-3 Adjusting the Shutter Speed Adjust the shutter speed to obtain special effects or when shooting scenes with slow-moving subjects. EDITSEARCH FILTER 1 3200K 2 5600K 1/8 ND .3 5600K .4 5600K 1/64 ND SHUTTER STATUS MONITOR MENU AUTO IRIS FULL AUTO BACK L NORMAL SPOT L BLACK LOLUX STRETCH NORMAL COMPRESS MODE VTR CAM OPEN CH-1 AUDIO LEVEL CH-2 LCD BRIGHT FRONT REAR CH-1 CH-2 AUDIO INPUT AUDIO SELECT CH-1 CH-2 AUTO MANUAL DISPLAY PULL OPEN Setting ■ Set the SHUTTER item on the CAMERA OPERATION menu screen. STEP : The shutter speed is changed in fixed steps. VARIABLE: The shutter speed is changed with variable scan. This setting is used for shooting the screen image on a computer monitor, etc. SHUTTER dial POWER VTR ON OFF SHUTTER STA MENU CAMERA OPERATION menu screen --- CAMERA OPERATION --- SHUTTER STEP FAW NONE GAIN L 0dB GAIN M 6dB GAIN H 9dB LOLUX GAIN 30dB SMOOTH TRANS OFF SPOT L/BACK L MIDDLE ASPECT RATIO 4:3 PAGE BACK Operation 1. Rotate the SHUTTER dial while the normal screen is shown. (when menu screens are not displayed). (If "SHUTTER OFF" is displayed, press the SHUTTER dial.) ● The current shutter speed is shown on the LCD monitor or in the viewfinder for approximately 3 seconds. 2. Rotate the SHUTTER dial while the shutter speed is shown. Rotating the dial downward makes the shutter slower, and rotating it upward makes it faster. 3. Stop rotating the SHUTTER dial when the desired shutter speed is indicated. The set shutter speed value is displayed for about 3 seconds on the LCD monitor or in the viewfinder. Setting range STEP: 1/7.5, 1/15, 1/30, 1/60, 1/100, 1/250, 1/500, 1/1000, 1/2000, 1/4000, 1/10000 VARIABLE: 1/60.1 Hz to 1/2084.6 Hz ■ To return the shutter speed to the initial setting, press the SHUTTER dial. Initial setting: OFF ("SHUTTER OFF" is indicated on the screen.) SHUTTER 1/1000 Shutter speed indication SHUTTER OFF Indication of initial shutter speed value 81
-
 1
1 -
2
-
3
-
4
-
5
-
6
-
7
-
8
-
9
-
10
-
11
-
12
-
13
-
14
-
15
-
16
-
17
-
18
-
19
-
20
-
21
-
22
-
23
-
24
-
25
-
26
-
27
-
28
-
29
-
30
-
31
-
32
-
33
-
34
-
35
-
36
-
 37
37 -
 38
38 -
 39
39 -
 40
40 -
 41
41 -
 42
42 -
 43
43 -
 44
44 -
 45
45 -
 46
46 -
 47
47 -
48
-
49
 |
 |