JVC HX-D7 Instructions - Page 15
Playing Back a Disc, To insert discs, To select a playback disc - dvd
 |
UPC - 046838017124
View all JVC HX-D7 manuals
Add to My Manuals
Save this manual to your list of manuals |
Page 15 highlights
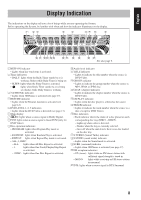
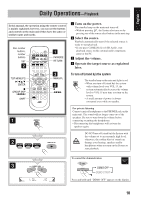
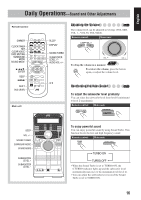
English Playing Back a Disc INFO Before operating a disc, be familiar how a disc is recorded. • DVD Video/DVD-VR comprises of "Titles" which includes "Chapters," MP3/WMA comprise of "Groups" which includes "Tracks," and CD/SVCD/VCD comprise of only "Tracks." For MP3/WMA/JPEG playback, see also page 30. To insert discs While playing DVD/SVCD/VCD: This System can store the stop point, and when you start playback again by pressing DISC PLAY 3, it starts from the position where you have stopped-Resume Play. (RESUME indicator lights up when you stop playback.) To stop completely while Resume is activated, press 7 twice. (To cancel Resume, see "RESUME" on page 38.) On-screen guide icons • During disc playback, the following icons may appear for a while on the TV screen: Appears at the beginning of a scene containing multi-angle views. Appears at the beginning of a scene containing multi-audio languages. Appears at the beginning of a scene containing multi-subtitle languages. • The following icons will be also shown on the TV screen to indicate your current operation. , ,, ,, • To deactivate the on-screen guide icons, see "ON SCREEN GUIDE" on page 38. To select a playback disc Remote control: • When using an 8 cm disc, place it on the inner circle of the disc tray. (While holding...) Main unit: Ex.: To select DISC 1 To close the disc tray, press the same button again. • If you press the 3 button, disc tray closes automatically and playback starts. • When you press the 0 button for the next tray you want to place another disc onto, the first disc tray automatically closes and then next tray comes out. To start: To pause: To stop: Playback of the selected disc starts. To release it, press DISC PLAY 3. 12
-
 1
1 -
2
-
3
-
4
-
5
-
6
-
7
-
8
-
9
-
 10
10 -
 11
11 -
 12
12 -
 13
13 -
 14
14 -
 15
15 -
 16
16 -
 17
17 -
 18
18 -
 19
19 -
 20
20 -
21
-
22
-
23
-
24
-
25
-
26
-
27
-
28
-
29
-
30
-
31
-
32
-
33
-
34
-
35
-
36
-
37
-
38
-
39
-
40
-
41
-
42
-
43
-
44
-
45
-
46
-
47
-
48
-
49
-
50
-
51
-
52
-
53
-
54
-
55
-
56
-
57
-
58
-
59
-
60
-
61
-
62
-
63
-
64
-
65
-
66
-
67
-
68
-
69
-
70
-
71
-
72
-
73
-
74
-
75
-
76
-
77
-
78
-
79
-
80
-
81
-
82
-
83
-
84
-
85
-
86
-
87
-
88
-
89
-
90
-
91
-
92
-
93
-
94
-
95
-
96
 |
 |