JVC LT32A200 Instructions - Page 18
OPTIONAL SETTING, Main Menu, Autoscan
 |
UPC - 046838037139
View all JVC LT32A200 manuals
Add to My Manuals
Save this manual to your list of manuals |
Page 18 highlights
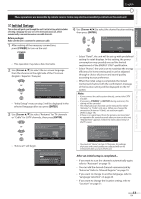
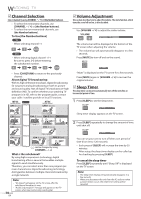
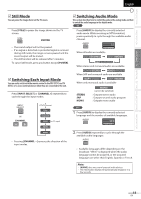
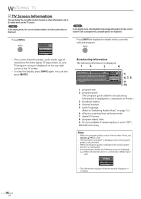
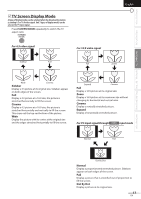
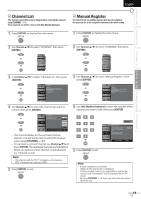
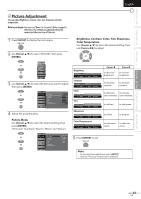
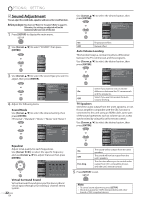
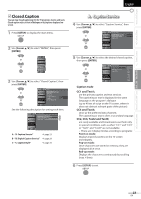
OPTIONAL SETTING 5 Main Menu This section describes the overview of the main menu displayed when you press [SETUP]. For more details, see the reference page for each item. The main menu consists of the function setting items below. Press [SETUP]. 5 Autoscan If you switch wires (e.g., between antenna and CATV) or if you move the unit to a different area after the initial setting, or if you restore the DTV channel you deleted, you will need to perform autoscan. Before you begin: Make sure the unit is connected to antenna or cable. 1 Press [SETUP] to display the main menu. PICTURE SOUND CHANNEL DETAIL LANGUAGE PICTURE You can adjust the picture quality. (Refer to "Picture Adjustment" on page 21.) SOUND You can adjust the sound quality. (Refer to "Sound Adjustment" on page 22.) CHANNEL • You can automatically scan the viewable channels. (Refer to "Autoscan" on page 18.) • You can skip the undesired channels when selecting the channels using [CHANNEL - / +]. (Refer to "Channel List" on page 19.) • You can add the channels that were not scanned by the autoscan. (Refer to "Manual Register" on page 19.) DETAIL • You can change the display format for closed caption, which displays the dialogue of a TV program or other information across the TV screen. (Refer to "Closed Caption" on page 23.) • You can set the viewing limitations. (Refer to ''Child Lock" on page 26.) • You can adjust the position, stability and clarity of the PC screen. (Refer to "PC Settings" on page 30.) • You can select the energy saving mode. (Refer to "Energy Saving Mode" on page 31.) • When you adjust the desired "PICTURE" and "SOUND" mode, you must switch the setting from "Retail" to "Home". (Refer to "Location" on page 31.) • You can confirm the version of the software currently used in this unit. (Refer to "Current Software Info" on page 32.) LANGUAGE You can change the language (English, Spanish, French) displayed on the main menu. (Refer to "Language Selection" on page 20.) 18 EN 2 Use [Cursor K/L] to select "CHANNEL" , then press [ENTER]. PICTURE SOUND CHANNEL DETAIL LANGUAGE 3 Use [Cursor K/L] to select "Autoscan", then press [ENTER]. PICTURE SOUND CHANNEL Channel Autoscan Channel List Manual Reg ster Antenna DETAIL LANGUAGE Use [Cursor K/L] to select an appropriate option, then press [ENTER]. PICTURE SOUND CHANNEL DETAIL LANGUAGE Autoscan Autoscan will rescan all channels Autoscan will take up to 20 minutes to complete Select the destination of "ANT IN" jack Antenna Cable Or ANT IN Back Antenna Cable • When aerial antenna is connected, select "Antenna". • When connected to CATV, select "Cable". • "Autoscan" will begin. Now the system is scanning for Channe s please wait Autoscan w ll take up to 20 minutes to complete 75% Analog channels Digital channels 10ch 6ch SETUP Exit • When the scanning and memorizing are completed, the lowest memorized channel will be displayed. Note: • After setting "Autoscan", using [CHANNEL - / +] on the remote control skips unavailable programs automatically. • If you connect the cable system directly, contact the CATV installer. • If you press [POWER] or [SETUP] during autoscan, the setting will be canceled. • Even if "Autoscan" is completed, the channel setting will be lost if the AC power cord is unplugged before turning off the unit by pressing [POWER]. • The PIN Code will be required once you set a PIN Code in the "Child Lock" (Refer to page 26). • If you want to change your PIN Code, follow the instruction of "New Password" (Refer to page 29).
-
 1
1 -
2
-
3
-
4
-
5
-
6
-
7
-
8
-
9
-
10
-
11
-
12
-
 13
13 -
 14
14 -
 15
15 -
 16
16 -
 17
17 -
 18
18 -
 19
19 -
 20
20 -
 21
21 -
 22
22 -
 23
23 -
24
-
25
-
26
-
27
-
28
-
29
-
30
-
31
-
32
-
33
-
34
-
35
-
36
-
37
-
38
-
39
-
40
 |
 |