JVC TM-1011GU Instruction Manual - Page 5
UNDER SCAN button, BLUE CHECK button, COLOR OFF button, INPUT SELECT buttons/lamps, DC INDICATOR lamp
 |
View all JVC TM-1011GU manuals
Add to My Manuals
Save this manual to your list of manuals |
Page 5 highlights
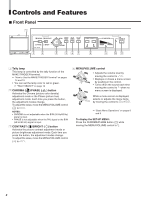
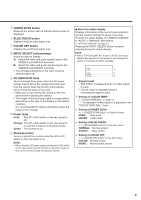
5 UNDER SCAN button Reduces the screen size so that the whole screen is displayed. 6 BLUE CHECK button Displays the blue video signal only. 7 COLOR OFF button Displays the luminance signal only. 8 INPUT SELECT buttons/lamps Select an input to display. A: Select the video and audio signals input to the VIDEO A and AUDIO A terminals. B: Select the video and audio signals input to the VIDEO B and AUDIO B terminals. • The corresponding lamp of the input currently selected lights up. 9 DC INDICATOR lamp Turns to orange from green when the DC power voltage lowers. When the voltage becomes lower than the certain level, the monitor automatically turns off and the lamp turns to red. • Make sure to turn off the DC switch on the rear panel before replacing the battery. • The length of time the lamp lights in orange differs depending on the type of the battery or the battery condition. It is recommended to replace the battery when the lamp turns to orange. p Power lamp Unlit: The AC or DC switch on the rear panel is off. Orange: The AC or DC switch on the rear panel is on and the monitor is in stand-by mode. Green: The monitor is on. q Stand-by button Turns on and off the monitor when the AC or DC switch on the rear panel is on. NOTE: • When using the DC power supply, turning on the DC switch on the rear panel puts the monitor in stand-by mode. To turn on the monitor, press the stand-by button. 7 About the status display Displays information of the current input selection and the monitor settings for about 3 seconds. To show the status display, set "STATUS DISPLAY" to "AUTO" or "MANUAL" beforehand. ☞ "STATUS DISPLAY" on page 13 Pressing the INPUT SELECT button currently selected shows the status display. NOTE: • When "STATUS DISPLAY" is set to "AUTO," the status display also appears on the screen if you change the inputs or the signal condition changes. 1 Signal format • "NO SYNC" is displayed when no video signal is input. • "Out of range" is displayed when a noncompliant signal is input. 2 Setting of "COLOR TEMP." ☞ "COLOR TEMP./BAL." on page 12 " * " is displayed if white balance is adjusted in the "COLOR TEMP./BAL." menu. 3 Setting of UNDER SCAN ☞ "5 UNDER SCAN button" on the left column OVER: Over-scan UNDER: Under-scan 4 Setting of BLUE CHECK ☞ "6 BLUE CHECK button" on the left column NORMAL: Normal screen B ONLY: Blue screen 5 Setting of COLOR OFF ☞ "7 COLOR OFF button" on the left column COLOR: Normal screen MONO: Monochrome screen 5
-
 1
1 -
 2
2 -
 3
3 -
 4
4 -
 5
5 -
 6
6 -
 7
7 -
 8
8 -
 9
9 -
 10
10 -
 11
11 -
12
-
13
-
14
-
15
-
16
-
17
-
18
-
19
-
20
 |
 |
