JVC TM-1011GU Instruction Manual - Page 7
Video A, Audio
 |
View all JVC TM-1011GU manuals
Add to My Manuals
Save this manual to your list of manuals |
Page 7 highlights
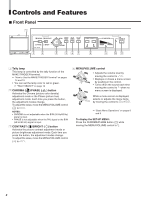
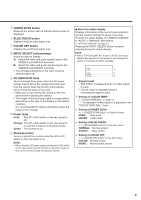
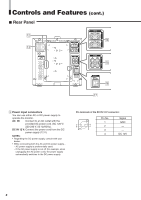
e AC power switch Turns the AC power on and off. • I : on ⅜ : off NOTE: • You need to turn on the stand-by button on the front panel to turn on the monitor after turning on the AC power switch. r Composite signal input/output terminals (VIDEO A, VIDEO B) Input (IN) and output (OUT) terminals for the composite signals of the NTSC, PAL, and B/W (50 Hz/60 Hz). NOTES: • NTSC and PAL are switched in the "COLOR SYSTEM." ☞ "COLOR SYSTEM" on page 12 • The IN and OUT terminals are bridge-connected (auto termination). t Analog audio signal input/output terminals (AUDIO A, AUDIO B) Input (IN) and output (OUT) terminals for the analog audio signals. NOTE: • The IN and OUT terminals are bridge-connected. y REMOTE (external control) terminals Terminals for controlling the monitor by an external control. ☞ "How to Use the External Control" on pages 14 and 15 u DC switch Turns the DC power on and off. • I : on ⅜ : off NOTES: • You need to turn on the stand-by button on the front panel to turn on the monitor after turning on the DC switch. • The monitor consumes the battery even while the monitor is on stand-by. To save battery life, turn off the DC switch on the rear panel. • While you operate the monitor with the DC power supply, the built-in degaussing circuit does not work. If the monitor has become magnetized, switch the power supply to AC so that the built-in degaussing circuit works or use an external degausser. 7
-
 1
1 -
 2
2 -
 3
3 -
 4
4 -
 5
5 -
 6
6 -
 7
7 -
 8
8 -
 9
9 -
 10
10 -
 11
11 -
 12
12 -
13
-
14
-
15
-
16
-
17
-
18
-
19
-
20
 |
 |
