JVC VN-C655U Instructions - Page 24
Setting the PC’s IP Address for Windows XP, For Windows 2000 - ip camera
 |
UPC - 046838016547
View all JVC VN-C655U manuals
Add to My Manuals
Save this manual to your list of manuals |
Page 24 highlights
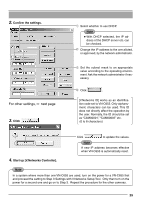
Settings (Step 2 Setting the Network) Setting the PC's IP Address for Windows XP After attaching the camera, proceed to set the IP address of the PC by which the camera is operated. With Windows XP, follow the procedure below to set the IP address. (For Windows 2000, ☞ Page 26) Note Under a DHCP environment and also if the IP address to be allotted to [V.Networks] is already known, skip [Setting the PC's IP Address]. 1. Click . • Right-click [My Network] and select [Properties]. 2. Select the network connected to the PC by which VN-C655 is operated. • Right-click to select [Properties]. Ensure that [Client for Microsoft Networks] is selected . Note If either [Client for Microsoft Networks] or [Internet Protocol (TCP/IP)] is not displayed, select [Install ...]. 24
-
 1
1 -
2
-
3
-
4
-
5
-
6
-
7
-
8
-
9
-
10
-
11
-
12
-
13
-
14
-
15
-
16
-
17
-
18
-
 19
19 -
 20
20 -
 21
21 -
 22
22 -
 23
23 -
 24
24 -
 25
25 -
 26
26 -
 27
27 -
 28
28 -
 29
29 -
30
-
31
-
32
-
33
-
34
-
35
-
36
-
37
-
38
-
39
-
40
 |
 |
