JVC VN-C655U Instructions - Page 29
For other settings, next Confirm the settings., Click, Start up [V.Networks Controller].
 |
UPC - 046838016547
View all JVC VN-C655U manuals
Add to My Manuals
Save this manual to your list of manuals |
Page 29 highlights
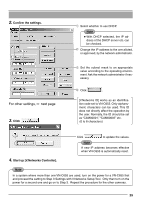
2. Confirm the settings. For other settings, ☞ next page 3. Click . Select whether to use DHCP. Note ● With DHCP selected, the IP ad- dress of the DHCP server etc. can be checked. Change the IP address to the one alloted, or approved, by the network administrator. Set the subnet mask to an appropriate value according to the operating environment. Ask the network administrator if necessary. Click . [V.Networks ID] works as an identification code set to VN-C655. Only alphanumeric characters can be used. This ID does not directly affect the operation by the user. Normally, the ID should be set as "CAM00001," "CAM00002" etc. (0 to 8 characters) 4. Start up [V.Networks Controller]. Click to update the values. Note A new IP address becomes effective when VN-C655 is automatically reset. Note In a system where more than one VN-C655 are used, turn on the power for a VN-C655 first and proceed the setting to Step 3 Settings with V.Networks Setup Tool. Only then turn on the power for a second one and go on to Step 3. Repeat the procedure for the other cameras. 29
-
 1
1 -
2
-
3
-
4
-
5
-
6
-
7
-
8
-
9
-
10
-
11
-
12
-
13
-
14
-
15
-
16
-
17
-
18
-
19
-
20
-
21
-
22
-
23
-
 24
24 -
 25
25 -
 26
26 -
 27
27 -
 28
28 -
 29
29 -
 30
30 -
 31
31 -
 32
32 -
 33
33 -
 34
34 -
35
-
36
-
37
-
38
-
39
-
40
 |
 |
