Jenn-Air JDRP436HL Installation Instructions - Page 11
Remove Door
 |
View all Jenn-Air JDRP436HL manuals
Add to My Manuals
Save this manual to your list of manuals |
Page 11 highlights
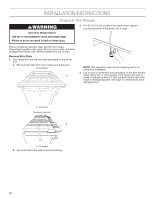
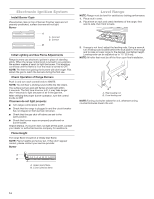
Remove Door Door Removal ■ Do not remove the side door spacers until the range is ready to install. Removing the door spacers could allow the door to shift, damaging the door latch. ■ Do not lift or move the range by the door handle(s) or control panel. ■ Prior to installing the range, you will need to remove the oven door(s). Prepare a surface where you will place the door(s). This surface should be flat and covered with a soft blanket, or use the corner posts from the packaging material. Use two hands to remove and replace the oven door(s). It may be necessary to gently shift door from side to side. A A. Oven door hinge in the locked position B B. Oven door hinge in the unlocked position A A. Slot in the oven frame for the door hinge lock Replace the Door ■ To replace the oven door(s), locate the slots in the oven cavity for the hinge locks and repeat the steps above in reverse order. Make sure the door closes properly and there is no interference from the door latch. If necessary, remove the door and repeat the steps above. If power is connected to the range, open and close the door to make sure the oven light comes on and goes off appropriately. ■ The range is equipped with leveling legs and rollers. Once the range is removed from the shipping pallet, make sure the leveling legs are not touching the floor and use the rollers to move the range into position. Always cover the flooring surface to avoid damage to the floor. Do not roll the range directly on the floor. Partially close the door to engage the door latch locks. The door will stop at this point. 11
-
 1
1 -
2
-
3
-
4
-
5
-
 6
6 -
 7
7 -
 8
8 -
 9
9 -
 10
10 -
 11
11 -
 12
12 -
 13
13 -
 14
14 -
 15
15 -
 16
16 -
17
-
18
-
19
-
20
-
21
-
22
-
23
-
24
-
25
-
26
-
27
-
28
-
29
-
30
-
31
-
32
-
33
-
34
-
35
-
36
-
37
-
38
-
39
-
40
-
41
-
42
-
43
-
44
-
45
-
46
-
47
-
48
 |
 |
