Jenn-Air JDRP436HL Installation Instructions - Page 15
Install Kick Plate, Complete Installation
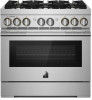 |
View all Jenn-Air JDRP436HL manuals
Add to My Manuals
Save this manual to your list of manuals |
Page 15 highlights
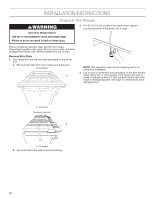
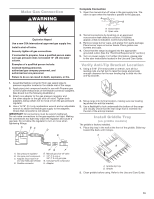
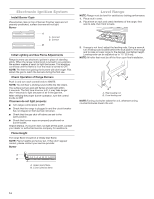
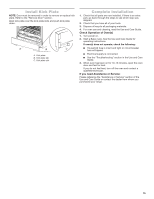
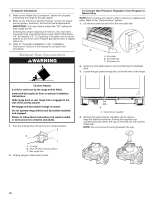
Install Kick Plate NOTE: Door must be removed in order to remove or replace kick plate. Refer to the "Remove Door" section. Align kick plate over the kick plate slots and push kick plate down. A B C A. Kick plate B. Kick plate tab C. Kick plate slot Complete Installation 1. Check that all parts are now installed. If there is an extra part, go back through the steps to see which step was skipped. 2. Check that you have all of your tools. 3. Dispose of/recycle all packaging materials. 4. For oven use and cleaning, read the Use and Care Guide. Check Operation of Oven(s) 1. Turn power on. 2. Start a Bake cycle. See the Use and Care Guide for operating instructions. If oven(s) does not operate, check the following: ■ Household fuse is intact and tight or circuit breaker has not tripped. ■ Electrical supply is connected. ■ See the "Troubleshooting" section in the Use and Care Guide. 3. When oven has been on for 10-15 minutes, open the oven door and feel for heat. If you do not feel heat, turn off the oven and contact a qualified technician. If you need Assistance or Service: Please reference the "Assistance or Service" section of the Use and Care Guide or contact the dealer from whom you purchased your range. 15
-
 1
1 -
2
-
3
-
4
-
5
-
6
-
7
-
8
-
9
-
 10
10 -
 11
11 -
 12
12 -
 13
13 -
 14
14 -
 15
15 -
 16
16 -
 17
17 -
 18
18 -
 19
19 -
 20
20 -
21
-
22
-
23
-
24
-
25
-
26
-
27
-
28
-
29
-
30
-
31
-
32
-
33
-
34
-
35
-
36
-
37
-
38
-
39
-
40
-
41
-
42
-
43
-
44
-
45
-
46
-
47
-
48
 |
 |
