Jenn-Air JDRP436HL Installation Instructions - Page 19
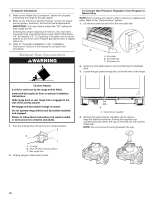
open end wrench, to remove/replace, orifice, Hold with adjustable, wrench here
 |
View all Jenn-Air JDRP436HL manuals
Add to My Manuals
Save this manual to your list of manuals |
Page 19 highlights
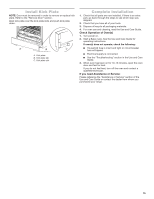
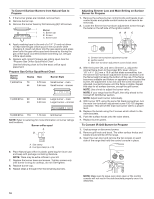
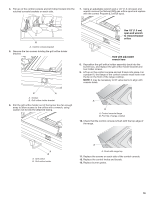
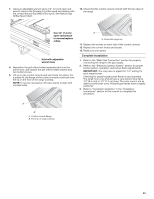
4. Pull up on the control console and let it drop forward into the notched console brackets on each side. 7. Using an adjustable wrench and a 1/2" (1.3 cm) open end wrench remove the Natural (NG) gas orifice spud and replace with the correct Propane (L) orifice spud. A A. Control console bracket 5. Remove the two screws holding the grill orifice holder bracket. Use 1/2" (1.3 cm) open end wrench to remove/replace orifice Hold with adjustable wrench here 8. Reposition the grill orifice holder assembly back into the burner box, and replace the grill orifice holder bracket and two holder screws. 9. Lift up on the control console and set it back into place. For a proper fit, the flange of the control console must hook over the lip on the front of the range cooktop. NOTE: It may be necessary to lift valve stems to align with console holes. B A A. Screws B. Grill orifice holder bracket 6. Pull the grill orifice holder out of the burner box far enough away to allow access to the orifice with a wrench, using caution not to kink the attached tubing. A B A. Control console flange B. Front lip of range cooktop 10. Check that the control console is flush with the top edge of the range. A B A. Grill orifice B. Grill orifice holder A A. Flush with range top 11. Replace the screws on each side of the control console. 12. Replace the control knobs and bezels. 13. Replace burner grates. 19
-
 1
1 -
2
-
3
-
4
-
5
-
6
-
7
-
8
-
9
-
10
-
11
-
12
-
13
-
 14
14 -
 15
15 -
 16
16 -
 17
17 -
 18
18 -
 19
19 -
 20
20 -
 21
21 -
 22
22 -
 23
23 -
 24
24 -
25
-
26
-
27
-
28
-
29
-
30
-
31
-
32
-
33
-
34
-
35
-
36
-
37
-
38
-
39
-
40
-
41
-
42
-
43
-
44
-
45
-
46
-
47
-
48
 |
 |
