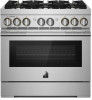
Jenn-Air JDRP436HL Installation Instructions - Page 22
Adjusting Simmer Low and Main Setting on Surface, Burner for Natural Gas, To Convert IR Grill Burner
 |
View all Jenn-Air JDRP436HL manuals
Add to My Manuals
Save this manual to your list of manuals |
Page 22 highlights
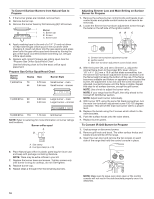
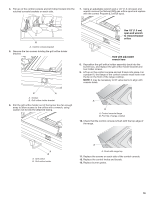
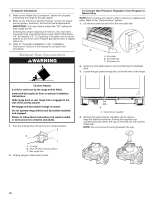
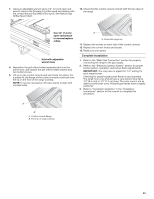
Adjusting Simmer Low and Main Setting on Surface Burner for Natural Gas 1. Remove the surface burner control knobs and bezels (oven control knobs and griddle control knobs do not have to be removed). 2. Locate the Simmer low-turndown adjustment screw through the bezel on the left side of the ignition switch. AB C 4. Pull up on the control console and let it drop forward into the notched console brackets on each side. A. Simmer low-turndown adjustment screw B. Ignition switch C. Main low-turndown adjustment screw (inside stem) 3. With the burner ON, and set to Simmer Lo, adjust the simmer flame down to the proper BTU level. Using a 1/8" x 41/4" (3.2 mm x 10.8 cm) flat blade screwdriver, turn the simmer low-turndown adjustment screw counterclockwise until the flame becomes stable, does not flicker, or appear to race around the burner. Once the flame is stable, turn the burner rate to SIMMER HIGH setting. The flame should increase to approximately 2X the flame height. If not, the low-turndown may be able to be adjusted low and still remain stable. Repeat this step for all surface burners, except the grill burner. NOTE: Use a knob to adjust the burner valve. NOTE: If your range has the IR grill, then skip ahead to the Convert IR Grill Burner section. NOTE: Adjust each burner individually. 4. With burner OFF, using the same flat blade screwdriver, turn the main low-turndown adjustment screw 120-135 degrees counterclockwise. This will set the main low burner rate to a proper level. 5. Replace the bezels using the 2 screws which attach to the valve brackets. 6. Push the surface knobs onto the valve stems. 7. Replace burner grates. To Convert IR Grill Burner for Natural Gas 1. Unplug range or disconnect power. 2. Remove grill knob and bezel. The other surface knobs and bezels should still be off the range. 3. Open the oven door and remove the two screws on each side of the range that hold the control console in place. A A. Control console bracket 5. Remove the two screws holding the grill orifice holder bracket. B A A. Screws B. Grill orifice holder bracket 6. Pull the grill orifice holder out of the burner box far enough away to allow access to the orifice with a wrench, using caution not to kink the attached tubing. A B A. Grill orifice B. Grill orifice holder NOTE: Make sure to leave oven door open or the control console will not rest in the side brackets properly once it is detached. 22
-
 1
1 -
2
-
3
-
4
-
5
-
6
-
7
-
8
-
9
-
10
-
11
-
12
-
13
-
14
-
15
-
16
-
 17
17 -
 18
18 -
 19
19 -
 20
20 -
 21
21 -
 22
22 -
 23
23 -
 24
24 -
 25
25 -
 26
26 -
 27
27 -
28
-
29
-
30
-
31
-
32
-
33
-
34
-
35
-
36
-
37
-
38
-
39
-
40
-
41
-
42
-
43
-
44
-
45
-
46
-
47
-
48
 |
 |
