Jensen UV8020 Operation Manual - Page 6
Installation
 |
UPC - 043258304209
View all Jensen UV8020 manuals
Add to My Manuals
Save this manual to your list of manuals |
Page 6 highlights
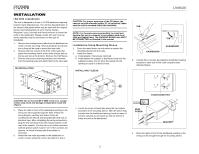
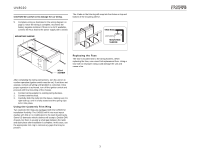
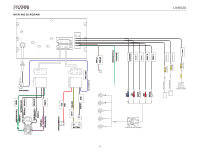
INSTALLATION ISO DIN Installation This unit is designed to fit into a 2.0 DIN dashboard opening, found in many imported cars. The unit has threaded holes in the chassis side panels which may be used with the original factory mounting brackets of some Toyota, Nissan, Mitsubishi, Isuzu, Hyundai and Honda vehicles to mount the radio to the dashboard. Please consult with your local car stereo specialty shop for assistance on this type of installation. 1. Remove the existing factory radio from the dashboard or center console mounting. Save all hardware and brackets as they will be used to mount the new radio. 2. Remove the four screws at the front of the radio that attach the mounting sleeve to the radio chassis (two at the top and two at the bottom). Remove the Half Sleeve. 3. Remove the factory mounting brackets and hardware from the existing radio and attach them to the new radio. ISO INSTALLATION CAUTION: For proper operation of the CD player, the chassis must be mounted within 30° of horizontal. Make sure the unit is mounted within this limitation. NOTE: It is the end-users responsibility to install and operate this unit in a manner in accordance with local, state and federal laws. The PARKING BRAKE wire MUST BE CONNECTED as directed in the manual. Installation Using Mounting Sleeve 1. Press the metal levers on both sides to remove the mounting sleeve from the radio. 2. Install the sleeve. a. Install adapter if necessary (optional). b. Install sleeve into adapter or dashboard (use only the supplied screws). Do not force the sleeve into the opening or cause it to bend or bow. INSTALL HALF SLEEVE UV8020 TAB TAB DASHBOARD DASHBOARD 3. Use the M5 x 6 screws (provided) to install the mounting brackets to each side of the radio using the holes indicated below. CAUTION: Do not exceed M5 X 6MM screw size. Longer screws may touch and damage components inside the chassis. 4. Place the radio in front of the dashboard opening so the wiring can be brought through the dash. Follow the wiring diagram carefully and make certain all connections are secure and insulated with wire nuts or electrical tape. After completing the wiring connections, plug the ISO connectors into the mating sockets on the rear of the chassis. Turn the unit on to confirm operation (vehicle ignition switch must be "on"). If the unit does not operate, re-check all wiring until the problem is corrected. 5. Mount the new radio assembly to the dashboard or center console using the reverse procedure in step 1. 2b c. Locate the series of bend-tabs along the top, bottom and sides of the mounting sleeve. With the sleeve fully inserted into the dashboard opening, bend as many of the tabs outward as necessary so that the sleeve is firmly secured to the dashboard. Non-Designated Screw Prohibited M5X6 SCREW Install Bracket Here BRACKET 4. Place the radio in front of the dashboard opening so the wiring can be brought through the mounting sleeve. 2
-
 1
1 -
 2
2 -
 3
3 -
 4
4 -
 5
5 -
 6
6 -
 7
7 -
 8
8 -
 9
9 -
 10
10 -
 11
11 -
 12
12 -
13
-
14
-
15
-
16
-
17
-
18
-
19
-
20
-
21
-
22
-
23
-
24
-
25
-
26
-
27
-
28
-
29
-
30
 |
 |
